You might be asking yourself, “Eh, why do I really care about whether kids learn to code?” Well I can assure you that you’re not the only person who has thought this. You might not even have kids of your own, so why should you care?
“Whether you want to uncover the secrets of the universe, or you just want to pursue a career in the 21st century, basic computer programming is an essential skill to learn.”
— Stephen Hawking
And this applies to children, as well as parents and grandparents.
This article isn’t about coding, it’s about teaching kids how to think and solve problems in a structured manner.
6 years ago, Netscape pioneer Marc Andreesen published an essay in the Wall Street Journal titled “Why Software is Eating the World.”
This article is now nearly 6 years old, which shows that even 6 years ago this was a hot topic. And its popularity has been growing exponentially. So you shouldn’t shield your children from what will help them in the future.
Read this link to see how building a tool that helps libraries, schools, and educational institutions made teaching fun and entertaining.

Why would you teach your kids to code?
Working with kids is awesome. Seeing them learn faster, and be more creative and focused on their vision have the potential to fill your free time with something that matters.
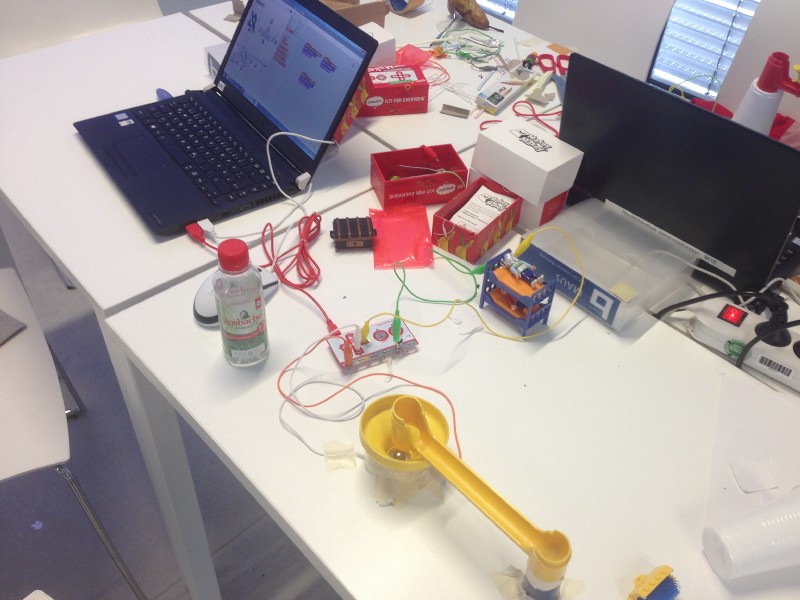
We had been giving Scratch and Makey-Makey workshops for nearly a year before we decided to create a new tool that has the ability to learn logic and teach the basics of programming.
When we gave kids the task to create a new alarm clock, they came up with some very creative solutions. Many of which would appear really weird, at least to us.
There were many times when I thought I couldn’t have come up with their solutions.
We initially thought about using a platform similar to CodeCombat or Code.org. However, with CodeCombat you have to “write code,” which wasn’t what we wanted. And Code.org was really easy, too easy in fact, for our use case.
We wanted the platform to provide a steep learning curve to its users. With the levels starting out really easy and then quickly progressing to a higher level of difficulty so that users can get the most out of it. Since we knew this tool would be used in events (which is described later), we could have some levels provide help and explanations.
We also researched some of the already published tools available. This helped us to get a better overview on the pros and cons on already established games and tools. We documented this search here.
After we did our research, and met with professors and project leader Per, we (our technical consultant David, Paul, Johannes, and I) knew where we were going with our journey.

The idea
Our idea was that the program would suit younger children and at the same time not scare away the older kids.
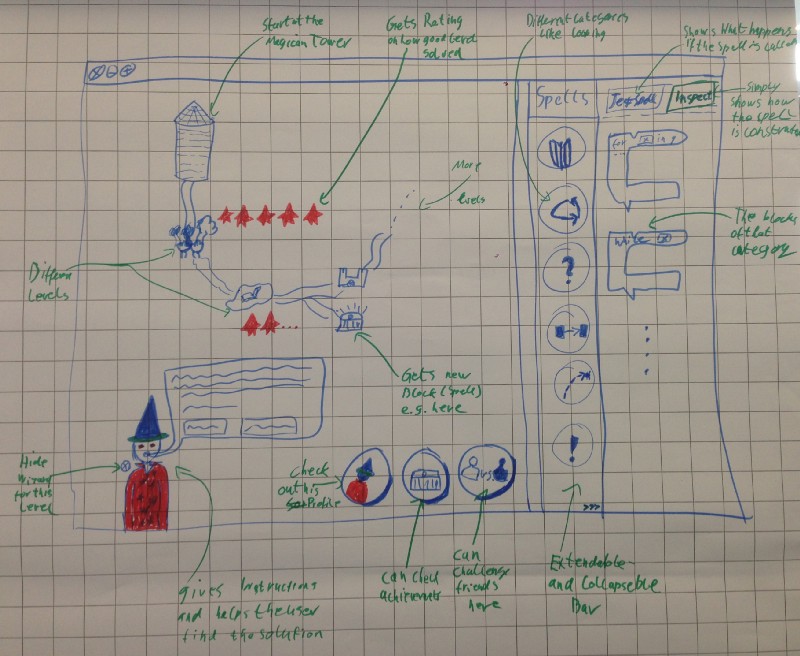
First, we thought about simplifying the computer part by using the world of magic. The idea was to introduce the concepts of programming by using different spells taught by a little wizard. This would’ve given us the advantage of providing “magic” when more complex logic was needed, such as in the case of pathfinding.
The kids could then later observe the logic behind these “magic” spells and understand how pathfinding was implemented with the basic logic they had learned.
After many iterations and discussions, we decided to take a less fairy tale approach and use robots that could be “programmable” with the logic blocks provided. The robots would be spawned from a factory where they got their behaviour once upon a production.
Users have the possibility to build robots that can do different tasks, like mining for resources or finding and fighting other robots.
That was the moment Robotopia (at that time it was called “Project-X”) was born.
Per, our project manager, decided that in order to learn the most from this project, we needed to use more experimental frameworks and technologies.
He presented us with an unknown (at that point in time at least) front-end JavaScript framework that allowed for a nice functional approach. It reminded us of Elm.
The tool was called Choo. Make sure to check it out. It’s awesome.
The communication for the event mode should work with Peer2Peer communication (P2P). Johannes became our P2P researcher. His role was to make a solid connection with our students.
If you’re interested, you can go in depth about the technologies used in The Tech section. From there you’ll probably be able to learn about tools that you haven’t heard of before (at least for me that was what happened).
Probably the most important part of the project was the user interface. Our users were children and young adults who had never coded before. Therefore we had to choose an interface that did not simplify coding, but made it easy to put things together and test them.
This is how we found Blockly.
It was the perfect choice for our project. It was easy to integrate, modular, and, most importantly, JavaScript compatible. You can visit its website and get an impression of its power.
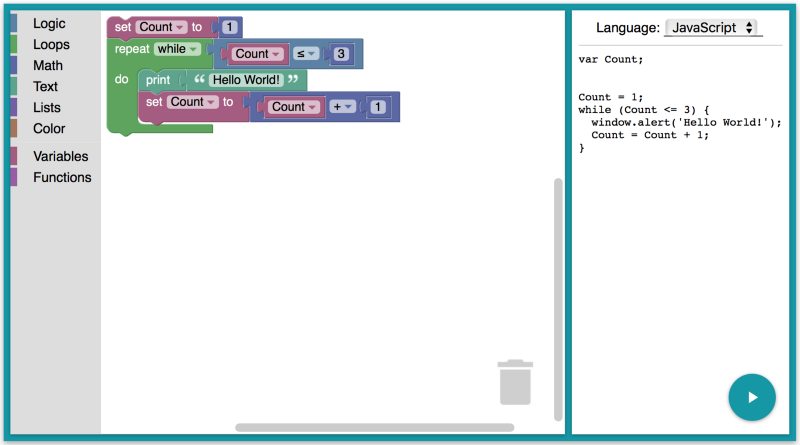
Note: Check out Blockly and consider using it for your next project. It’s easy to integrate and has powerful code-generators for all major programming languages. It’s not only for children but it also gives non-programmers a forum to build complex logic.
To get more information, click here.
It was the right combination of tools that gave us the momentum to make Robotopia happen.

The game
Once we had our idea and tech stack in place, we could finally start coding.
But because we had never worked with the tools before, we had to go through a steep learning curve in order to gain momentum and to give the project the attention it deserved.
We used all of our free time creating thet project. In the beginning, we even attended a weekend Hackathon event so that we could code through the weekend. For the core game logic, we had only two developers and about only four months to include all the lectures and tests for that semester. Johannes first took care of the P2P event logic and developed a mini-game (that was later abandoned), which would’ve created a better engagement in the event mode.
The Hackathon weekend, where we spent over 20 hours coding, proved to be valuable. In the first day, we had something that could be shown to people. We had an editor and a figure that we could move on a grid by using the Blockly graphical programming language.
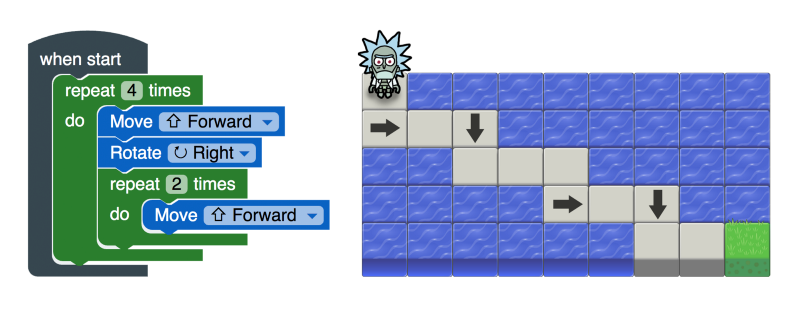
Since we did not have an artist that could provide any assets, we had to make sure our tools didn’t look like rubbish. Because we are big fans of Rick and Morty, even though it is not suitable for children, we used some of their mobile games assets to pretty up our tool.
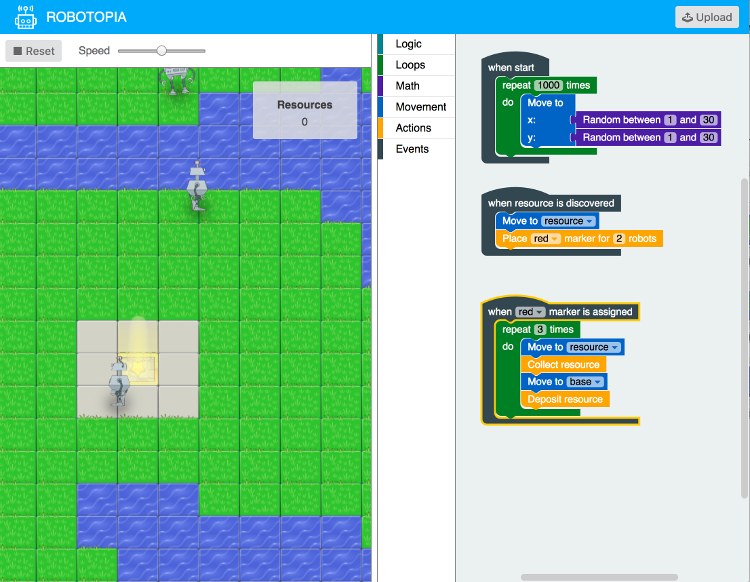
As our deadline came closer, we replaced the Rick and Morty assets with robots. We also made sure that people could play our game by using this website.
The final version had a nice overview, where people can visit previous levels, thus solidifying their knowledge.
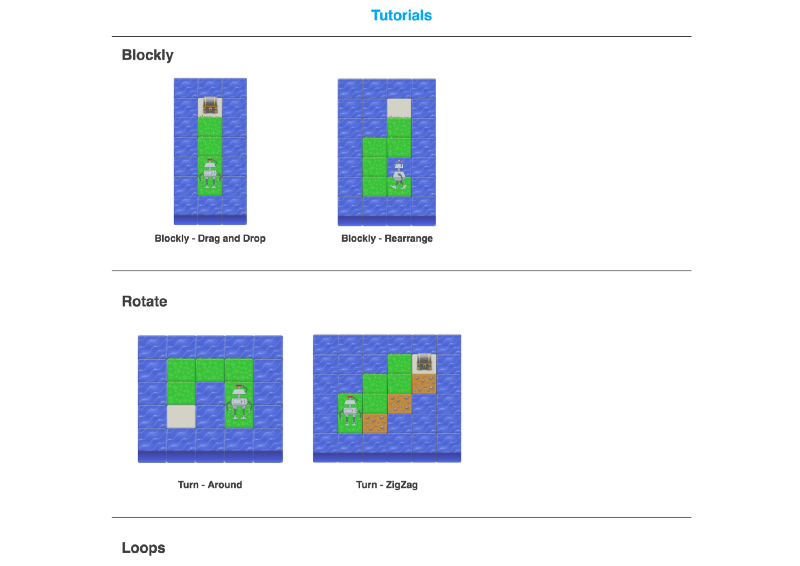
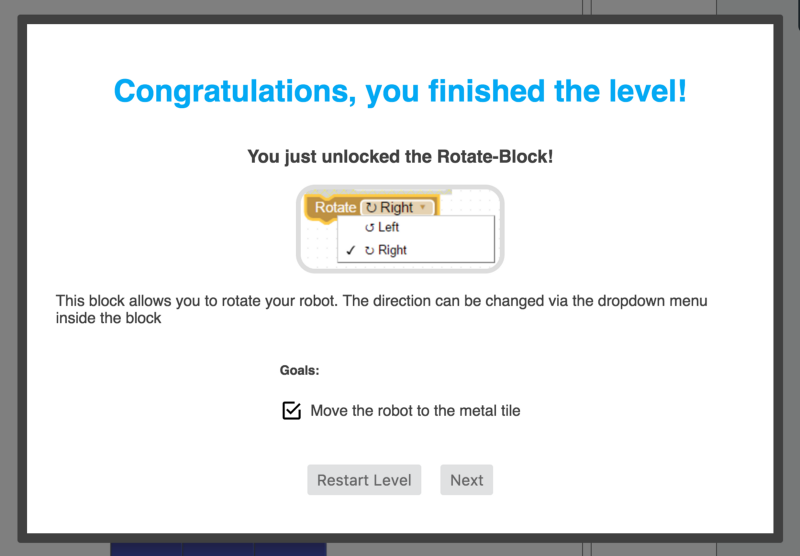
After selecting a level, you will receive information about the goals for the level. Then you can solve the level using a preselected amount of blocks. This gave us the chance to slowly add more and more complex blocks in the later levels.
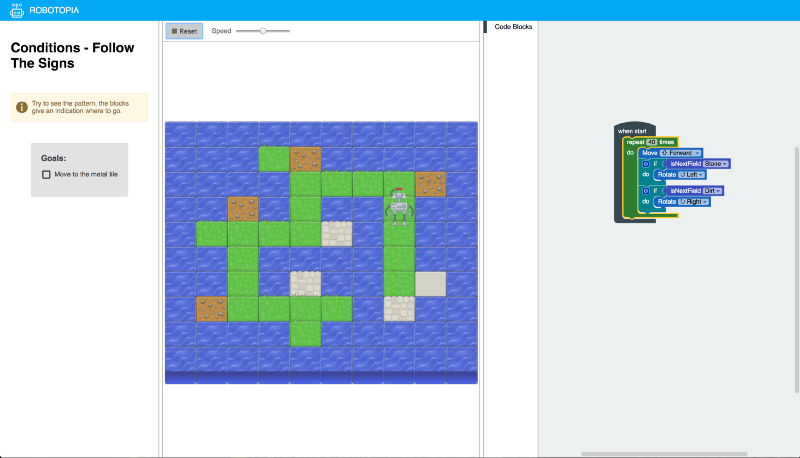
Once users pass a level, they receive a summary of the goals they have achieved, “unlocking” a new block for the next levels.
Let the competition start
After the kids learned about what the blocks do, we tested their knowledge by holding a competition where they try to mine the most resources in the shortest amount of time.
Therefore we had to build two different views.
Users can use the Robotopia editor to help build their robots’ logic and test their implementation, while permanently improving their behaviour.
Users enter their display name and the room they want to join (rooms are the competitions that can be opened with the presenter view).
The presenter view is shown with a projector to a classroom of children, so that they can see the competition. In this view, users can enter a room name, which users can use to join the competition. In this view you can see the number of points that each user has and how much time is left until the round is finished.

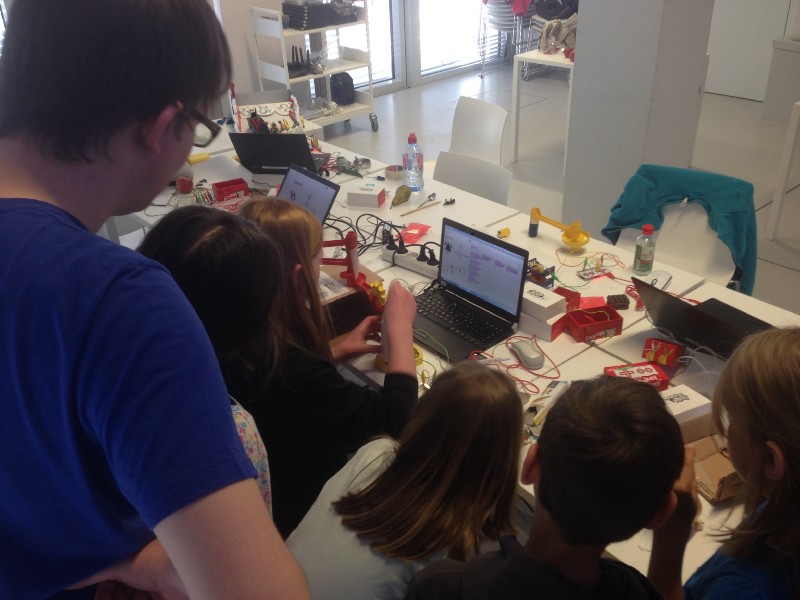
After our presentation, we received a lot of positive feedback. This boosted our confidence. We then showed the presentation to a classroom of children, and worked with them through the different levels.
Here’s a really short impression of the event:

The tech
Per had a few milestones for our project. Besides actually testing what we came up with together, he wanted us to use open source “scene.” What that meant for us was that we were encouraged to use small JavaScript libraries, and report to the developers the problems we experienced.
Per had the opportunity to contact and ask the creator of Choo, Yoshua, to meet him in an online meeting. This was to get us going with Choo!
Even though the meeting didn’t take place (because of a biking accident that Yoshua had), we were able to chat with Yoshua about Choo on at least two different occasions.
We also submitted a couple of patches to other open source projects through GitHub. ?
Lesson learned: If you’re doing a project that involves open source technology, go for it. Contact the creator. In most cases, the creator will be glad to help you. Behind the really big projects, there are only a few people who actually enjoy working with open source content. They just want to show off what they have done and have people use them.
Blockly
As explained before, we chose Blockly for our user interface. If you visit their webpage and check out their examples, you will see that it has already established many teaching tools. Since the abstract design makes it easy to create new blocks, you can integrate it in whatever game or app you want.
It is unique the way that individuals and, especially, kids use the different coding blocks to create the behavior. The different colored blocks make it easy to associate each block with a behavior. Furthermore, developers are free to provide a few blocks when introducing new concepts. Another incredible feature about this framework is that you can easily switch from stacking blocks to writing code, and then quickly switch between them.
Features
Here are some features of Blockly:
- It is a graphical programming language
- It allows you to create and style your own blocks
- It is compatible with the Web and mobile devices
- It is established in many projects
- It has the ability to interpret most languages
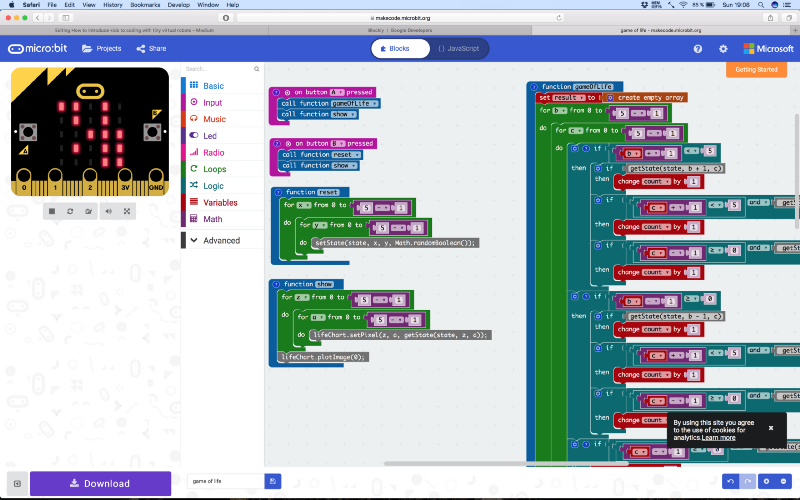
Even projects like Microsofts Micro:bit use Blockly to teach.
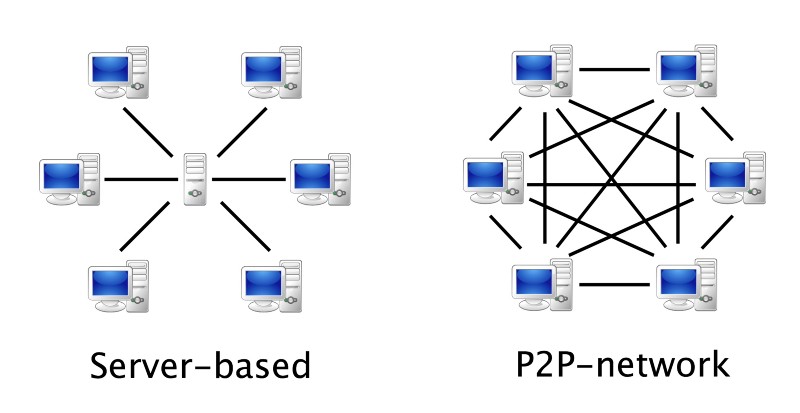
Peer2Peer
Peer2Peer (P2P) technology is cool.
Why? Because it allows developers to build apps that not only provide great features but also reduce dependencies on central services.
Lucky for us that the big players on the market (most notably Google) got around to making P2P available on the browser. The technology is called WebRTC and is a Web standard — meaning it’s available on the browser through JavaScript.
Part of our project’s specification was to have as little back-end infrastructure as possible. So no heavy servers, just a simple HTML page with JavaScript. We would have to manage our game state client side by using only WebRTC signalling servers (which can be compared to digital phone books) to initiate the P2P connection.
Features
Here are some features of P2P:
- It is decentralized
- It is available for the Web (WebRTC)
- It is easy to use (simple peer)
- It uses only a singling server for the initial connection
You can do awesome things with P2P technology. For example, you can send files between clients without a central authority. You can do this in your browser. For an example of this, click here.
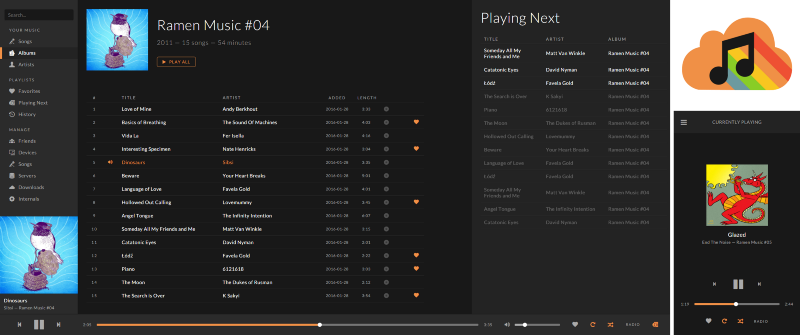
If you want to take it to the next level, you can build a fully decentralized, open source Spotify clone (PeerMusic). Click here to see an example.
Choo
Choo is a fun and functional programming language used to create sturdy front-end applications. Choo’s developers had a special philosophy in mind when they created it. They believed that programming should be fun and light, not stressful, and that it’s cool to be cute. And that using technical words without explaining them makes for poor results and scares people off.
You should read about Choo’s philosophy at its GitHub repository page. It’s interesting and inspiring.
Features
Here are some features of Choo:
- Its minimum weight is 4 kb
- It is event based
- It is a small API with only six methods
- It has minimal tooling
- It has an isomorphic design which renders seamlessly in with both Node and browsers
- It is very cute. Choo choo!
The kind of “Hello World” for function programming languages is a “Counter” App. With Choo, this looks something like this.
var html = require('choo/html')
var log = require('choo-log')
var choo = require('choo')

var app = choo()

// inserting middleware is as easy as this
app.use(log())
app.use(countStore)

// have you ever seen defining routes as easy as that?
app.route('/', mainView)
app.mount('body')

// views, rendered pages, can be set up as easy as that
function mainView (state, emit) {
  return html`
    <body>
      <h1>count is ${state.count}</h1>
      <button onclick=${onclick}>Increment</button>
    </body>
  `

  function onclick () {
    emit('increment', 1)
  }
}

function countStore (state, emitter) {
  state.count = 0
  emitter.on('increment', function (count) {
    state.count += count
    emitter.emit('render')
  })
}This looks easy and lightweight, doesn’t it? If you’re interested, you should definitely check it out. They have a lot of great resources.
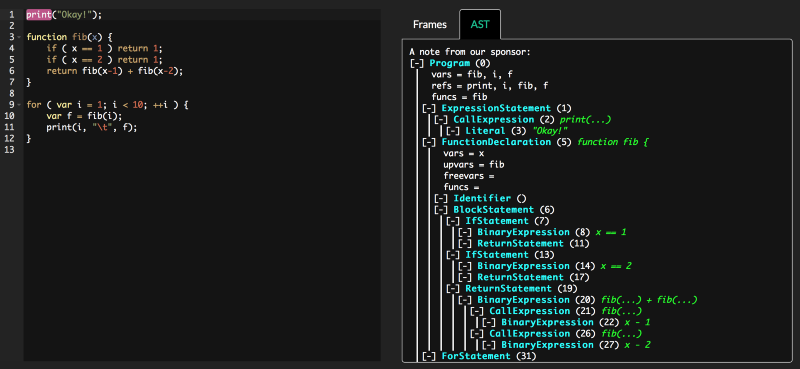
Esper.js
This is an awesome JavaScript self-interpreter with a high focus on testing execution and runtime introspection. In our opinion, this program is not as reputable as it should be for how good it is.
Sadly, there is no real documentation for esper.js. There are just the comments in the code and some minor explanations, making this hard to use. But it’s definitely worth checking out. There is an interpreter on the Blockly page. But for our use case, it wasn’t good enough. And we simply fell in love with esper.js. Thank you CodeCombat for open sourcing. ?
Features
Here are some features of esper.js:
- It has a JavaScript interpreter
- It has a testing environment for its execution
- It is built for CodeCombat
- It provides step-by-step executions
- It builds a complete Abstract Syntax Tree (AST)
To look at the actual demo, click here.
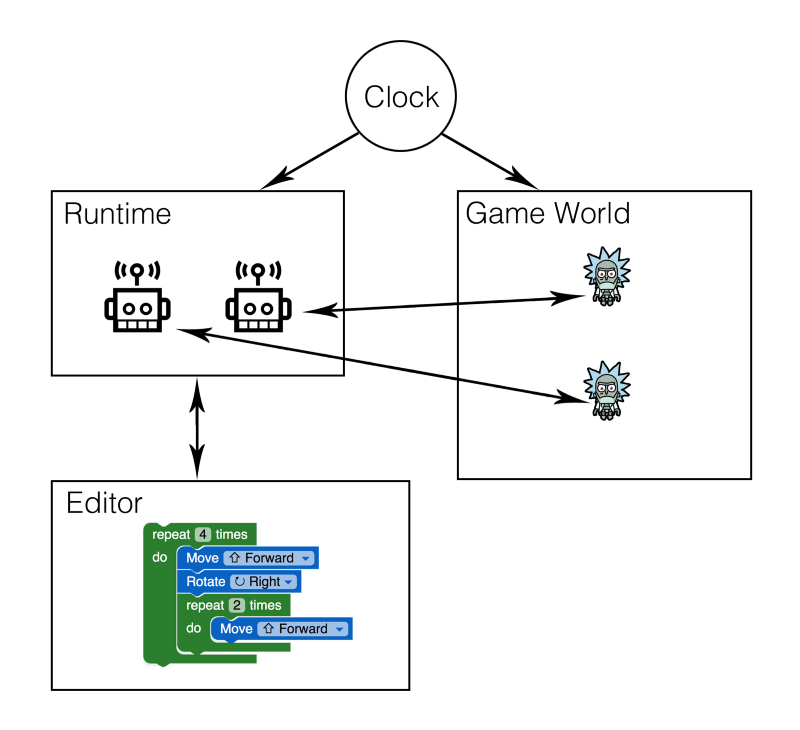
The robot engine
When two teams compete against each other, in tournament mode, we need an environment that simulates that the robots are interacting with the game world. Each robot has its own program, and each performs one action every round. The runtime keeps track of the state of every robot and the game world. On every clocked event, the runtime executes the next action of each robot and sends an event to the game world.
The game world contains all the game logic. For example, it’s responsible for checking that the robots can’t move on water fields.
Features
Here are features of the robot engine:
- It provides a turn-based simulation
- It has simultaneous executions of multiple robots
- It has an event system that trigger bots, for example when a robot discovers a resource
- It provides an API for the robots to interact with the world

You can help
If you think this project is interesting and want to plan your own event, perfect.
Simply head over to our GitHub-Repository and look for the “How you could use this” section. There it explains how you can take this project and make it your own event.
Here are the things you will need to organize an event like this:
Items you need to plan an event
- About 1.5 hours
- A computer with an up-to-date browser for each kid
- A projector and a big screen to display the competition
- Tutors who can help the kids if they have questions
The event is then split into 4 sections:
- Tutorials
- Programming the robots
- Letting the robots compete
- Improving the programs
You can read about each of the steps here.
If you have any questions about how and where to organize such an event, or how to best plan it, feel free to ask us.
We love working with children. If you try it, we’re sure you won’t regret it. You will learn to explain things in a simpler and more logical way, which will help you to grow as a developer and as a person.
Try it. We’re serious. ?

Thank you for reading.
We’d love to hear your opinion, so feel free to comment or hit me up on email.
Also be sure to follow us on YouTube and to star Robotopia on GitHub.
Don’t forget to hit the clap button and follow me on Twitter, GitHub, Youtube, and Facebook to follow me on my journey.
We are always looking for new opportunities.
Please feel free to contact us. We’d love to be in touch with you.
I’ll be in Palo Alto, California, for an internship starting in September. I would love to meet you! If you’re interested, hit me up on email. I’d be happy to be in touch!
Also, if you’re someone who actually works at Google and are reading this, I’d love to meet the team behind Blockly!