
by Shaun Persad
How you can build your own free, serverless comment box
Contentful’s flexible content modeling goes far beyond blog posts. Here’s how you can leverage Contentful and Netlify to create a nested commenting system that’s easy to moderate and deploy.
The motivation
I find most commenting systems out there to be…lacking. Disqus can often be slow to render, and their user tracking behavior doesn’t have the best reputation. Meanwhile, Facebook’s comments plugin is quite nice, but of course is limited to Facebook users.
What I really wanted was the native speed and approach to nested commenting and moderation taken by sites like Hacker News and Indie Hackers, but I needed a solution that would be portable to multiple projects.
There just didn’t seem to be a great fit out there, so I decided to build my own, with my wish list of features:
- Free
- Low barrier to entry — minimal steps required to submit a comment
- Low maintenance — serverless, to not worry about hosting or scaling
- Easy moderation — use a dashboard to perform CRUD on comments
- Peformant — super-fast to appear on the page
- Flexible — users should be able to log in via multiple platforms
- Powerful — comments should have smart formatting features
- High comment quality — users can upvote and downvote comments
- Subscriptions — users can receive notifications when their comments are replied to
Over the course of this series, we will build out a commenting system that incorporates each of the above aspects.
The plan
Our stack will initially include:
- Contentful as a database and moderation dashboard
- AWS Lambda via Netlify as our back-end
- React on the front-end
We will create a React component to serve as our comment box, and supply it with the ability to make an API call to Contentful to fetch comments as necessary. It will also be able to make an API call to our Lambda function to post a comment to Contentful.
Project-wise, our Lambda function will live along-side our front-end code. Both the front-end and back-end will be set up to be continuously deployed via Netlify.
By the way, the above stack is all free! Well, mostly. Unless you’re going to be doing over 10,000 comments, it’s free. Also, I’m not affiliated with any of these companies…I just love their stuff :)
Contentful in 10 seconds
If you’re not already familiar with Contentful and how it works, it’s a “headless” (API-driven) CMS. You’re able to model your content with different fields and field types, and then you create content based on those models. You can build your front-end however you like, and query for your data using their API. It’s super flexible, and their dashboard is quite nice to use. It’s basically the best thing to happen to CMS’s since, well, ever?
I was already using Contentful for my blog posts, so I wondered, could it be viable to host comments as well? I’m happy to report that the answer is yes! However, a few of the items on my wishlist don’t quite work out using just Contentful. But don’t worry, we’ll get there…in the subsequent posts of this series.
We’ll be using Contentful because:
- flexible data modeling
- convenient API
- moderation via a dashboard
- you may already be using it for your website/blog that needs comments
Netlify in 10 seconds
I think Netlify has by far the most enjoyable deployment experience for front-end apps. It links to your GitHub repo and sets you up to continuously deploy a static site to CDN-backed hosting. They also have Netlify Functions, which let you deploy to AWS Lambda without any of the pain of messing around in AWS.
You can get started at their docs, but honestly, their dashboard is so easy to use and understand, I recommend just logging in and poking around.
We’ll be using Netlify because:
- painless AWS Lambda integration
- you may already be using it for your website/blog that needs comments
- If you’re not already using it, you can still deploy the Lambda functions we create to AWS itself
Wait, no “React in 10 seconds”?
I don’t know if 10 seconds is enough to do React justice. If you haven’t yet learned it, you should! But skip the Redux and Flux stuff. Chances are you don’t need any of that (but that’s another topic for another time).
Content modeling in Contentful
Now down to business.
There are two different approaches we could take regarding how we handle our users: authless and logged-in commenting:
- Authless — anyone can leave a comment simply by supplying their name
- Logged-in — only users who are authenticated in some auth system can comment
I prefer logged-in commenting, because in my opinion, the conversations tend to be more civilized. Plus, you tend to avoid spam altogether. On the flipside, the barrier to create a comment is slightly higher.
However, we will start off with authless commenting, because it’s simpler to implement. Once we get our feet wet, we’ll jump into logged-in commenting in Part 2.
Regardless, we’re going to first need to create a content model to represent our comments.
For both authless and logged-in approaches, our Comment content model will remain mostly the same as well, though there will be some later changes to the Author field, as noted below.
The Comment content model
This is the model at the heart of our commenting system. Comments should have four fields:
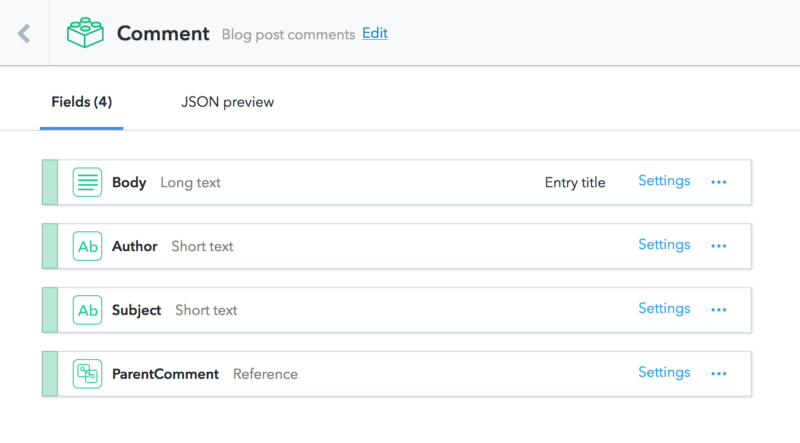
Body
- The actual body of the comment
- Mark this one as the entry title
- Feel free to also set a maximum and/or minimum value on its length
Author
- A unique identifier representing the user who posted this comment.
- For authless commenting, you’d use short text and fill in the author’s name in this field
- For logged-in commenting, this field will become a reference to the upcoming CommentAuthor model
Subject
- The unique ID of the blog post (or equivalent) that these comments belong to
- It can also be the URL of the page
- For maximum flexibility, I chose not to assume that you’re storing your blog posts in Contentful, or else this would be a reference field instead of short text
ParentComment
- If this comment is a reply to another comment, we’ll reference that comment here
- This field is what enables us to create nested comments
Implementing authless commenting
For this implementation, we want the user to enter their name before they are able to post a comment. I recommend doing an initial read-through of the following steps, and then check out the final demo project at the end to see how it all comes together.
Front-end
Now that our Comment model is done, it’s time to create our comment box. The good news is that I’ve already made a generic “comment box” React component. It’s designed as a low-order component, where you wrap a higher-order component around it to handle fetching and creating Contentful comments, and other application-specific business logic.
You can install it and the other required packages via npm:
npm install react-commentbox contentful contentful-management --saveThe GitHub repo has a list of every prop you can pass to it, but minimally, we’ll be implementing and passing these:
getComments: a function that returns a promise that resolves to an array of comments, ordered from oldest to newestnormalizeComment: a function that maps your array of comments to objects that the component understandscomment: a function that makes an API call to create a comment, and returns a promisedisabled: set to true when commenting should be disableddisabledComponent: the component to show when commenting is disabled
Let’s create our higher-level component:
import React from 'react';import CommentBox from 'react-commentbox';class MyCommentBox extends React.Component { state = { authorName: '', authorNameIsSet: false }; onChangeAuthorName = (e) => this.setState({ authorName: e.currentTarget.value }); onSubmitAuthorName = (e) => { e.preventDefault(); this.setState({ authorNameIsSet: true }); };}Notice that the component is in charge of setting the author’s name.
By the way, we’re using the transform-class-properties Babel plugin to avoid tedious constructor setup and function bindings. You don’t need to use it, but it’s quite handy.
Now we need to implement the business-logic props that react-commentbox needs.
We’ll start off by fetching comments from Contentful, and normalizing them:
// fetch our comments from ContentfulgetComments = () => { return this.props.contentfulClient.getEntries({ 'order': 'sys.createdAt', 'content_type': 'comment', 'fields.subject': this.props.subjectId, }).then( response => { return response.items; }).catch(console.error);};// turn Contentful entries to objects that react-commentbox expects.normalizeComment = (comment) => { const { id, createdAt } = comment.sys; const { body, author, parentComment } = comment.fields; return { id, bodyDisplay: body, userNameDisplay: author, timestampDisplay: createdAt.split('T')[0], belongsToAuthor: false, parentCommentId: parentComment ? parentComment.sys.id : null };};Next, we need to make the API call to create comments:
// make an API call to post a commentcomment = (body, parentCommentId = null) => { return this.props.postData('/create-comment', { body, parentCommentId, authorName: this.state.authorName, subjectId: this.props.subjectId });};We also need to ask the user for their name before they can comment:
// will be shown when the comment box is initially disableddisabledComponent = (props) => { return ( <form className="author-name" onSubmit{ this.onSubmitAuthorName } > <input type="text" placeholder="Enter your name to post a comment" value={ this.state.authorName } onChange={ this.onChangeAuthorName } /> <button type="submit">Submit</button> </form> );};Then, bring it all together in render, by passing the appropriate props to react-commentbox:
render() { return ( <div> <h4>Comments</h4> <CommentBox disabled={ !this.state.authorNameIsSet } getComments={ this.getComments } normalizeComment={ this.normalizeComment } comment={ this.comment } disabledComponent={ this.disabledComponent } /> </div> );};We’ve also set the disabled prop to true while the author's name is not set. This disables the textarea, and shows the disabledComponent form we made to get the author's name.
You can view the complete component here.
You may have noticed that our newly created MyCommentBox also expects a few props itself: subjectId, postData, and contentfulClient.
The subjectId is simply some unique ID or URL of the blog post (or equivalent entity) that these comments are for.
postData is a function that makes POST ajax calls. Using fetch, it could look like this:
function postData(url, data) { return fetch(`.netlify/functions${url}`, { body: JSON.stringify(data), headers: { 'content-type': 'application/json' }, method: 'POST', mode: 'cors' // if your endpoints are on a different domain }).then(response => response.json());}contentfulClient is an instance of the client you get when using the contentful npm package (so make sure you've installed it):
import { createClient } from 'contentful';const contentfulClient = createClient({ space: 'my-space-id', accessToken: 'my-access-token'});You can get your space ID in the Contentful dashboard under “Space settings” > “General settings”.
You can get your access token from “Space settings” > “API keys” > “Content delivery/preview tokens” > “Add API Key”.
You can then pass in your props when creating MyCommentBox, as shown here.
Back-end
We will implement our /create-comment endpoint as an AWS Lambda function.
Prerequisites
To be able to build, preview, and eventually deploy these functions, we’re going to use the handy netlify-lambda npm package. It lets you write your Lambda functions as regular ES6 functions in a particular source directory, and then it builds them in a Lambda-friendly way and puts them in a destination directory, ready for deployment. Even better, it also allows us to preview these functions by deploying them locally.
So, you’ll need to create a particular source directory to store your function (e.g. src/lambda), then create a netlify.toml file in your root directory. Minimally, that file should look like this:
[build] Functions = "lambda"The above tells netlify-lambda which directory to put your built functions, meaning it will build the functions in src/lambda and store them in ./lambda. Also, when it comes time to deploy, Netlify will look in the ./lambda directory to deploy to AWS.
To run your Lambda functions locally, use the following command:
netlify-lambda serve <source directory>This will allow you to run your functions on http://localhost:9000/{function-name}.
This is the default behavior, but it does not quite match what will happen in production, because it’s running our functions on a different domain from our front-end. In production, our functions will be available on the same domain as our front-end, via the URL {domain}/.netlify/functions/{function-name}.
To replicate this behavior locally, we need to proxy front-end calls from /.netlify/functions/{function-name} to http://localhost:9000/{function-name}.
Accomplishing this differs based on your project setup. I will cover two popular setups:
For create-react-app projects, add the following to your package.json:
"proxy": { "/.netlify/functions": { "target": "http://localhost:9000", "pathRewrite": { "^/\\.netlify/functions": "" } }}For Gatsby.js projects, add the following to your gatsby-config.js:
const proxy = require('http-proxy-middleware');...developMiddleware: app => { app.use( '/.netlify/functions/', proxy({ target: 'http://lambda:9000', pathRewrite: { '/.netlify/functions/': '', } }) );},For most other projects, you can leverage webpack’s dev server, which has proxy support.
Writing our function
Before we get to writing Lambda-specific code, we will first create a generic function to handle most of our logic. This way, our code remains portable beyond Lambda.
Let’s create a createComment function:
const contentful = require('contentful-management');const client = contentful.createClient({ accessToken: process.env.CONTENTFUL_CONTENT_MANAGEMENT_ACCESS_TOKEN});module.exports = function createComment( body, authorName, subjectId, parentCommentId = null) { return client.getSpace('my-space-id') .then(space => space.getEnvironment('master')) .then(environment => environment.createEntry('comment', { fields: { body: { 'en-US': body }, author: { 'en-US': authorName }, subject: { 'en-US': subjectId }, parentComment: { 'en-US': { sys: { type: 'Link', linkType: 'Entry', id: parentCommentId } } } } })) .then(entry => entry.publish());};You can put the above function someplace like a utils directory. It uses the contentful-management npm package to create and publish a new comment entry, and returns a promise. Notice we've specified our management API key as an environment variable. You definitely do not want to hard-code that one. When deploying to Netlify or anywhere else, be sure to check that your environment variables are set.
You can get your management access token from the Contentful dashboard at “Space settings” > “API keys” > “Content management tokens” > “Generate personal token”.
Now, let’s create our Lambda-specific function:
const createComment = require('../utils/createComment');exports.handler = function (event, context, callback) { const { body, authorName, subjectId, parentCommentId } = JSON.parse(event.body); createComment(body, authorName, subjectId, parentCommentId) .then(entry => callback(null, { headers: { 'Content-Type': 'application/json' }, statusCode: 200, body: JSON.stringify({ message: 'OK' }) })) .catch(callback);};Put this function in your Lambda source directory, and name the file with the path you’d want the URL to be, e.g. create-comment.js . This will make your function available at the URL /.netlify/functions/create-comment.
The big picture
To illustrate our complete front-end and back-end setup thus far, I’ve created a create-react-app project that functions as a readily-deployable, fully-functional example.
Notice that in the example project’s netlify.toml file, there’s a few more lines that you should add to your own file. Command tells Netlify what commands to run to build the project. Publish tells Netlify where to find the static assets ready for deployment once the build is complete. You can read more about this file in Netlify's documentation.
The example project is also easily cloneable and deployable to your own Netlify account via the convenient deploy button in the README.
If you’ve been implementing this in your own project instead, head over to the Netlify dashboard and follow their straightforward instructions to set up your repo to deploy.
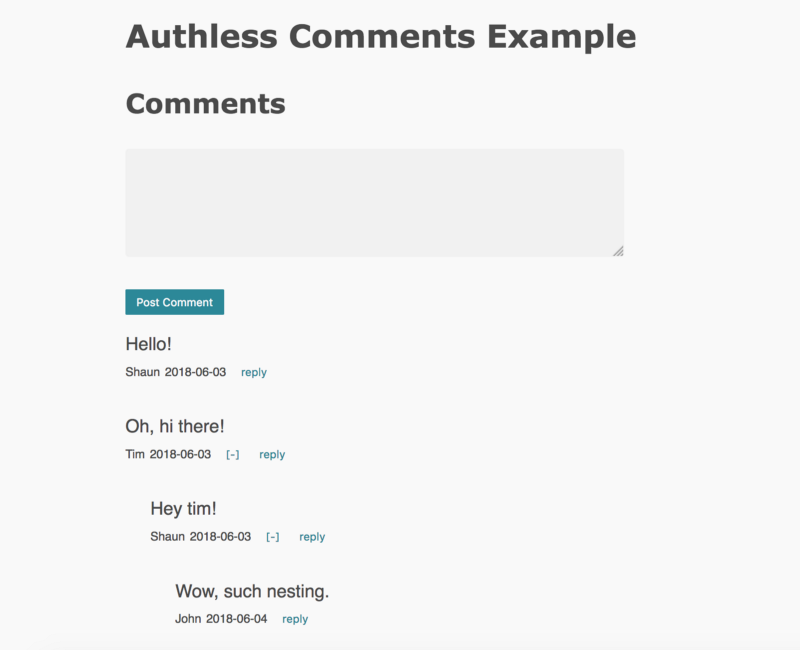
Once it’s up and running, you’ll be able to start commenting like a boss.
(Note: this is just a screenshot, so don’t try clicking on it ^_^)
Until next time
In Part 2, we’ll cover implementing logged-in commenting, as well as giving our comment box some super-cool text formatting functionality.
Thanks for reading! — Shaun
Originally published at shaunasaservice.com.