by Dejan Atanasov
Your ultimate guide to the Google Maps SDK on iOS, using Swift 4

Many iOS apps use Google Maps. This is a very common feature, so I have decided to prepare an ultimate guide on the Google Maps SDK for iOS. This tutorial covers everything that you might need to know.
I hope that my readers will request features, so I can expand this article. Everything will be documented in this post! ?
Installation
Before we start coding, we must install the Google Maps iOS SDK first. You might prefer some other dependency manager, but I would recommend CocoaPods.
Create a Podfile inside your project root directory, and copy the following code:
source 'https://github.com/CocoaPods/Specs.git'target 'YOUR_TARGET_NAME' do pod 'GoogleMaps'endAll you need to do is changing the YOUR_TARGET_NAME string with a real value. Save the file and close it. Open the terminal and cd to the root directory of the project, then type pod install. You're done! ?
Get an API key
To use the Google Maps iOS SDK, you will need an API Key. To generate the key you will need to visit the Google API Console.
Create a project, and navigate to ‘Credentials’.
Then, click ‘Generate Credentials’ and pick API Key. You will need to provide your projects bundle id. The key is generated by the unique bundle id, so if it’s changed, the Google Maps services won’t work!
Go to your project, and in your AppDelegate.swift class add import GoogleMaps. Then, copy the following code to application(_:didFinishLaunchingWithOptions:)
GMSServices.provideAPIKey("YOUR_API_KEY")Step 1 — Add a map
I will start by showing you how to set up the map together with a basic marker. The code that you will see here is tested in parallel as I write.
Let’s start! ?
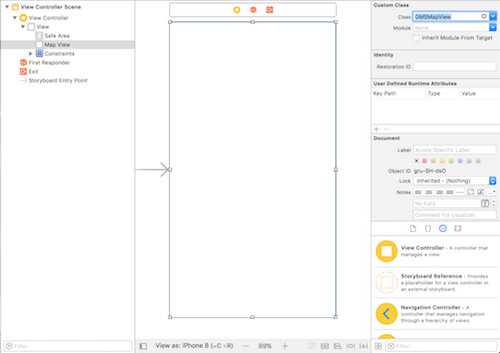
Visit your UIViewController (where you need to add the map). Create a custom UIView with the size you need. Assign the GMSMapView class as a Custom Class to the UIView (see the screenshot below). Also, don't forget to connect the delegate.
Finally, some code!
Let’s get back to the UIViewController and write some code. ⌨️
️In the below snippet, I have added the whole class so you can get a better picture of what is going on.
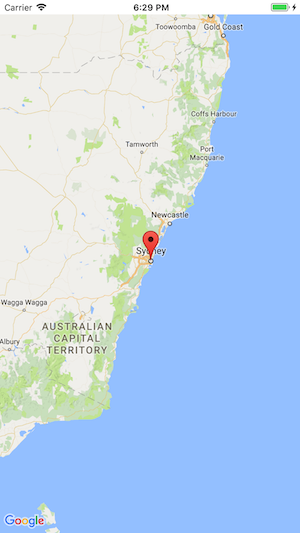
GMSCameraPosition tells the map which coordinates to take as a center point. To show a simple marker on the map, use the showMarker() function.
At the end of the file, add an extension which will “store” the GMSMapViewDelegate methods that we need.
Step 2 — Delegate methods
I will now introduce you to some GMSMapViewDelegate methods and their powers. ✊
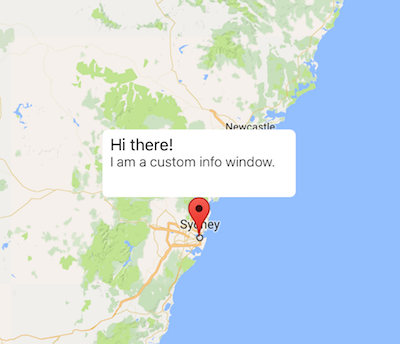
GMSMarker InfoWindow
In Google Maps, an InfoWindow is a popup window with extra information about a given location. It is displayed when the user taps on the marker we added above.
Our InfoWindow is customizable. You can attach your own UIView with whatever components you need.
I have written an example implementation. This assumes in most cases people will use a custom InfoWindow,
didTapInfoWindowOf()detects when the user taps on the InfoWindow.markerInfoWindow()adds the custom UIView that we want to show to the marker.didLongPressInfoWindowOf()detects when the InfoWindow has been long pressed.
Drag GMSMarker
Another interesting feature in GMSMapViewDelegate is the ability to drag the marker. This can be achieved with a minimal amount of code.
All you have to do is turn on the “switch”, by calling marker.isDragabble=trueon the marker created above.
In order to drag the marker, you will need to use a long press. If you need to be notified when the user starts and ends dragging, you can implement these three delegate methods:
didBeginDraggingnotifies once — when the dragging has started.didDragnotifies while the marker is being dragged.didEndDraggingnotifies once — when the dragging has ended.
GMSMarker position
What if you need to change the GMSMarker position while the user is tapping on the map? Well, GMSMapViewDelegate offers a solution for that as well. A single delegate method can intercept the coordinates (latitude and longitude) of the tapped area. It will then assign their values to the marker.
didTapAt()returns the coordinate from the tapped area on the map
Step 3 — Adding shapes
The Google Maps iOS SDK makes it simple to draw a shape. I will cover how to draw with polylines, polygons and circles.
Polylines
Shapes can be built using lines. We can draw lines in Google Maps using ‘polylines’. The object that will help us with the drawing is called GMSPolyline.
To create a polyline, you will need to create a path using GMSMutablePath. It needs two or more points to start creating a path.
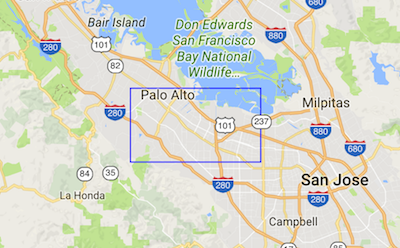
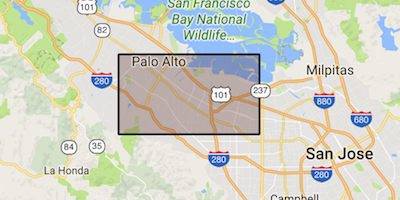
If you have used the above example, you will get a rectangular shape like the one shown.
Some other useful tips:
- To remove a polyline from the map, call
mapView.clear(). - You can change the color of the line by using
polyline.strokeColor=.black. - Change the width of the line by calling
polyline.strokeWidth=3.
Polygon
Polygon is almost the same as polylines. It works using the same approach, with a few minor differences.
For example, GMSPolygonwill draw a shape. You can then use fillColor to fill in the drawn area. Here is an example of what this looks like.
Radius (circle)
The final shape we will look at is a circle. This is probably the easiest shape of all, since it’s always the same!
To achieve this, we need to use theGMSCircle class. Here, we are not passing a path. Instead, we use one coordinate to specify the circle’s center. We also define a radius (measured in meters).
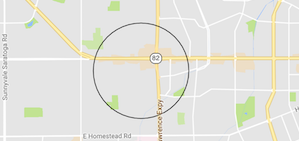
TheGMSCircle class contains the same properties as the polygon, includingfillColor , strokeColor and strokeWidth.
Step 4 — Properties and Settings
This part will cover a few properties and settings that are often used when using Google Maps in your app. Let’s take a look at them.
Change marker icon
The GMSMarkercontains two different properties for changing the marker icon.
marker.icon=UIImage(named: "image.png")in this approach, you pass an image filename. This replaces the default one.marker.iconView=customViewYou can also add a custom view instead of an image. This can be used for more complex markers. For example, you may want to add some animation, or multiple components (instead of a single image). Note theiconproperty gets overwritten wheniconViewis called.
Add ‘My Location’ button
The ‘My Location’ button appears in the bottom right corner. Clicking the button will animate the map to show the user’s current location.
To add this, set mapView.settings.myLocationButton = true. The button will appear.
Zoom controls
Google Maps SDK for iOS doesn’t provide inbuilt zoom controls (but the Android SDK does). You will need to write your own logic instead.
All you need to do is add two buttons with ‘+’ and ‘-’ icons. When tapped, these will call mapView.animate(toZoom: zoom).
Control gestures
You can turn on or off any gesture that you can see on the map. For example, you might want to disable zooming, or turn off scrolling.
There are a total of four gestures available to you:
mapView.settings.scrollGestures = falsemapView.settings.zoomGestures = falsemapView.settings.tiltGestures = falsemapView.settings.rotateGestures = falseI hope that you have enjoyed this tutorial. If you want to read more on Google Maps SDK for iOS, write me a comment. I would be very happy to expand this tutorial with your requests.
That’s it from this tutorial and if it helped you please ? or share this story so others like you can find it. Thank you for your attention! ?

Check out my latest project:
1x2 BET - Soccer Tips & Odds
HOT ODDS Each day, we generate a list of the hottest odds in the world. These are odds that have dropped the most…apple.co
Read more of my writing on Medium:
Introducing Clean Swift Architecture (VIP)
Forget MVC, now!hackernoon.comYour ultimate guide to the Google Maps SDK on iOS, using Swift 4
Many iOS apps use Google Maps. This is a very common feature, so I have decided to prepare an ultimate guide on the…medium.freecodecamp.orgSWIFT — Custom UIView with XIB file
Custom UIView with XIB file is a very common practice in iOS Development. Custom UIView classes don’t contain XIB files…medium.comHow to add Spotlight support to your iOS app
A Swift tutorial that will make your app available in Spotlight searchhackernoon.comCore Data Relationships
Understanding One-to-One and One-To-Many relationshipshackernoon.comUnderstanding Auto Layout in Xcode 9
All you need to know about Auto Layouthackernoon.com