
by Henri Little - Beyle
How to build a reactive Joystick as a single RxJS Observable stream

We are all likely familiar with the concept of a Joystick.
We start holding the handle of the Joystick, we move the handle around, and when we release it, the handle gently goes back to its initial position.
Now, what if we want to build some sort of software component that simulates the behaviour of a Joystick in the browser?
Well, with RxJS this turns out to be pretty simple. And it is also an interesting exercise to prove your Reactive thinking. You can jump directly to the code here if you want, otherwise keep reading and see what we can do.
Which are the events we are interested in?
The behaviour of the Joystick can be seen a series of events combined together in some way.
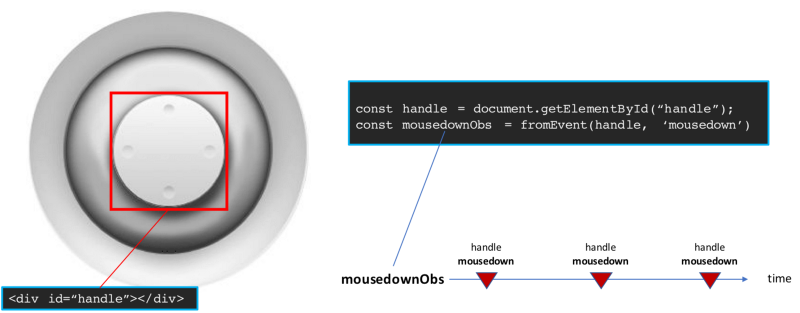
The first event we are interested in is when the user presses a mouse on the handle (mousedown) - the handle is just the central part of the Joystick image.
If you hold the mouse pressed, then you can move around and you see the handle move accordingly — the mousemove events of the mouse are therefore the second series of events we want to capture.
Last, we need to consider when the user releases the mouse (mouseup) since this is the event that causes the Joystick handle to go back to its initial position.

The whole sequence can be repeated after the handle is released. The mouse is pressed on the handle, then it is moved, then it is released. Again and again.
This repetition can be seen as a stream of events. We can say that the behaviour of a joystick is governed by this stream of events.

If we are able to build such stream of events, we are in a good position to reach our objective — that is, to implement a Joystick software component for the browser using RxJS.
The building blocks with RxJS
The browser actually provides us with the notification of the events we are interested in: the mousedown event on the DOM element representing the handle of the Joystick, and the mousemove and mouseup events at DOM document level.
RxJS, on its side, comes with the function fromEvent that allows us to create an Observable from a browser event.
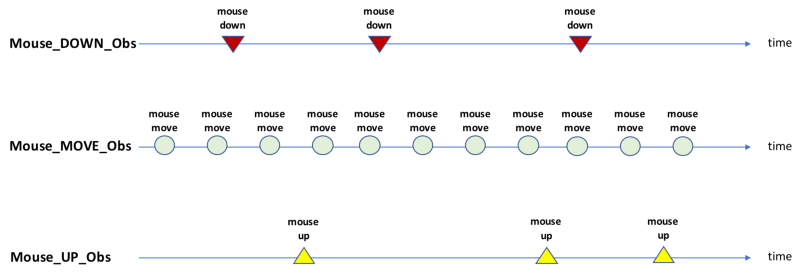
Using this mechanism we can create the three streams of events which are going to be the building blocks of our solution: mouse_DOWN_Obs, mouse_MOVE_Obs, mouse_UP_Obs.
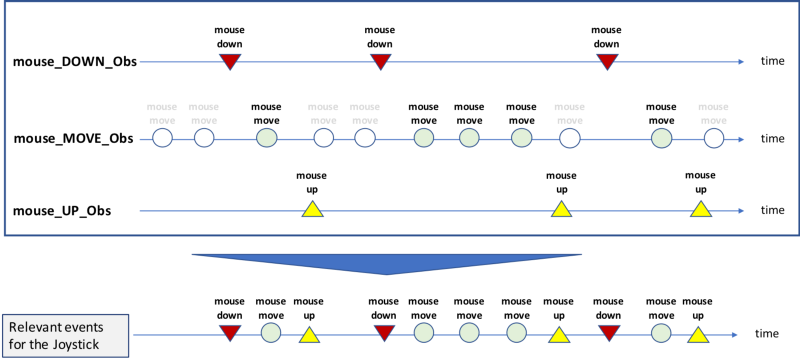
But these are just our building blocks. We need to do something with them in order to get what we want: we need to ignore all mousemove events which occur before the first mousedown and then ignore all the mousemove events which occur after the next mouseup. Then we repeat all this again when a new mousedown event occurs. These compose the “stream of events for the Joystick”.
The transformation of Observables via composition of operators
Everything starts when the user presses the mouse on the handle of the Joystick, i.e. mouse_DOWN_Obs. We can call it the source Observable.
Once we are notified of an event from mouse_DOWN_Obs we have to switch and start listening to mouse_MOVE_Obs.
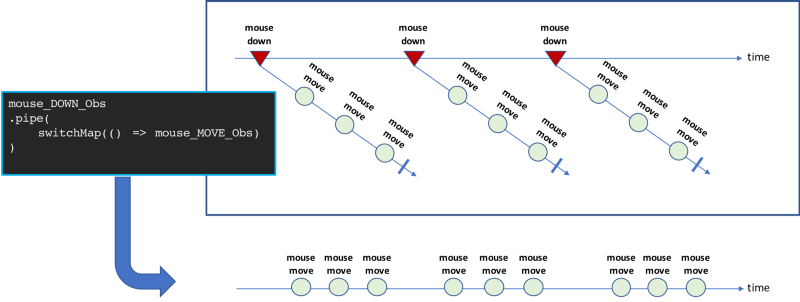
It may seem like we have not achieved much, but in fact we are now in a position where we can take the mouse_MOVE_Obs notifications until we hear from mouse_UP_Obs. At this point we stop just to restart at the next notification from mouse_DOWN_Obs.
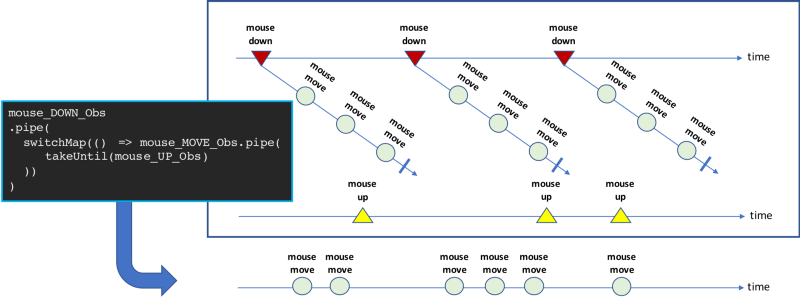
Notice that we apply takeUntil to mouse_MOVE_Obs, because this is the Observable we want to complete. If we had applied one level higher, to mouse_DOWN_Obs, this is what would have happened:
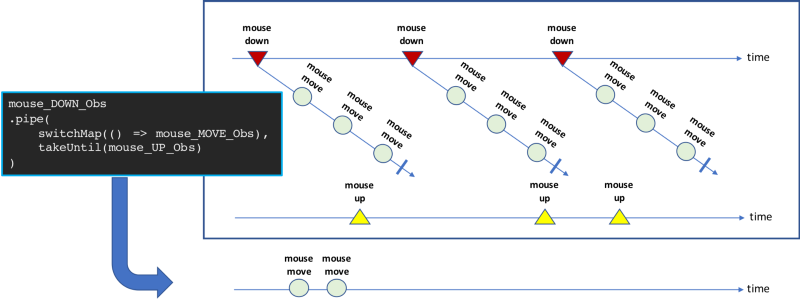
Just the first sequence of move events would have been notified, and then the stream of events would have been closed down. No more events for the Joystick.
Now is the time of side effects
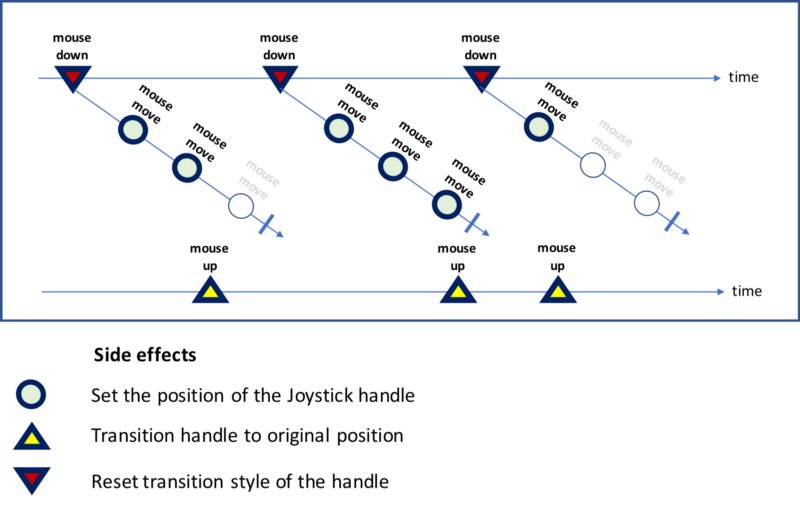
We have learned how to build a stream of all the events relevant for a Joystick. To do something useful with this stream, we need to link the events to some sort of action we want to do. More specifically:
- when we sense a
mousemoveevent we have to change the position of the handle on the browser - when we sense a
mouseupevent we have to gently move the handle back to its original position, setting some transition style - when we sense a
mousedownevent we have to reset the transition style
But careful. Not all are mousemove events, not all are mouseup events, and not all are mousedown events. Only those which belong to the set of “relevant events for the Joystick”. For instance, we are not interested in all mousemove events which happen before the Joystick has been activated (pressing the mouse on the handle) or after the Joystick handle has been released.
Let’s get back to our main track of reasoning. We need to do something at the occurrence of some events. Something that changes the state of the system. In our case, this is the position of the handle on the browser. In functional programming terms these are called side effects, i.e. functions which change the state of the system.
RxJS gives us two ways to implement side effects.
The first one is the subscribe method of Observable. The second one is the tap operator, formerly know as do, which “performs a side effect for every emission on the source Observable, but returns an Observable that is identical to the source” — the side effect is determined by the function passed to tap as a parameter. tap is the method we are going to use.
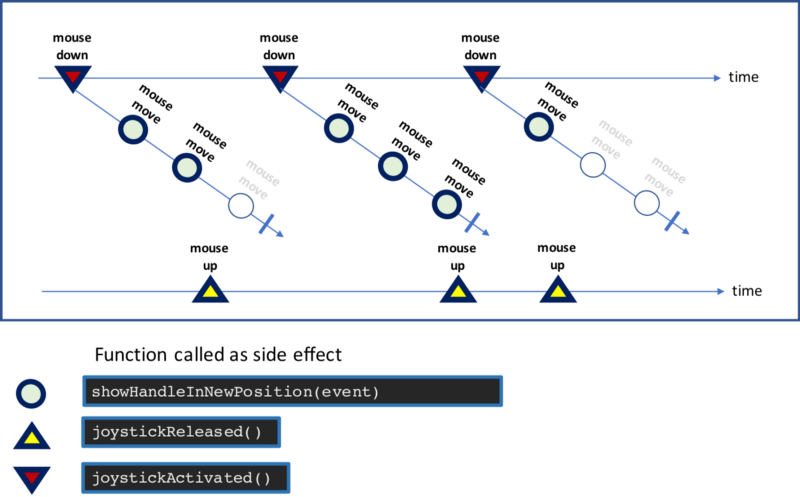
Eventually this is the core of the code that implements our Reactive Joystick
const handle = document.getElementById("handle");const mouse_DOWN_Obs = rxjs.fromEvent(handle, 'mousedown');const mouse_MOVE_Obs = rxjs.fromEvent(document, 'mousemove');const mouse_UP_Obs = rxjs.fromEvent(document, 'mouseup');function activateJoytick() { mouse_DOWN_Obs.pipe( rxjs.operators.tap(() => joystickActivated()), rxjs.operators.switchMap(() => mouse_MOVE_Obs.pipe( rxjs.operators.takeUntil(mouse_UP_Obs.pipe( rxjs.operators.tap(() => joystickReleased()) )), )), rxjs.operators.tap(event => showHandleInNewPosition(event)) ) .subscribe();}Example code
You can find the example code here, where you can compare the RxJS implementation with one built using pure JavaScript.