by Nate Wang
Introducing Rekit Studio: a real IDE for React and Redux development
We’re very excited to announce the stable release of Rekit Studio, a complete IDE for React, Redux, and React Router development! Though it’s maybe new to some of you, it has helped us build complicated web apps for more than a year.
The previous version of Rekit Studio was Rekit Portal, which has no ability to edit code. Now thanks to Monaco Editor (which also powers VS Code) and prettier (an amazing tool for formatting code), Rekit Studio provides a great experience for coding. That’s also why we renamed it from “portal” to “studio.”
As an IDE, besides code editing, Rekit Studio provides the capability for code generation, dependency diagraming, refactoring, building, unit tests, and a meaningful way to navigate code.
You will no longer care about how to setup the project, config webpack, or organize your folder structure. Rekit Studio provides an integrated way to manage the entire project. That’s what makes Rekit Studio different from other code editors like Sublime Text and VS Code.
See the quick demo
Before the introduction, you may want to see a quick demo video about how to use Rekit Studio to manage Redux actions.
From the video, we can see that all we care about is the business logic rather than verbose code boilerplate.
Try it now
The best way to go through the following introduction is to have Rekit Studio running alongside so that you can try the features for yourself in real time. It’s super easy with either of these two ways:
- Access the live demo: http://demo.rekit.org . It’s a Rekit Studio instance running at readonly mode. So you can’t perform any changes to the project it manages (the code of the Rekit Studio itself!).
- Create a Rekit app yourself in only 3 steps:
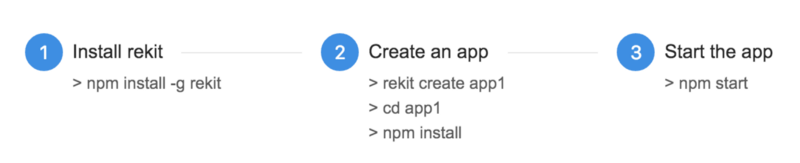
Then access http://localhost:6075 for your app. http://localhost:6076 for Rekit Studio by default.
Yes, Rekit Studio is a npm package in your project and runs in a browser. This mechanism ensures that each app has its own Rekit Studio so that there will never be version compatibility issues.
Show your code in a meaningful way
Almost all IDEs for front-end development just display files in the same way as the folder structure. People complain that navigating between files is frustrating. To make matters worse, there seems to be no way to improve, because code editors don’t know which file is a component, which is an action, which style file belongs to which component, where the routing rules are defined, and so on. While the project structure is in free style it will never be improved.
Now Rekit follows the pattern of how a scalable web application is organized. And based on that, Rekit Studio understands your project. I introduced the practices in two previous articles.
Based on the pattern, Rekit Studio knows which files are components, which are actions, where routing rules are defined, and so on. Then the project explorer can show the project structure in a meaningful way, like this:
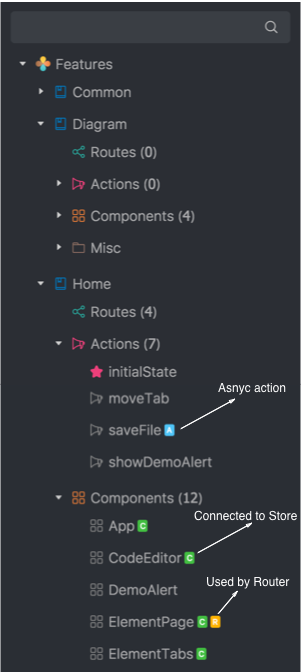
Rekit Studio knows the features of those project elements, like which actions are asynchronous (with blue mark “A”), which components connect to the Redux store (with green mark “C”), and which components are managed by the React Router (with orange mark “R”) that are used in some routing rules.
With this project explorer, you can easily navigate between project elements. You can also get more information about an element without opening it and looking into the code.
One thing to point out is that the project explorer only shows files under the src folder in the project so that it has good performance. So if you want to edit files out of the src folder, such as package.json, or .gitignore, you may need some other text editor.
Code generation
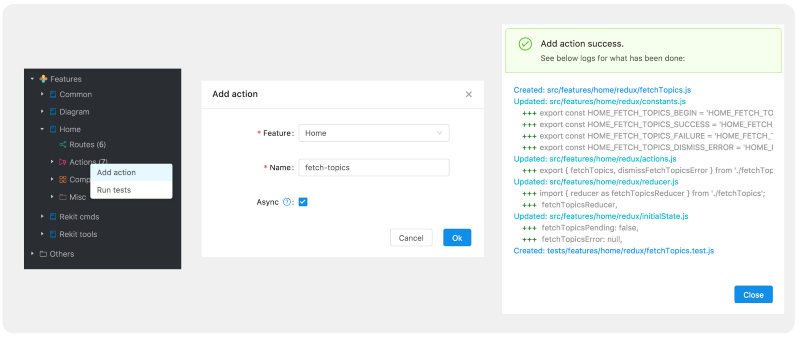
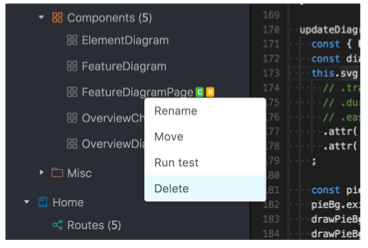
Just like other true IDEs like Eclipse for Java, or Visual Studio for .Net, Rekit Studio helps to create code boilerplates with its intuitive UI without any learning cost. For example, to create a component, right click a feature node in the project explorer and click `Add Component`.
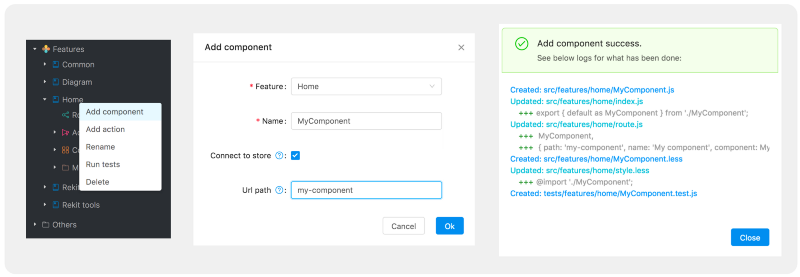
Besides giving it a name, you can set whether it connects to the Redux store, or whether it’s used in a React Router rule. After clicking `Ok`, it generates all necessary code and configurations. You can see what it does behind by the operation log. It creates a less/scss file for styling, a test file for testing, it adds a React Router rule to access it by URL (if url path is set), and so on.
There’s no magic behind it — Rekit Studio just helps you do automatically what needed to be done manually before. And you always know what’s happened by checking the logs.
To create a Redux async action, Rekit Studio uses redux-thunk by default to create reducers and actions:
Alternatively, you could create async actions using `redux-saga` by installing the `rekit-plugin-redux-saga` plugin. See the plugin chapter for more of an introduction.
All file names, function names, or variable names generated by Rekit are forced to follow pre-defined rules as described here. So even if you input a name like `my component` in the name field, Rekit will convert it to `MyComponent`. By this approach, all names in the project are always consistent.
These code boilerplates are created following general best practices. You only need to fill business logic inside them without having to write verbose code manually. Once code is generated, you can edit it for free.
Refactoring is important
When creating a large application, refactoring is very important to make code clean, readable, and then maintainable. Some of the main parts of refactoring are renaming, moving, and deleting project elements. With modern front-end technologies, this work becomes overly difficult.
For example, if we want to rename an async action, it usually needs to touch several files and modify dozens of code at different places. Say that we want to rename an async action from `fetchTopics` to `fetchTopicList`, it needs these modifications:
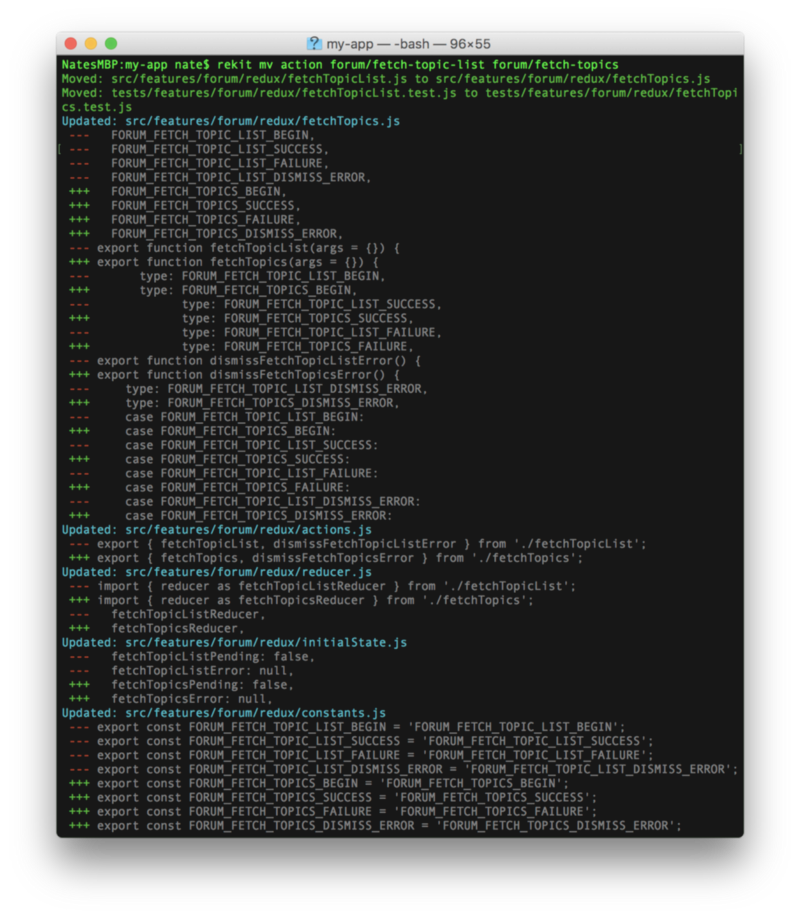
It looks so crazy that you would never want to do it manually, right? The same pain exists in moving and deleting components and actions. Without the tool’s help, this pain used to prevent many of us from refactoring our code. This caused our project to become hard to maintain in a short time.
Now with Rekit Studio, you can right click a component or action to move, and rename or delete it just like you do with other IDEs like Eclipse for Java or Visual Studio for .Net. Rekit Studio will do all things automatically, and you can check logs to see what it does behind.
Review your project with intuitive diagrams
When your project grows, the dependency relationship of modules becomes complicated. This often leads to regression issues if you don’t consider them entirely. It’s good practice to always keep the relationship simple, so that the code is always understandable. Rekit Studio provides two kinds of diagrams for you to review the dependencies:
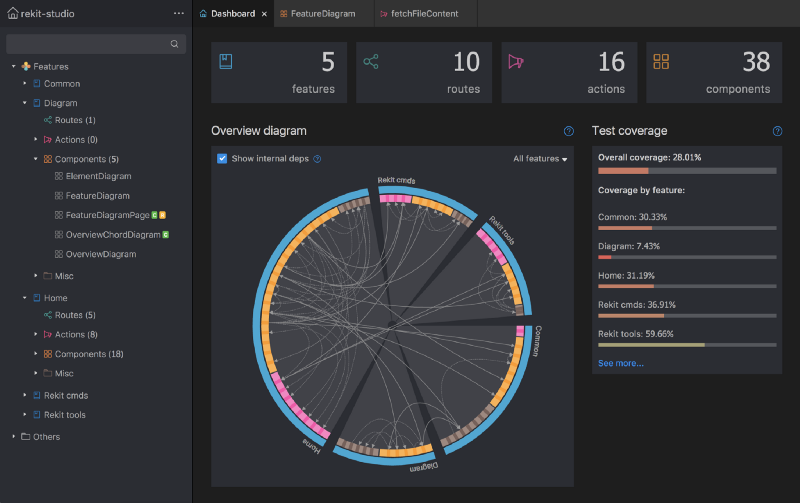
1. The overview diagram
It’s displayed on the dashboard page (home page), with which we can see not only the dependencies between features (a high level concept of Rekit apps), but also normal modules like components and actions. So you could easily find which modules are dangerous to refactor (with many deps) and which ones are easy to refactor (with fewer deps).
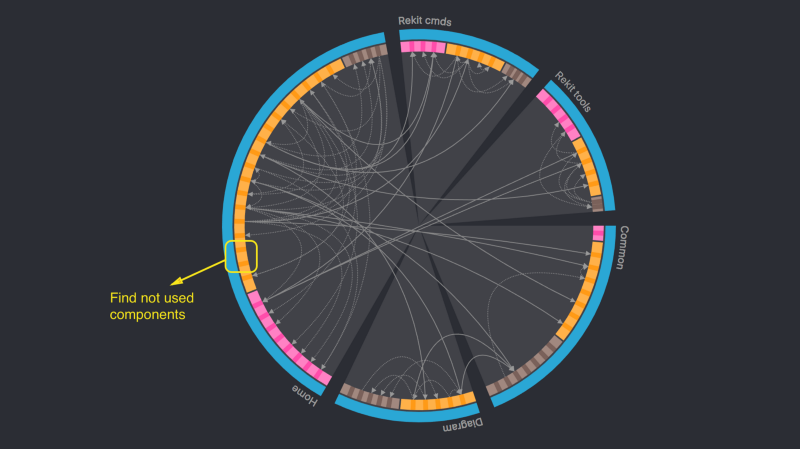
This diagram also helps you find those unused modules — for example, two components of the `home` feature are not used any more in the project as show in the above diagram. You can safely remove them. Removing unnecessary code helps to reduce the project’s complexity along with the bundle size of the application.
2. Element diagram
Open an element from project explorer, then you can see the element diagram under the diagram tab. It provides a very intuitive view of how an element is created or used by others. That is the complication of a module.
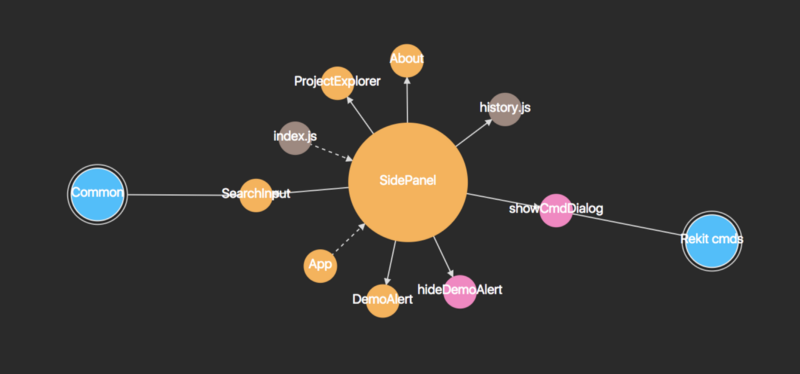
For example, SidePanel is a complicated component which uses many other components and actions. And it has dependencies from other features. Maybe it’s a component to refactor to become simple and easy to understand.
Build and testing
As an IDE, Rekit Studio can also build and test the project with intuitive UIs. By default, Rekit Studio will try to run the `npm run build` command to build the project, and will run `npm test — [test-file-pattern]` to run unit tests.
To build the project, click the `Build` menu item from the main menu:

Then you can see a progress bar and build result. Before deploying to the production server, you can also verify the build result by accessing the dist server which by default runs at: http://localhost:6077 .
To run unit tests, you can either run all tests by clicking the `Run tests` menu item from the main menu, or right click a file/folder which has tests. Rekit Studio will auto-convert the command to test the file pattern:
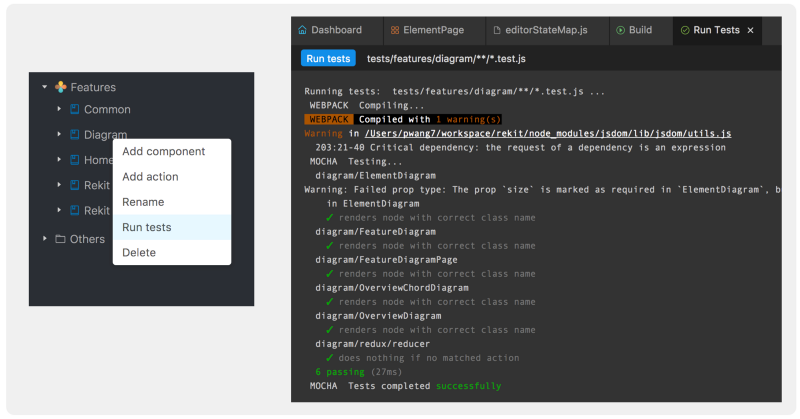
Above is the test result of the feature `diagram`. If you run all tests of the project, it will generate a test coverage report. You can access it from the main menu:

Plugin system
We can see that Rekit Studio can create boilerplates of features, actions, and components. If you want to create some new elements like selectors, or you want to alter the default code boilerplate (like using `redux-saga` instead of `redux-thunk` for async actions), you can create plugins to do it.
See more about the plugin system here.
Command line interface
Besides Rekit Studio, there is another command line interface for managing a Rekit project. Actually both Rekit Studio and Rekit CLI use `rekit-core` to manage project elements. The CLI system supports more kinds of plugins. And Rekit Studio will be improved in the future to provide a unified UI for the plugin system.
Migrating from Rekit Portal to Rekit Studio
If your existing project has been using Rekit Portal, it’s super easy to migrate to Rekit Studio, because Rekit Studio is completely compatible with previous Rekit projects. All you need to do is install Rekit Studio and update the script to start it in server.js here.
Turning your project to a Rekit project
If you happen to have created a project using React, Redux and React Router, it’s possible to convert it to a Rekit project so that you can use Rekit Studio to manage it. It’s not that difficult, but the topic needs another article to introduce it properly. I will write it if you want — let me know in the comments. The key point is to re-organize your files and code in the Rekit way.
What’s next
Rekit Studio is still in the early stages, although we have been using it to build web apps for a long time now. We will keep improving it as we all use it in our daily work.
Some high priority candidates are listed below:
- Better code syntax highlight.
- Support custom ESlint rules.
- Better code auto-complete, such as installing module names.
- Quick open files using Cmd + P.
- Support multiple un-saved files. Currently, only one file can be in an un-saved state to keep your code safe.
- Add more type of diagrams.
- Allow users to create/rename/delete normal files besides components and actions.
- Integrate Storybook.
- Support TypeScript.
- Support server side rendering.
The list could be long, and it depends on your feedback — we welcome any you might have.
Summary
Though front end technology evolves very quickly, Rekit as a toolkit, rather than a framework, has been very stable for more than two years. The practices it follows are independent of technologies. Now the release of Rekit Studio is a new milestone for us to improve our coding experience. We hope you will like it too!
Finally, I want to point out that Rekit does not provide any SDK or npm packages for your application. It’s only a tool for creating and managing the project. Even without Rekit, you can use any text editors to write code and use the terminal to run scripts for a Rekit project. That is, you use Rekit, but you don’t depend on it.