
by Flavio De Stefano
How to install Kali on a USB stick with pure EFI boot on a Mac (and let’s throw in virtualization via USB on Virtualbox, too)

This tutorial is for everyone who wants a USB stick with a full Kali installation to use with your Mac(s). This is not intended to perform a Live Kali installation with persistence.
The problem when you perform a Kali installation on a USB stick is that Kali partitions the disk with the VFAT file system. Mac OS only recognizes HFS+ partitions along with some files needed for it.
So, you need:
- Your Mac
- A USB stick with Kali ISO installer
- A target USB stick, SD card or an SSD external drive where you’re going to install Kali (16GB and USB 3.0 recommended)
This tutorial was heavily inspired by this tutorial with proper fixes for Kali. https://medium.com/@mmiglier/ubuntu-installation-on-usb-stick-with-pure-efi-boot-mac-compatible-469ad33645c9
USB Live installation
First of all, install Kali on a USB stick by following this tutorial. I’m not gonna bother you on how to proceed on this step, but start here:
$ sudo dd if={KALI_ISO.iso} of=/dev/{USB} bs=1m When you’re ready, reboot your Mac. Insert both your USB sticks, then press ALT and select the EFI boot to start the Live installer.

Kali installer will ask you different questions about your timezone and keyboard layout.
Proceed until it asks you to partition disks, here select: Manual. Then select your USB target drive (where you want to install Kali). You can recognize by various factors, for example by its size. Click Continue: this will partition your drive.
Now, back again to the same screen and select the FREE SPACE under the USB target drive. Click Continue and select Automatically partition the free space. Follow the recommended option. Then click on Finish partitioning and write the change to disk.
The installation process now will copy data to disk. Wait until it finishes (this is gonna take ~30 minutes).
Boot from GRUB Live
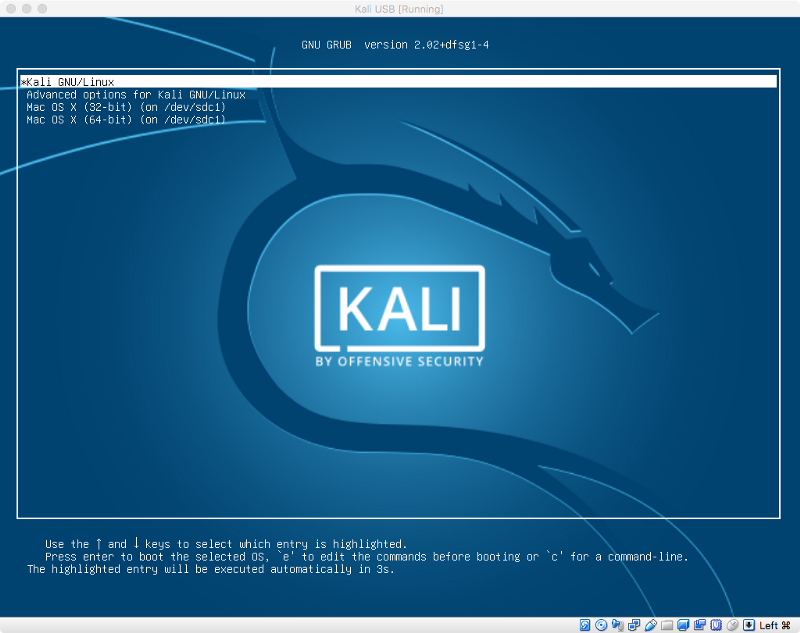
Once finished, your Mac will reboot and you have to press ALT again. Select EFI boot again.
What we have to do now is to load our installed Kali system via Live GRUB, because our installed system doesn’t have a recognizable boot-loader by MacOS.
Once GRUB is loaded, press c to get the GRUB command-line-interface.
Now you have to understand in which HD is your Kali installation. To do this, when GRUB cli is loaded, type ls; eject your USB stick and type ls again.
grub> ls
(memdisk) (hd0) (hd1) (hd1,gpt3) (hd1, gpt2) (hd1,gpt1) ...
You’ll notice that an hd{X} disappeared: that is your drive. Now you have to find your gpt. Probably it’s the gpt2, but just to be sure, type:
grub> ls (hdX,gpt2)/boot/grub
unicode.pf2 ...
If the command says unicode.. it’s the correct gpt; try other gpts otherwise. Now find your UUID of the partition, and annotate it.
grub> ls -l (hdX},gpt{X})
        Partition hd2,gpt2: Filesystem type ext* 〈...snip...〉 UUID e86c20b9-83e1-447d-a3be-d1ddaad6c4c6 - Partition start at [...]
Now we cant set the parameters to GRUB to boot (use the tab key to use autocomplete):
grub> set root=(hd{X},gpt{X})
grub> linux /boot/vmlinuz〈...tab here!...〉.efi.signed root=UUID=〈the UUID〉
grub> initrd /boot/initrd〈...tab here!...〉
grub> boot
This should boot your Full Kali Installation using the Live GRUB. You could differentiate from Live environment by the password it recognizes during the login process.
Fixing the EFI partition
Once you’re logged in in your Kali installation, open the Terminal and type:
$ fdisk -land find your drive.
Now, open gdisk (installed by default on Kali) to partition the drive (be very careful here):
$ gdisk /dev/sd{X}
GPT fdisk (gdisk) version 1.0.1

Partition table scan:
  MBR: hybrid
  BSD: not present
  APM: not present
  GPT: present

Found valid GPT with hybrid MBR; using GPT.

Command (? for help):
Print the partition table and confirm that the first partition has type EF00:
Command (? for help): p
Disk /dev/sdd: ...

[...]

Number  Start (sector)  End (sector)  Size     Code   Name
   1         2048         1050623  512.0 MiB   EF00   EFI System Partition

[...]
Now we have to:
- delete that EF00 partition
- create a new HFS+ once in its place
Command (? for help): d
Partition number (1-3): 1

Command (? for help): n
Partition number (1-128, default 1): 1

Just leave defaults values in the sector phase

Current type is 'Linux filesystem'
Hex code or GUID (L to show codes, Enter = 8300): AF00
Changed type of partition to 'Apple HFS/HFS+'

Command (? for help): w

Final checks complete. About to write GPT data. THIS WILL OVERWRITE EXISTING
PARTITIONS!!

Do you want to proceed? (Y/N): Y
OK; writing new GUID partition table (GPT) to /dev/sdd.
Warning: The kernel is still using the old partition table.
The new table will be used at the next reboot.
The operation has completed successfully.
Now we have an unformatted HFS+ partition. To format, we need some tools; but to obtain these tools we need to add the Debian source-list to apt.
$ echo "deb http://ftp.debian.org/debian unstable main contrib non-free" > /etc/apt/sources.list.d/debian.list
$ apt update
$ apt install hfsprogs
We can format that partition:
$ mkfs.hfsplus /dev/sd{X}1 -v Kali
Initialized /dev/sd{X}1 as a 512 MB HFS Plus volume
Now we have to edit the /etc/fstab file:
$ gedit /etc/fstabThis will launch Gedit. In this file, localize these lines:
# /boot/efi was on /dev/sd{X}1 during installation
UUID={XXXXXXX} /boot/efi vfat defaults 0 1
and delete them.
Now, unmount the boot partition, localizing it using:
$ mount | grep /boot/efi
/dev/sd{Y}1 on /boot/efi ...
$ umount /dev/sd{Y}1
Then run this to add the necessary entries to your fstab file:
$ echo "UUID=$(blkid -o value -s UUID /dev/sd{X}1) /boot/efi auto defaults 0 0" >> /etc/fstabNow we have to reinstall GRUB so it can use the newly formatted HFS+ partition for its EFI data:
$ mkdir -p /boot/efi/EFI/Kali

$ echo "This file is required for booting" > /boot/efi/EFI/Kali/mach_kernel
$ echo "This file is required for booting" > /boot/efi/mach_kernel

$ grub-install --target x86_64-efi --boot-directory=/boot --efi-directory=/boot/efi --bootloader-id=Kali
We then need to “bless” the bootloader code, so that the Mac bootloader will boot it. To do that we need hfsbless binary that is not available via apt. No problem, just clone the repository and build:
$ cd /root
$ git clone https://github.com/detly/mactel-boot
$ cd mactel-boot
$ make
Then bless:
./hfs-bless /boot/efi/EFI/Kali/System/Library/CoreServices/boot.efiThe final step is to create the grub configuration:
$ sed -i 's/GRUB_HIDDEN/#GRUB_HIDDEN/g' /etc/default/grub
$ sed -i 's/GRUB_TIMEOUT=10/GRUB_TIMEOUT=0.1/' /etc/default/grub
$ grub-mkconfig -o /boot/grub/grub.cfg
Perfecto! Now reboot and you should see your USB stick in the Mac bootloader by pressing ALT.
Virtualizing the USB via Virtualbox
If you ever need to boot this USB stick via Virtualbox (on Mac OSX), there is a simple trick to do that.
First of all, you’ve to create a VMDK disk that points to the sectors of your USB stick. So, let’s identify that disk:
$ diskutil list
/dev/disk0 (internal):
   #:                       TYPE NAME                    SIZE       IDENTIFIER
   0:      GUID_partition_scheme                         500.3 GB   disk0
   1:                        EFI EFI                     314.6 MB   disk0s1
   2:                 Apple_APFS Container disk1         499.3 GB   disk0s2

/dev/disk1 (synthesized):
   #:                       TYPE NAME                    SIZE       IDENTIFIER
   0:      APFS Container Scheme -                      +499.3 GB   disk1
                                 Physical Store disk0s2
   1:                APFS Volume Macintosh HD            222.0 GB   disk1s1
   2:                APFS Volume Preboot                 22.4 MB    disk1s2
   3:                APFS Volume Recovery                519.9 MB   disk1s3
   4:                APFS Volume VM                      3.2 GB     disk1s4

/dev/disk3 (external, physical):
   #:                       TYPE NAME                    SIZE       IDENTIFIER
   0:      GUID_partition_scheme                        *32.0 GB    disk3
In our case, it is /dev/disk3. Let’s unmount before proceeding:
$ diskutil unmountDisk /dev/disk{X}With VirtualBox installed, run:
$ sudo VBoxManage internalcommands createrawvmdk -filename ~/Kali.vmdk -rawdisk /dev/disk{X}
$ chmod 777 ~/Kali.vmdk
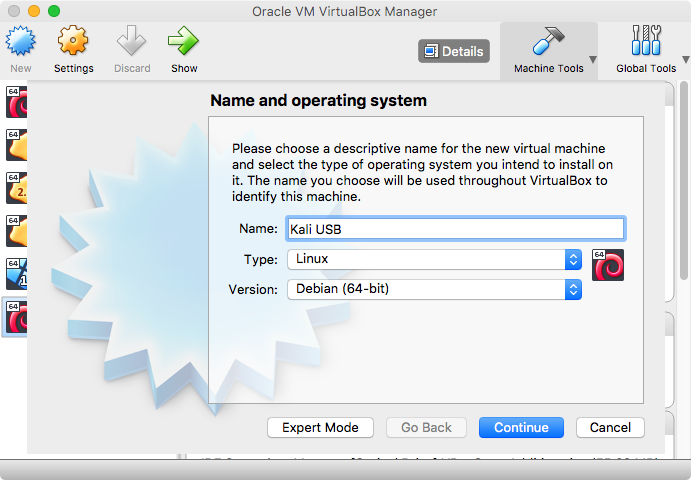
$ chmod 777 /dev/disk{X}Perfecto. Now, run Virtualbox UI and create a new machine with the following settings:
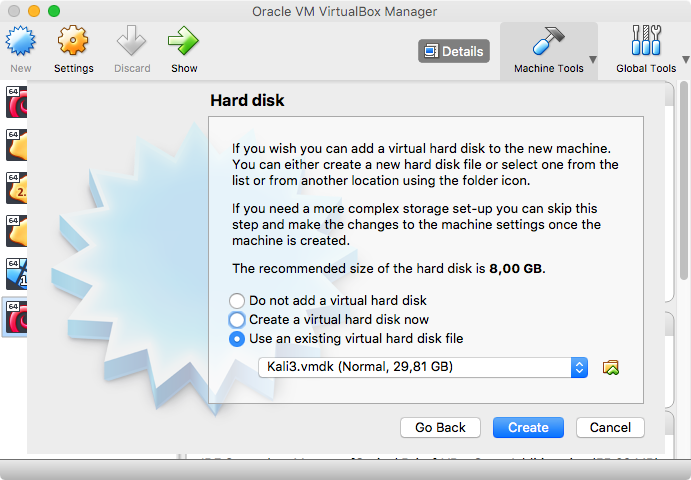
When VirtualBox asks you for a disk, let’s point to that VMDK created before:
Before starting up the machine, let’s go to Settings and adjust your process counts, video and memory.
The important things are to set Enable EFI under System > Motherboard.

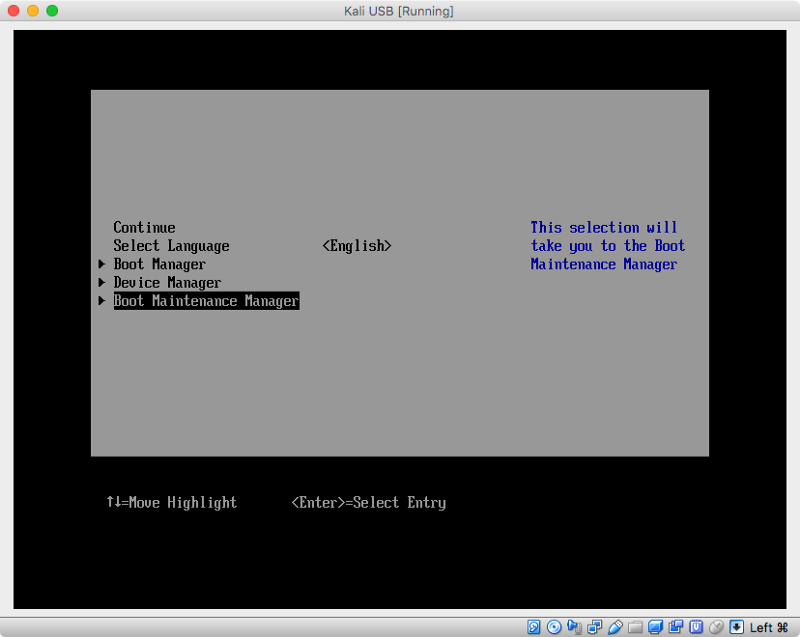
This will allow you to boot via EFI. Now start the virtual machine and immediately press F12.
Select Boot Maintenance Manager:
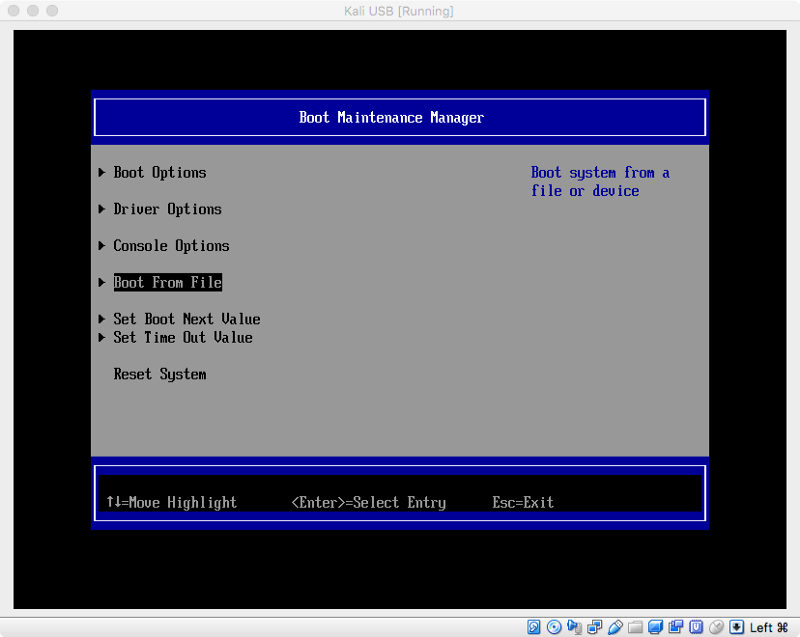
Select Boot from file:
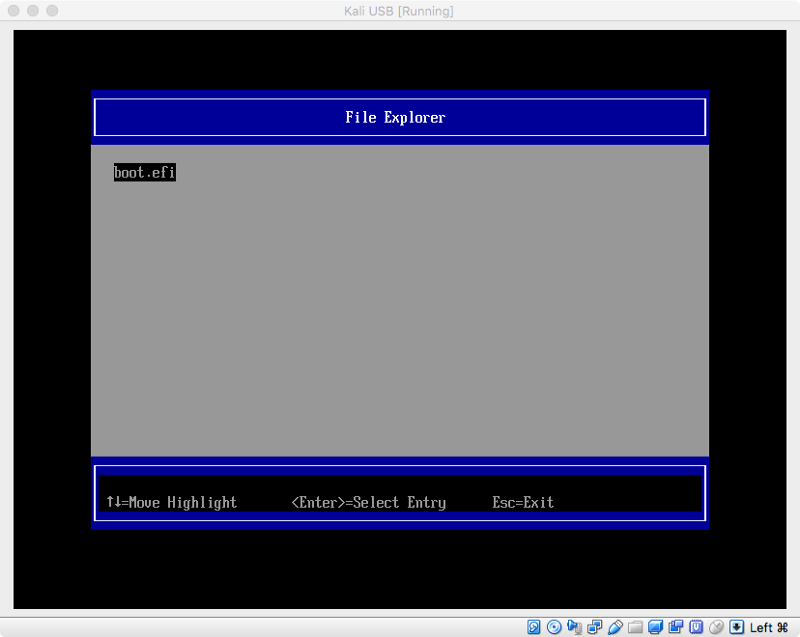
Then select {SATA_DRIVE} > EFI > Kali > System > Library > CoreServices > boot.efi
And, voilà:
Stay tuned :)