
by Ashish Nandan Singh
What is the DOM ?
DOM stands for Document Object Model. It’s nothing more than the block level diagram of all the HTML elements loaded on the page when a browser loads a web page. It is presented as a tree of objects which are HTML elements. Look at the image below and you may get a better idea.
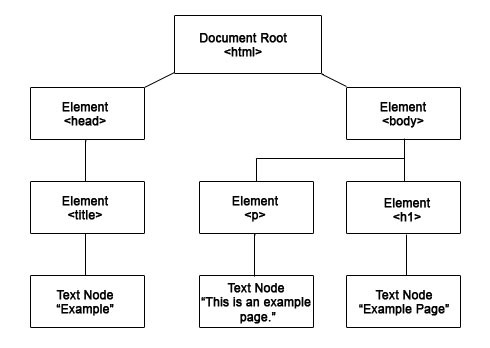
A nice clean block diagram of your ugly .html file — isn’t that great! But now you are thinking, how does this help me? What’s the use case? Why do I need to know this?
To put it simply, the DOM enables you to bring dynamics to your static website. With the use of the DOM, you can do a bunch of useful things on the webpage like:
- adding and deleting HTML elements and attributes
- adding and deleting CSS rules on a user fired event
- creating new events for synthetic user events
And this is exactly what you will learn throughout the course of this article.
To give you an idea of what we will achieve by the end of this article, check out this link.
Getting started
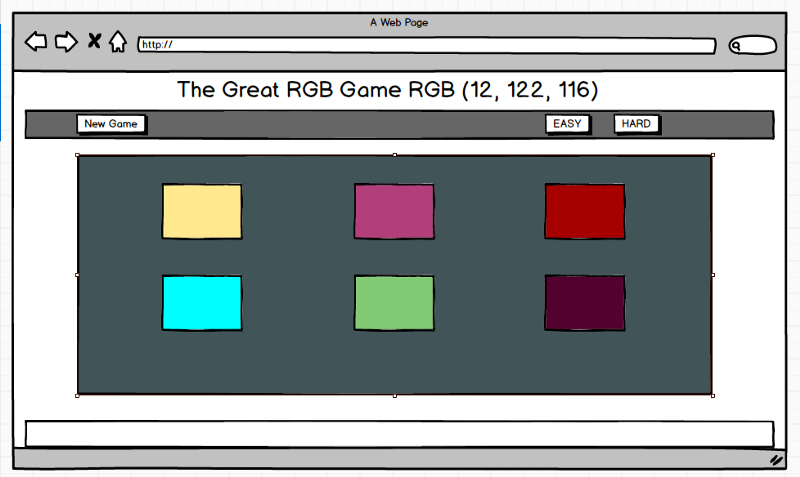
We will build a simple color guessing game. Every time the game is started, a random RGB color code will be selected. Depending on the mode of the game, we will have three (easy) or six (hard) options or color blocks on the screen to choose from. Every time an incorrect color block is selected, the block will disappear until the user selects the correct color (or its the last option left).
Here’s a rough diagram of what we would be building:
This is something I learnt while I was taking a course from Colt Steele, phenomenal trainer when it comes to teaching basic concepts. You all should check out his videos on Udemy’s YouTube channel.
Part 1
We’ll start by creating a simple web boiler plate, which will be compromised of index.html, app.css, and app.js files. Let’s see how these files look when we’re starting out.
But first, please note: just to keep it simple for anyone who is reading this without any prior development experience, I will keep showing the source code whenever we change something major.
- index.html
<!DOCTYPE html><html><head><title>Color Game</title><link rel="stylesheet" type="text/css" href="app.css"></head><body><h1>The Great<br><span id="colorDisplay">RGB</span><br>Color Game</h1><div id="stripe"><button id="reset">New Colors</button><span id="message"></span><button class="mode">Easy</button><button class="mode selected">Hard</button></div><div id="container"><div class="square"></div><div class="square"></div><div class="square"></div><div class="square"></div><div class="square"></div><div class="square"></div></div><script type="text/javascript" src="app.js"></script></body></html>This is as simple as it gets. We can simply segregate the entire webpage in three primary blocks.
First we have the header section, which has the text and may contain some other information if you want to add it in there.
Next is the control panel, which has buttons to reset the game and to switch between the game modes.
Third — and the most interesting part — is the main game area, which has six divs. These divs serve as the options for every random RGB color code which can be selected by some fancy logic (which we will see in a while).
- app.css
body {background-color: #232323;margin: 0;font-family: "Montserrat", "Avenir";}h1 {text-align: center;line-height: 1.1;font-weight: normal;color: white;background: steelblue;margin: 0;text-transform: uppercase;padding: 20px 0;}#container {margin: 20px auto;max-width: 600px;}.square {width: 30%;background: purple;padding-bottom: 30%;float: left;margin: 1.66%;border-radius: 15%;transition: background 0.6s;-webkit-transition: background 0.6s;-moz-transition: background 0.6s;}Some basic styles have been added for the body, text, and squares that serve as the game options.
- app.js
var numSquares = 6;var colors = [];var pickedColor;var squares = document.querySelectorAll(".square");var resetButton = document.querySelector("#reset");var modeButtons = document.querySelectorAll(".mode");We have stored all the HTML elements in the form of variables. This will help us perform some actions by adding events to each of these variables, and by calling them inside various logic functions we will create during this article.
In fact, let’s break each of these variables down and see what their significance is:
- The numSquares variable stores the number of squares that will be available in the game as per the mode. For simplicity’s sake, I have hard coded the value to be six always — we can come back to this and add some logic to keep it changing.
- colors is an empty array which contains the random six or three RGB color code generated every time the game is reset or the mode is changed.
- pickedColor is the color/option block selected by the user upon every click.
- squares is an array of all the squares on the page that are available as options. This array may have three or six elements depending on the mode of the game.
- The reset variable is the “new game” button in the control panel.
- modeButtons is again an array which has easy and hard mode buttons in it.
If you have followed up to this point, here you should have a pretty basic version of this game. You may open the index.html file in any browser and check it out. All right, so now that we have the ground set, let’s get to the serious stuff.
Part 2
In this section, we will mostly be working with the JavaScript file and a few times with the CSS file.
Generating random colours
Our first goal will generating random colors every time the game is started or restarted or the mode is changed. Let’s see how can do that.
To understand the underlying principle of generating anything randomly, we should start with a hard coded array of six RGB color codes. Let’s try to set those colors as the background colors of the six squares/options available on the webpage.
var colors = [ "rgb(255, 0, 0)", "rgb(255, 0, 255)", "rgb(255, 225, 0)", "rgb(255, 0, 255)", "rgb(0, 255, 255)", "rgb(0, 255, 0)"];var squares = document.querySelectorAll(.squares);for (i=0; i<squares.length; i++) {squares.style.backgroundColor = colors[i]}- I added six static RGB color codes to the color array
- I used the already created squares array to run a loop across all the squares present in the array.
- I matched the background color of each square to its corresponding index in the colors array.
If you add this to the app.js file and you refresh the browser, you will see that each square is now a unique color.
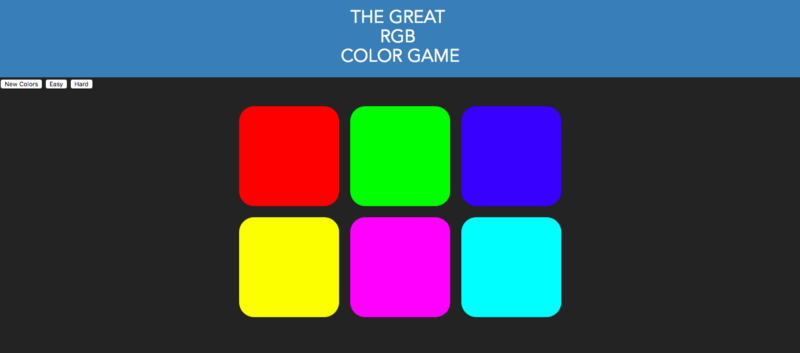
You might notice that the buttons are not yet styled, but leave that for now. We will come to that part later on.
Enable Click Functionality
So all we need is event listeners enabled on each option/color block listening for click events. The easiest way to do that is — again you guessed it right — by looping through the array of squares. This loop would look similar to that which was used to style the background of the color blocks. Let’s take a look at the code:
for(i=0; i<= squares.length; i++) { squares[i].addeventListeners('click', function() { alert('option was clicked'); });}Now every time you click on any block you will get this alert message from the browser. That was easy! Now our options are receptive, and they are responding to user input. All we need to do now is define the logic that tells what happens if the color picked by the game and that chosen by the user are the same.
By now you may already have the solution if you have paid attention to the above parts carefully. So let’s see how we can do it.
Checking if the color is correct or not
Let’s explore the possibilities we have with our options/color boxes being receptive and responding back. We can conduct a small test and see if the two colors match or not. Very soon we will have randomly generated colors every time we refresh the page or every time we reset the game or change the mode of game. But for now, we will practice with the set of six RGB color codes we have assigned in the file.
Let’s look at some code and then I would break it down for you.
for(i=0; i<= squares.length; i++) { squares[i].addeventListeners('click', function() { //if correct block is clicked do something.... //if wrong block is clicked do something.... });}As you already may know, we will be using a simple if-else block.
pickedColor = colors[3];for (i=0; i <= squares.length; i++) { //apply background colour to all the squares... squares[i].style.backgroundColor = colors[i] //enable click event on each square..... squares[i].addEventListener('click', function() { //if the user selected the right colour.... var clickedColor = this.style.backgroundColor; //check if the selected colour matches the default colour... if(pickedColor === clickedColor) { changeColors(pickedColor); } //if the user user selected wrong colour.... else { this.style.backgroundColor = "#232323"; messageDisplay.text = "Wrong Choice!"; } })};I know — it’s a lot of code. But let’s see what it really means:
- We start with defining what the default color picked by the game will be, with the variable pickedColour.
- Then we run our for loop which lets us go through the array of color blocks/options.
- Then we enable the click events on each and every color bock/option. We do this using a callback function. This function does nothing but select the background color of the selected color block/option simply by assigning it to the variable called clickedColour.
- Now we have both colors: one that was selected by the game and the other by the user. All that’s left is to match and see if the choice was correct or not.
- We can do this easily using the if else block. If the choice is correct, then do this, or else do something else
- If the correct color is selected, we add some text on the page to confirm the correct choice and add some visual effect to reconfirm. Else we match the color of that particular color option/block to match the background color of the page. This produces an effect as if the color block/option just disappeared.
- Now you have seen that if the same color is selected, then a function is executed. Let’s see what that function is made up of:
function changeColors(color) { for (i=0; i <= squares.length; i++) { squares[i].style.backgroundColor = color; messageDisplay.text = "You are good at guessing!"; }}This function goes through the array of color blocks/options and resets the background color to be that of the selected color or the default color.
In case the colors are not the same, we simply set the current selection’s background color to be that of the webpage.
else { this.style.backgroundColor = "#232323"; messageDisplay.text = "Wrong Choice!";}Alright now that we have the main game set, we just need to worry about minimal design issues and adding the functionality into the control panel.
But first let’s look at what the code folder looks like at this point if you have followed all the steps correctly:
index.html
app.css
app.js
Step 3
All is well. But now we need to create new randomly generated RGB color codes in our game that are not the same set of colours that would be assigned in the color blocks/options.
If that makes you think about functions, then that’s the right choice. We will be creating a new function along with totally random (new) color codes, and we will assign them to the colors array. Then we’ll fetch them in the color blocks/options array.
Let’s see what the code looks like, and then we’ll go through it line by line.
A built-in method in JavaScript helps us generate a random number between 0 and 1. Then we make some manipulations to make sure that the range of that random number stays between the digits 0 and 255.
- First we implement Math.random, selecting any random number between 0 and 1, then multiply the number by 256 since we don’t want the number to be any bigger than 255. Once we have a random number, we use Math.floor and make sure that we only have the digit before the decimal values (a whole number).
- We assign these random numbers generated to variables called r, g, and b. Each signifies its own respective RGB number for the color code.
- Lastly, we add up all of these numbers or variables to form a string. We return the string so it looks something like this: rgb(23, 45, 112).
- All that’s left to do is to run this function depending on the mode of the game, and generate three or six random RGB color codes and assign them in the colors array.
But this will only return a string which looks like an RGB code. How will this be added to the array of colors we have? How will a random color be selected every time the game is started or reset?
To accomplish both of these things, we’ll create a couple of more functions and see how they help us solve this issue.
Select a random colour from the array
To do this, we will create a new function called pickColor(). Let’s see how the function will look, and then we will break it down.
function pickColor() { var random = Math.floor(Math.random() * colors.length); return colors[random];}As simple as it can get, let’s see what these two powerful lines do for us.
- As we have already seen with the magic of Math.random and Math.floor, we use the same function to get a random number generated between 0 and the length of the array.
- Next, we get the corresponding RGB code in the colors array by using the random number in the index
Add six (or three) random RGB codes in the colors array
To do this, we use the above two functions, which are randomColors() and pickColors(). What the randomColors() function does in particular is that it runs the randomColors() function six or three times (depending on the mode of the game) and adds the corresponding number of RGB color codes to the colors array. We will name this generateRandomColor(num*) function. Let’s see how the code looks and break it down line by line.
*num will be decided on the basis of the mode of the game.
- First we’ll make a simple empty array
- Next we run a loop as per the mode of the game
- Every time this loop gets executed, a new RGB code is pushed into the array created
- At last we return this array
Now after all these new functions and all this code manipulation, our code base for app.js has changed quite a bit. Let’s see what it looks like now:
Reset Game
After almost setting up the primary logic, this may look like a cake walk. It’s all about creating a function and letting that function do its job against any given user input (in this case, a click of the reset button).
All we want with the reset button is
- generate a set of six random colors
- pick a random color out of the new created colors array.
Let’s see how the pseudo code would look:
function reset() { //create a new array of 6 random colors //pick new random color //fill the squares with new set of generated colors}I strongly recommend writing pseudo code while solving complex problems. This habit of writing pseudo code has helped me save a lot of time whenever I’m stuck on complex algorithmic challenges.
Alright, coming back to our reset button: let’s see how the actual function would look:
Let’s break it down line by line:
- We start with adding the event listener for the reset button. We then fire a callback function which does a bunch of things when the click event is fired.
- When it’s fired, we start by generating a new array of six random colors.
- Then we pick a random color.
- Lastly, we reset the background color for all the color blocks.
This is what the updated app.js looks like after all the edits we have made:
This looks pretty good for now! I am not adding the functionality for setting up the mode in this article, as it is already getting to big and I don’t want to bore you all :). But if you liked all of this, I will be more than happy to write another article covering the rest.
Here’s the link for the GitHub repository where the final optimized code can be found.
I hope this article inspires a few of you to learn more about DOM manipulation and this beautiful language of JavaScript. Until the next time!