by Yazed Jamal
Let’s build the Dig Dug game using MelonJS

Recently I had the chance to watch Stranger Things Season 2. After watching it, I was very excited to see one of my favorite game during my childhood, “Dig Dug”, featured in the series. At the same time, I was searching for a game that I could build to practice my game development skills. So today I have decided that Dig Dug is the game.
This Dig Dug version is not a complete version. It is only the basic mechanism of the game, which can be expand to a full working Dig Dug version later on.
MelonJS is the chosen framework, not because of any particular reason. I just picked it randomly from the many frameworks out there.
Below are the steps that I will go through for this game development:
- Setting up the framework
- Creating the ground
- Creating the digger
- Creating the Monster
- Creating the collision logic
- Adding Head Unit Display
- Adding sound effects and background music
- Adding the Intro screen
- Final adjustment
- What’s next
Step 1 — Setting up the framework
MelonJS recommends using the boilerplate provided by them, to start a game development. First, I need to download the boilerplate from GitHub.
I am going to clone the boilerplate to my local directory of choice:
#terminalgit clone https://github.com/melonjs/boilerplate.git mylocalfolderThen I will need to setup my own remote repository for the game by using this guide. It is also advisable to go through their tutorial to familiarize yourself with the usage of the framework.
Next, I will need to download the game assets provided by MelonJS on their tutorial pages. This may be useful if you need some images or tiles and have no time to design and create them. These assets can be downloaded on either of the MelonJS tutorial pages here and here.
Now I would like to discuss a bit about some important skeleton files provided in the boilerplate. MelonJS is using the Jay Extend inheritance library. So I need also to familiarize myself with the files.
js/game.js:
Here is the global namespace of my game which happens to be defined as game (which can be anything I like).
From lines 1 to 8, I can define any information I require as an object.
Then from lines 12 to 25 is where I can setup the resolution of the game, how the screen behaves, and load all the game resources like image and sounds.
I need to change some details, like the screen resolution and scale method for the game performance on line 14.
Lastly, lines 28 to 37 is when the game will run everything.
js/screen/play.js:
This file will be loaded by game.js which handles the play screen.
From lines 5 to 13, all the execution happens when the game starts. This is where I will specify to render all the game entities later on.
But, lines 18 to 21 is where all the entities will be removed. I will be going to edit these two files a lot along the way.
So before creating any other object, I need to install all the npm libraries required by running the command below:
#terminalnpm installand I need to install grunt-cli which is required:
npm install -g grunt-cliFinally, to run the game, I can execute the command below and get to the local server to see the game running:
grunt serveFor now I can only see a black blank screen when the game is running.
Step 2 — Creating the ground
After knowing a bit about the boilerplate provided, now is the time to create my first entity, the ground. There are several types of objects that I could build from this framework.
So because this ground will collide with the digger and the monster in the game, I need to create an Entity object for the ground. The ground is the object where the game takes place and which the digger needs to dig out for the digger to pass through.
Originally, the ground is a small 15 x 15 pixel square drawing which can then be repeatedly rendered on the screen to make a larger area. I could use a software called Tile Map Editor for this purpose, but for this game I will be doing it manually.
So this is how I do it. First create a file in the js folder called ground.js. Then I will create a new object entity as below:
On line 2, I will crate a new object called game.Ground which extends from the Entity object provided by MelonJS.
On the next line, I will initialize the object through the parent object with all required arguments. This object will need x and y values as the location of the object.
The width and height is defined on lines 37 and 38.
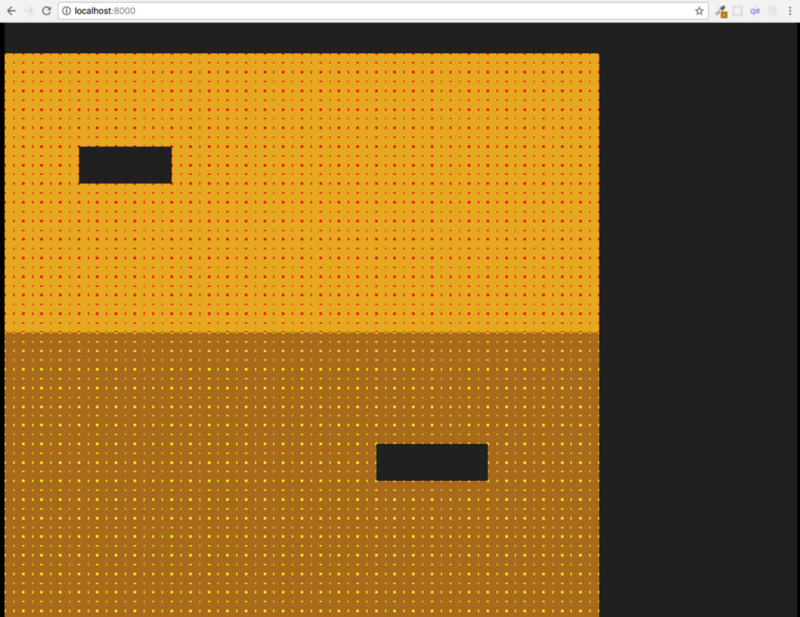
To render something, I can use an image sprite for this purpose. But in this case, I will make use of the draw function from the HTML5 Canvas. This was done in lines 9 to 28. Here I will program to draw a rectangle with polka dots in it. The color of the square and dots will be defined by the variables declared on lines 5 and 6, respectively.
On lines 30 to 35 is where the object’s update function is. Here I need to set the entity to update itself on line 32 each time the update function is called. And finally return a true value to make sure the entity is redrawn each time the game is updated.
In the next step, I will need to make a reference to this file on the index.html file on line 40 and:
register the entity to the pool in game.js on line 33. I will not need the code previously in game.js which registered the game.PlayerEntity because I will create the player entity manually later.
Since the ground needs to be drawn quite a few times, it is good for me to create a container for all the ground which will handle all the work. To create a container, I will need to create a new object and extend the container object provided by MelonJS.
I will name this container game.LevelManager.
As before, I will need to initialize the arguments. Define the name of this object, and define the data that will be used to place all the squares on the screen at lines 2 to 21.
Then I will create a custom function that executes the rendering work based on the data on lines 24 to 37. On line 30 is how I add the square to this container, and after all squares are rendered I need to update the container boundary area in line 36.
Finally, I will need to render the container on the play screen, so everything under this container will be rendered as well.
Before doing that, I will need to create an instance of the levelManager object at lines 9 to 11 below:
I also need to remember to always make a reference to the new object created in the index.html file.
Now if i run the server, I should get a view like this:
Step 3 — Creating the digger
First I will need an image sprite for my digger. At first I was going to use the game assets provided by MelonJS, but luckily my son created a pixel image for me to use for the digger:
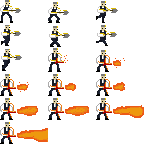
I then need to place this image in the data/img folder of the boilerplate directory. When I run the server now, Grunt will automatically build and append the resource file in build/js folder with the image data above.
To create the Digger object, I will again need to extend the Entity object.
I will create a new file called digger.js in the js folder and make the reference in index.html.
In line 3, I load the image from the resource file I made earlier and assign it to a variable. On line 5, I initialize the object with the required arguments and settings. For the digger, I will assign the image with the image defined earlier.
Next, on line 12, I flip the sprite when it is rendered the first time.
I will also need to make the gravity to 0 in line 13 because this is not a platform game which requires gravity for the character to act properly. In this case, the digger will be floating.
In line 14, the velocity of the digger is initialized so it can be moved later. I define the collision type for this entity for the use of the collision logic later on.
From lines 17 to 22, I define and manage the sprite animation. The numbers in the array of the addAnimation function are to determine which particular frame in the image is to be used for the animation. The number next to it is to define the speed. Finally, I set up the initial animation to be used when the play screen starts.
Now I will need to define the digger movement. I notice in the original Dig Dug game that each time the digger turns up or down, it will always rotate its character appropriately base on the ground. I need to take note of this to implement it properly in my digger. This will be quite a long section of code.
I discover that in order for the digger to act properly each time I rotate the sprite, I will need to adjust the boundary of the entity and also the shape of the collision box.
Initially the digger sprite is 48 x 24 in size. This is because of the picture of the digger firing its weapon. However, during normal movement, I will only need the digger to be 24 x 24 in size.
This is handled by changing the collision shape initially to be 24 x 24 and having it transform to 48 x 24 when the digger fires its weapon, at lines 17 to 19 below:
From lines 28 to 33, I define several boolean flags that I will use in the movement function.
Starting on line 36 is the digger update function which also contains the digger movement logic based on the keyboard input from lines 40 to 134.
In this logic, I need to consider a lot of things like what happens when the movement key is pressed or released, the last position of the digger before a direction or fire button is pressed and released, and the different state of animation required. It is not a complex function, but the logic is a bit lengthy (although basically straightforward).
From lines 143 to 283 is the movement function for up, down, left and right.
To render the digger to the screen and make the movement possible, I need to add the digger object to game.world container at line 12 and register the keyboard key from lines 19 to 23 for the movement in play.js below. I will also need to unbind when the game leaves the play screen for other uses if required at lines 30 to 34.
If I run the server now, I can see the digger in action and move him up, down, left and right.
However, I can see a trailing image when the digger is moving, as well as the line of the MelonJS startup image.
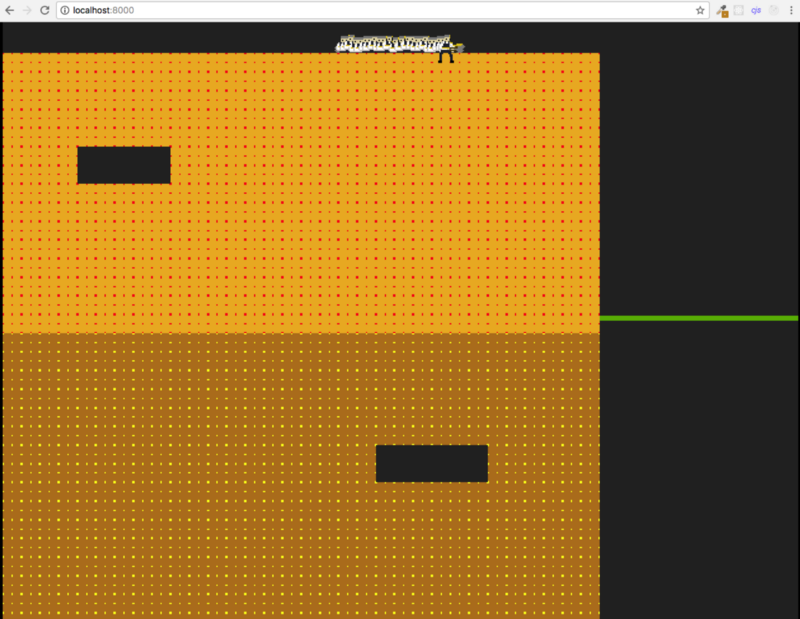
The trailing image is because of the drawing executed each time the game loop updates. This can be solved by adding a layer of drawing before each time the digger is redrawn at line 12 below:
Step 4 — Creating the Monster
Done with the digger for now, I will create the monsters next. It will be basically the same process for the monsters. I will need to create an object Entity for the monsters, add the monsters to the levelManager container, and finally render it to the screen.
Below is the object Entity for the monster:
I will first initialize the object on lines 5 to 9. This time, I will just use a sprite provided by MelonJS from it’s platform game tutorial which I modified to add more frames below.
This sprite needs to be in the same folder as the digger sprite:

Then I name the object on line 11, define the collision type on line 12, reset the collision square and make it smaller at lines 14 to 15, and set velocity and gravity of the monster at lines 17 to 18. I also define the animation group to be used before setting up the initial animation to be used on lines 20 to 22.
Next, I define a function for the monster’s movement. It is a very basic movement algorithm manipulating the object’s velocity value X for horizontal movement and Y for vertical movement on lines 26 to 43. Finally, I create the object’s update function which will contain only the body update for now on lines 45 to 52.
Before proceeding any further, again I need to always remind myself to make a reference in index.html and a registration in game.js for any new entity object created.
After creating the object, I will need to update the LevelManager container to include the monster’s data and also the creation function.
Below is the updated code:
From lines 21 to 28 is the data for the monster’s location. The function for the monster creation or adding to this container is added on lines 48 to 56. Lastly, to make it appear on the screen, some lines need to be added in play.js.
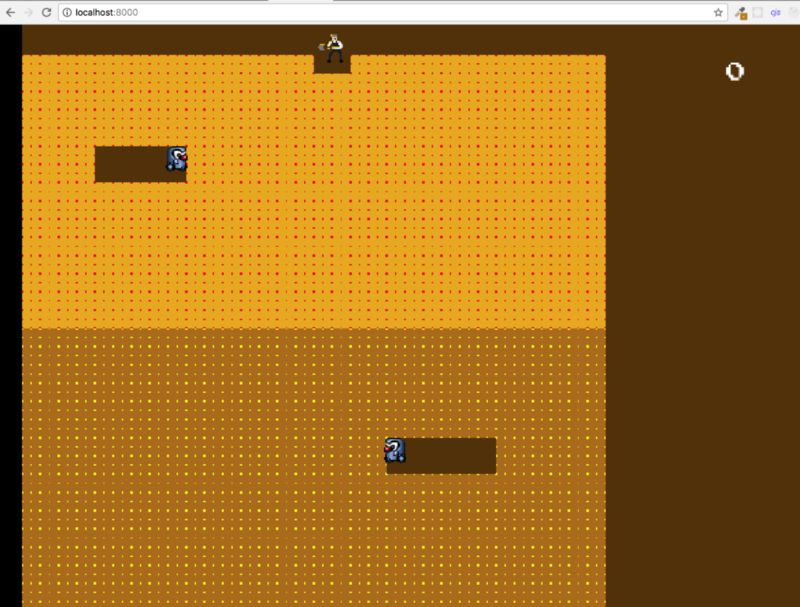
Below is the addition on line 11 which calls the function to create all the monsters:
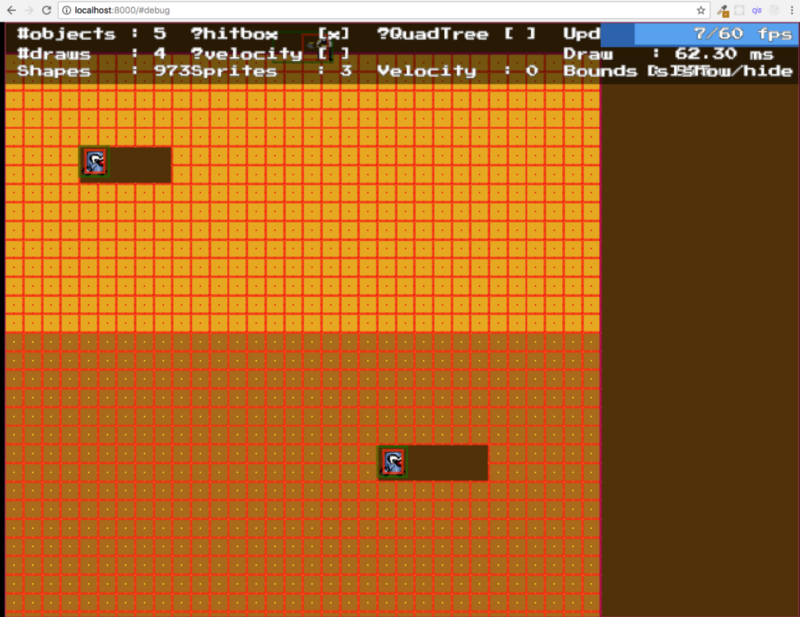
Now if I run the server, I can see two little cute monsters appear on the the specific location on the screen. At the moment they will not move.
Part 5 — Creating the collision logic
I will start with the digger collision logic with the ground and the monster. In order for the framework to check for any collision on the entity object, I need to include the collision check method in the update function. After that, now I can include the onCollision function which provides the information about the specific objects that are colliding together.
Below is the updated digger object codes:
In line 138, the code check for any collision occurs for this object.
In lines 144 to 166, a function provides a response when the objects collide. When the digger collides with the ground at lines 147 to 150, the specific ground entity will be removed from the levelManager container.
However, I don’t want the ground to disappear when the digger is firing its weapon, so I put an exception on line 148.
Next is the logic for collision with the monsters. If the digger collides with a monster while firing its weapon, the monster will flicker and be removed. Other than that the digger will flicker, be removed, and the game will reset from lines 151 to 163. Returning true in the collision function will make other objects that collide with the digger solid. In other words, the digger will not pass through another object during collision. For this case, I want it to return false.
To finish this up, I will then create the logic for the boundaries. Currently, the digger is allowed to travel off the screen. To do this I will define the maximum distance the digger is allowed to travel on the x and y axis in the object init function at lines 16 to 17 below.
Then in the update function, I will set the boundaries by using the built-in clamp method at lines 105–106.
Now for the monsters. After making the collision check on monster, I need to define the collision logic with the ground and also the boundary. This logic must also include some sort of Artificial Intelligence (AI) for the monster to chase the digger.
The monster will not able to dig the ground, so it will bounce to the direction where the digger is when it hits the ground or boundary. In order for the boundary collision to work, I need to define the maximum distance movement for the monster and set it up. I do not have to define the collision logic with the digger because it is already being handled by the Digger object. I also made the monster move to the right when the game starts.
Below is the latest Monster object:
From lines 138 to 159 is a function I defined that will be executed when the monster collides with the ground in the onCollision function. The logic is to make the monster move toward the digger when it hits the ground.
From lines 76 to 136 I defined a function that represents the monster collision logic with the boundary, which is called in the update function on line 57.
Whenever the monster is not hitting the boundary, it will always check the digger’s location and move towards it. Then if the monster hits the boundary, it will turn toward the digger and continue chasing it. I did not come up with the AI algorithm myself — it is a combination from scripts I found on the internet with my own. Also in this function, I am required to access the digger’s object properties like the X and Y position. To gain this access, I need to make some changes on how the digger is rendered to the play screen.
On line 13 I declare a game property that represents the registered digger from the pool before adding it to the play screen. This property will be used to access the digger properties inside the monster object.
Finally, I will include the code that will reset the game if all the monsters collided with the digger in firing mode. In other words, if the digger manages to killed all the monsters. This checking will be done in the levelManager container.
I will check the array containing all the monsters from lines 60 to 62. If the array is empty, I will reset the game.
But before that, I must also create a boolean flag at line 56 which will confirm that the monster is already created when I start the game. If not, the game will keep on resetting before the monsters can be created.
Step 6 — Adding Head Unit Display
First I need to create a font folder in the data directory:
data/fntthen use the font provided by MelonJS in the game assets downloaded earlier:
PressStart2P.pngPressStart2P.fntand put them in the new folder.
Then, I need to add some script in the gruntfile in order for it to generate the resource data for the font below on lines 22 to 28:
When I run the server, the font will be in the resource data:
By default, the Head Unit Display (HUD) object is already created in the boilerplate. I can access the file in js/entities/HUD.js. I just need to define the font added earlier and create a draw function for it.
Below is the updated code:
I define and initialize the font on lines 42 to 48, then I create the draw function which will render the game score on the specific location as defined on line 71.
Lastly, I will add a high score display and its logic. The logic is just saving and adding up the current score to the highScore property each time game resets. Either the digger kills all the monsters or the digger is killed.
First I created the highScore property on line 9:
Then, in the onCollision function of the digger I will increase the point each time a monster is killed at line 14 and add up the current points to the high score if the digger is killed at line 26.
I will also make a bit of an adjustment to what will happen when the monster hits the fire. I will make the monster stop moving, right after it hits the fire, to avoid any unnecessary collisions afterwards at line 11.
Step 7 — Adding sound effects and background music
Setting this up is a breeze. All the required code is already there in the boilerplate. What I’ll need to do is put the required music or sound file to the relevant folder and do something with the music.
Based on the original game when the digger moves, the background music will be played. A simple logic needs to be implemented so the background music will not try to start repeatedly when a direction key is pressed.
Below is the digger updated object:
On line 37 I create a boolean flag to be used in the movement and background music logic.
On lines 45 to 47 is the logic so that the background music doesn’t repeatedly start if a direction key is pressed continuously.
Respectively on lines 114, 200, 224, 249 and 288, the flag is set in order for the logic to work properly.
The background music was made to stop when the digger stops at line 115.
As for the other sounds, I also add a sound for the digger in firing mode and a pop sound when the monster dies. In line 69 I activate the sound when fire key is pressed, and stop it when the the fire key is released in line 140. The pop sound will be activated when the monster collides with the digger during firing mode just after it is removed from the screen in line 174.
Step 8 — Adding the Intro screen
First, I will open game.js and modify one piece of code. Instead of changing the game state to PLAY, I will change the state to MENU in line 40.
This will load the title.js file when the game is loaded:
Next I will edit the file title.js in js/screens folder:
Here, in the onResetEvent I play the background music when the screen appears in line 8.
Next, I cover the viewport with brown colored layer at line 10.
Then, I create a Renderable object which contains the title and some wordings from line 13 to 43.
This Renderable object will be scrolled upwards from outside to the middle of the screen using Tween at lines 22 to 23.
Finally I will need to bind the ENTER key to trigger an event which will start the game at lines 47 to 57.
Step 9 — Final adjustment
I will not do much for the final adjustment. I will just add another background sound to the monster and I will position the digger similarly to the original game. First I will add another Tween for the digger to move to the center of the screen when the game starts.
I will include the new sound file to the right folder then I will update the digger file.
I will declare a few more boolean flags to be used in lines 38 to 40, play the background music at the beginning of the game in line 30, and execute the initial digger movement by calling the defined function in line 29.
Below is the new function:
From line 4, I will define the Tween animation with a callback function which stops the background music, sets some flags for the logic, and moves the binding key registration here from the play.js to avoid any additional movement by any key press during the tweening.
Finally, below is the function to create the monster sound every 5 seconds. This function will be called in the update function of the digger object.
Step 10 — What’s next
Below are the items I could continue to develop for this game:
- Create the ghost version of the monster that goes through ground.
- Create a second and next level for the game.
- Create additional items where digger could gain more points.
- Create a local database with cookies where the game will remember the player’s high score.
- Refactor, refactor and refactor.
- Improve the game performance.
Thank you for reading until this end. If you have any more suggestion on the above list, feel free to comment on this post below.
The full code can be pulled from GitHub.
Feel free to try the demo of the game.
Notes: There are probably many ways to implement this feature, but this was easiest for me. Anybody is free to comment on any mistakes or improvements that I can apply. This guide is initially for me to learn and remember what I have done. Nonetheless anybody is welcome to follow this guide if you find it is helpful.