by rajaraodv
In this blog I’ll go over the steps to add Themes, Powerline, fonts, and powerline-gitstatus to make your regular Bash Terminal look beautiful and useful as shown in the picture above.
It turns out, if you are using Mac, you’ll need to jump through a lot of hoops to get this working as many instructions are for linux, or are out of date. So I thought I'd blog about it - hopefully it'll help you.
Notes:
1. Follow the steps carefully as any mistake will cause a lot of headaches.
2. This is for MacOS and for regular bash in the Terminal.app. I’m not using ZSH or Hyper in this blog — I plan to write different blogs for them.
3. My Versions: Mac High Sierra; git version 2.14.3 (Apple Git-98); Python 2.7.10
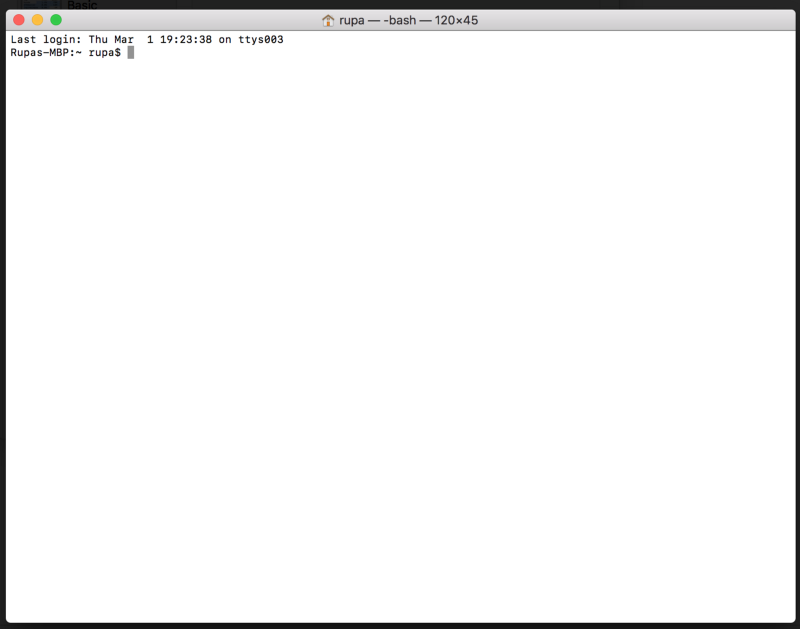
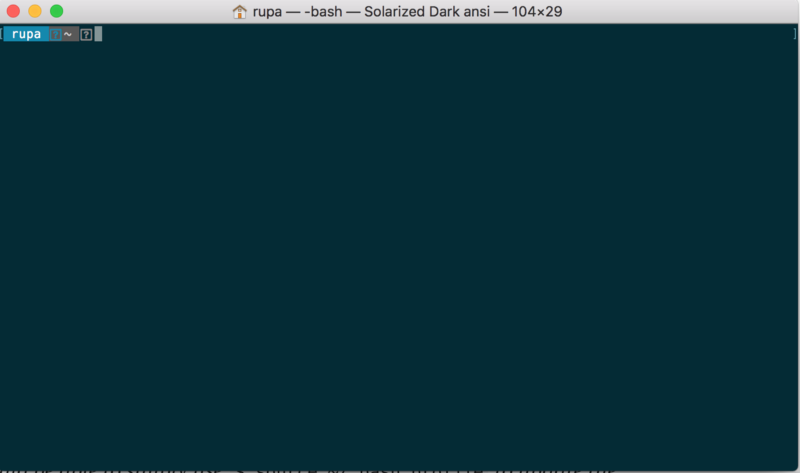
OK, by default, when you have a new mac, your Terminal.app will look something like below. Let’s go ahead and add Themes, fonts, and so on.
Step 1 — Add A New Theme
The first obvious step is to enhance the Theme. Terminal doesn’t provide all the cool and fancy themes that you see other developers use. Let’s download a Theme and add it to the Terminal.
In this blog, I’ll add Solarized-Dark theme to our Terminal.
Note: You can download various Themes (.terminal files) from this git repo. Simply open the*.terminalfile to install it, i.e.right-click on the *.terminal file > “open with" > Terminal
- Go to http://ethanschoonover.com/solarized
- Scroll down and download the Theme (solarized.zip)
- Extract the solarized.zip file
- Open the osx-terminal.app-colors-solarized folder. This folder contains Theme for the terminal.
- Double click “Solarized Dark ansi.terminal” file — This is the specific Theme file for Terminal.app. Note: If you get a warning that this is from an unidentified developer, Right-click on the file and select “Open with” > Terminal option.
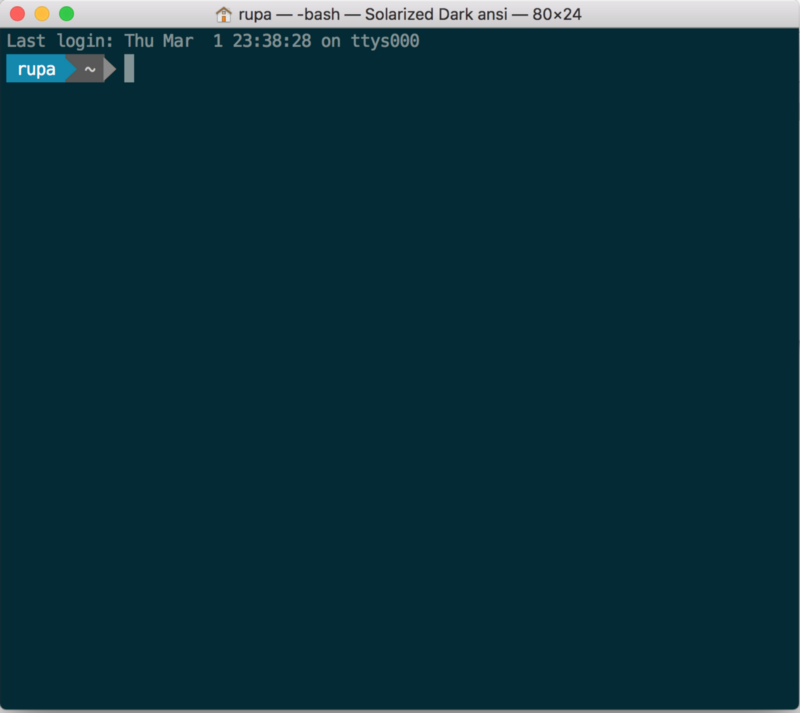
- At this point, you have the Theme installed into your Terminal. We just need to make it a default Theme.
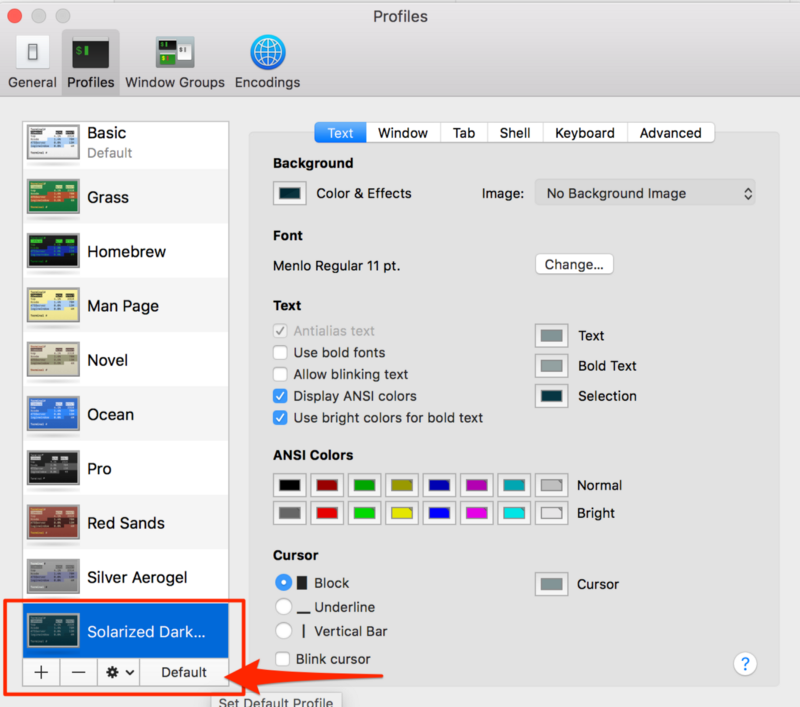
- Open Terminal > Preferences > Text and select the “Solarized Dark …” theme and click on “Default”.
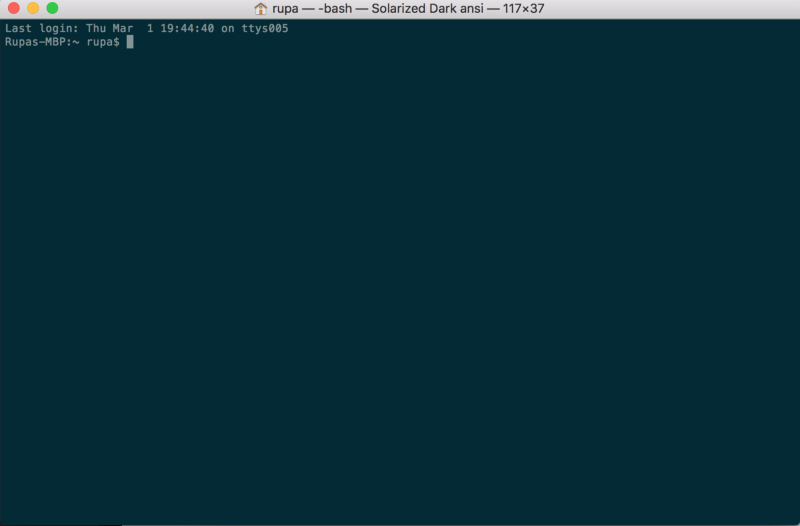
From now on, your Terminal should like below.
Step 2 — Install Powerline
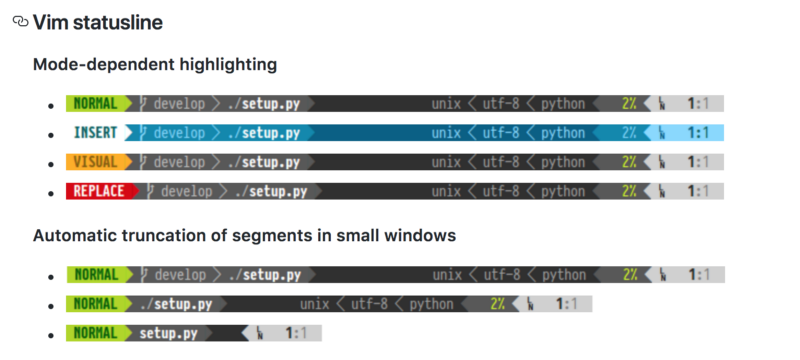
Powerline is a Python app and is a status line plugin for vim, and provides status lines and prompts for several other applications, including zsh, bash, tmux, IPython, Awesome and Qtile.
It makes the Terminal prompt look like below.
2.1 Install Python
Because Powerline is a Python app, we need to have Python and that too a proper version of Python.
- MacOS comes with Python installed already. Ensure Python’s version is 2.7.x by typing
python -Vin the Terminal. - If it’s not 2.7, install Homebrew that allows us to install various software from the CLI, by running:
/usr/bin/ruby -e "$(curl -fsSL https://raw.githubusercontent.com/Homebrew/install/master/install)" - Run
brew install pythonto install the latest Python via Homebrew
2.2 Install pip — A package manager for Python (similar to npm)
Install pip by running the following command
$ sudo easy_install pip
2.3 Install XCode Developer CLI tools
XCode Developer CLI tools are used by Powerline and other apps that manipulate core OSX features. So make sure to install the XCode CLI tools by running the following command.
$ xcode-select —-install
Note: The above command opens up Mac’s installer and installs the XCode Developer CLI tools. If it doesn’t work, try xcode-select -r to reset.2.4 Install Powerline
Finally, install the Powerline (stable version) via pip by running the following command.
$ pip install --user powerline-statusIf you want to install the latest development branch, then use:
$ pip install --user git+git://github.com/powerline/powerline //dev2.5 Add the Powerline daemon to bash
We now need to add the Powerline daemon to bash so that it can monitor the Terminal prompt and make changes.
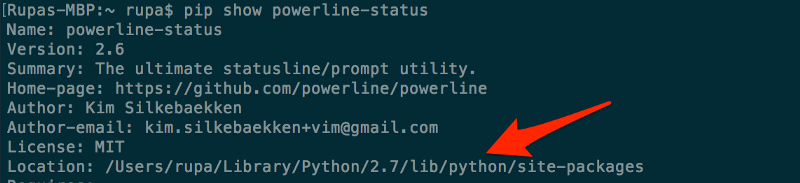
2.5.1 Copy the Powerline’s installation location
You can figure out the location of Powerline by running the following: pip show powerline-status Copy the value from the Location field.
2.5.2 Add the daemon with a proper location to .bash_profile
- Make sure you have
.bash_profilefile in your root directory. If not following create one by doing:cd ~ && touch ~/.bash_profile
2. Open .bash_profile and add the following:
export PATH=$PATH:$HOME/Library/Python/2.7/bin
powerline-daemon -q
POWERLINE_BASH_CONTINUATION=1
POWERLINE_BASH_SELECT=1
. /Users/rupa/Library/Python/2.7/lib/python/site-packages/powerline/bindings/bash/powerline.sh
Note: The location /Users/rupa/Library/Python/2.7/lib/python/site-packages/ is from the previous step (2.5.1). Change it to match your computer’s location.
2.5.3. Restart the Terminal
Completely quit the Terminal if it’s open (Terminal > Quit Terminal). And open it again.
You should be able to simply use$ source ~/.bash_profileto update the settings. But I got some oddpowerline-configfile is missing! Typically you get this error if you don’t have $HOME/Library/Python/2.7/bin in your PATH.
2.5.4 Your new Terminal
Your new Terminal should look like below. It should be using “Solarized Dark ansi” theme and should show Powerline in the command prompt. But also notice that there are “?” characters! This is because Powerline uses various icons and fonts that are not available by default. So we need to install the fonts.
Step 3 — Install Powerline fonts
To install Powerline fonts, simply go to https://github.com/powerline/fonts. There you’ll see a whole bunch of folders. Each one is a font, aka “Patched fonts”.
It is called “Patched fonts” because people have taken regular fonts and have added/patched additional Powerline specific icons and fonts to them.
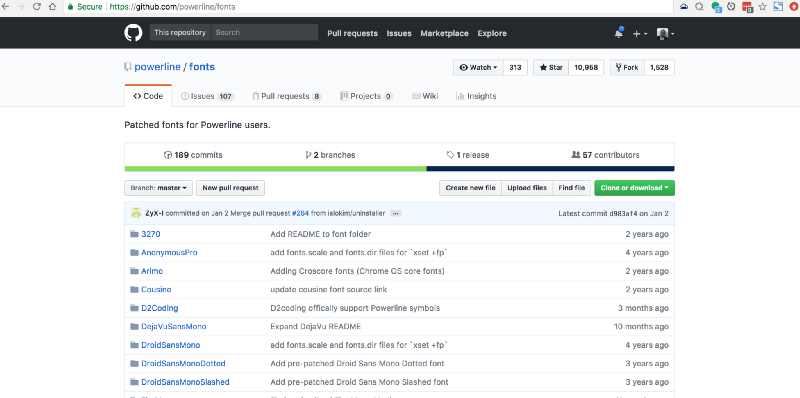
3.1 Download the whole repo and unzip it
- Click on the “Clone or download” button and download the whole repo so you try various fonts.
- Unzip the fonts-master.zip
3.2 Install some fonts
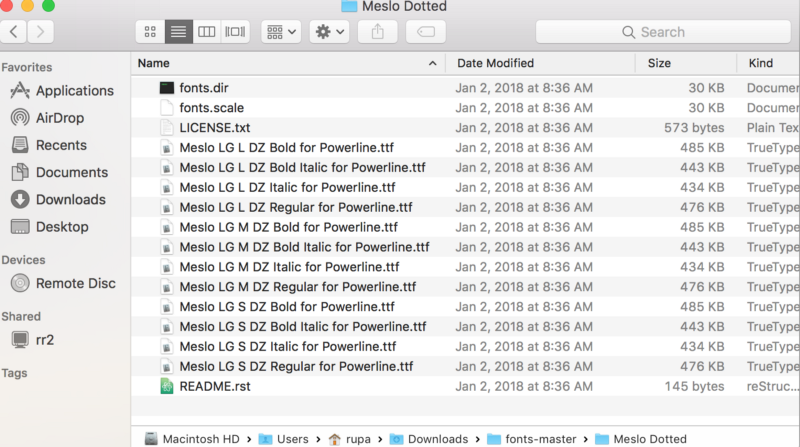
Let’s open Meslo dotted fonts folder. It will look like below. You’ll see a whole bunch of .ttf file. Each one of them is a font but some are “bold” version of the font, some are “regular” version and so on.
Simply double-click on the .ttf file and press “Install font” to install the font on your computer.
For our case, let’s install “Meslo LG L DZ Regular for Powerline.ttf” and “Meslo LG L DZ Italic for Powerline.ttf”. This will add a regular and an Italic version of the Meslo font.
3.3 Select the font in the Terminal’s Theme
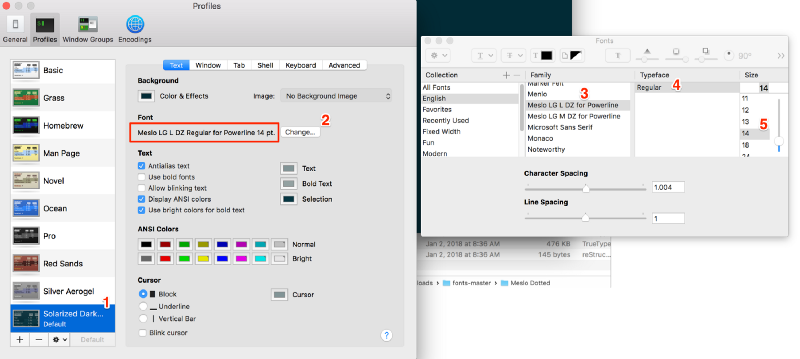
Remember we added “Solarized Dark” theme in Step 1? That didn’t have any fonts in it and MacOS had some default font. All we need to do is to set our Meslo dotted font for this theme and we are done!
- Open Terminal > Preferences > Text
- Select Solarized Dark ansi Theme
- Click on the “Font” button — This opens up “Fonts” dialog
- In the “Fonts” dialog, select “Meslo LG L DZ for Powerline” in the Family and also select font size 14 (so it’s easier to read).
3.4 Restart Terminal
Completely quit the Terminal (Terminal > Quit Terminal) and then reopen it.
Step 4 — Adding Git information to the prompt
In order to display various Git status at the prompt, we need to install powerline-gitstatus. It is a simple add-on to Powerline and adds multiple colors and Themes to display various git status information.
4.1 Install powerline-gitstatus
pip install --user powerline-gitstatusNote: “ — user” command is required to install it in the user’s profile.
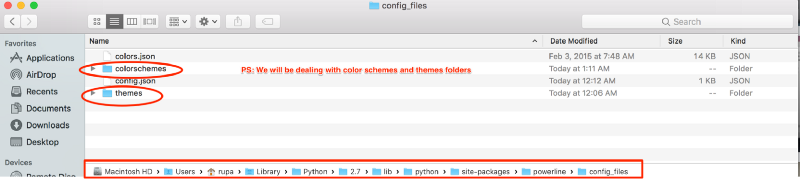
4.2 Add powerline-gitstatus color schemes to Powerline
4.2.1 Open the following colorschemes/shell/default.json folder
${powerline-install-directory}/powerline/config_files/colorschemes/shell/default.json

//For example:
/Users/rupa/Library/Python/2.7/lib/python/site-packages/powerline/config_files/colorschemes/shell/default.json
4.2.2 Add the following colors:
As mentioned in the powerline-gitstatus readme. PS: Just copy the colors inside “groups” and then append it to the default.json as shown below.
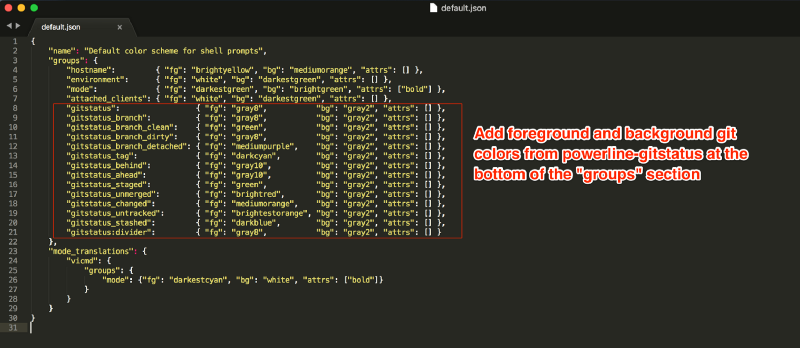
Here is my color schemes default.json (you may copy and paste this instead):
{
	"name": "Default color scheme for shell prompts",
	"groups": {
		"hostname": {
			"fg": "brightyellow",
			"bg": "mediumorange",
			"attrs": []
		},
		"environment": {
			"fg": "white",
			"bg": "darkestgreen",
			"attrs": []
		},
		"mode": {
			"fg": "darkestgreen",
			"bg": "brightgreen",
			"attrs": ["bold"]
		},
		"attached_clients": {
			"fg": "white",
			"bg": "darkestgreen",
			"attrs": []
		},

		"gitstatus": {
			"fg": "gray8",
			"bg": "gray2",
			"attrs": []
		},
		"gitstatus_branch": {
			"fg": "gray8",
			"bg": "gray2",
			"attrs": []
		},
		"gitstatus_branch_clean": {
			"fg": "green",
			"bg": "gray2",
			"attrs": []
		},
		"gitstatus_branch_dirty": {
			"fg": "gray8",
			"bg": "gray2",
			"attrs": []
		},
		"gitstatus_branch_detached": {
			"fg": "mediumpurple",
			"bg": "gray2",
			"attrs": []
		},
		"gitstatus_tag": {
			"fg": "darkcyan",
			"bg": "gray2",
			"attrs": []
		},
		"gitstatus_behind": {
			"fg": "gray10",
			"bg": "gray2",
			"attrs": []
		},
		"gitstatus_ahead": {
			"fg": "gray10",
			"bg": "gray2",
			"attrs": []
		},
		"gitstatus_staged": {
			"fg": "green",
			"bg": "gray2",
			"attrs": []
		},
		"gitstatus_unmerged": {
			"fg": "brightred",
			"bg": "gray2",
			"attrs": []
		},
		"gitstatus_changed": {
			"fg": "mediumorange",
			"bg": "gray2",
			"attrs": []
		},
		"gitstatus_untracked": {
			"fg": "brightestorange",
			"bg": "gray2",
			"attrs": []
		},
		"gitstatus_stashed": {
			"fg": "darkblue",
			"bg": "gray2",
			"attrs": []
		},
		"gitstatus:divider": {
			"fg": "gray8",
			"bg": "gray2",
			"attrs": []
		}
	},
	"mode_translations": {
		"vicmd": {
			"groups": {
				"mode": {
					"fg": "darkestcyan",
					"bg": "white",
					"attrs": ["bold"]
				}
			}
		}
	}
}
4.3 Activate The Theme
4.3.1 Open Theme’s default.json file
${powerline-install-directory}/powerline/config_files/themes/shell/default.json

//For example:
/Users/rupa/Library/Python/2.7/lib/python/site-packages/powerline/config_files/themes/shell/default.json
4.3.2 Add the following to the default.json
{
    "function": "powerline_gitstatus.gitstatus",
    "priority": 40
}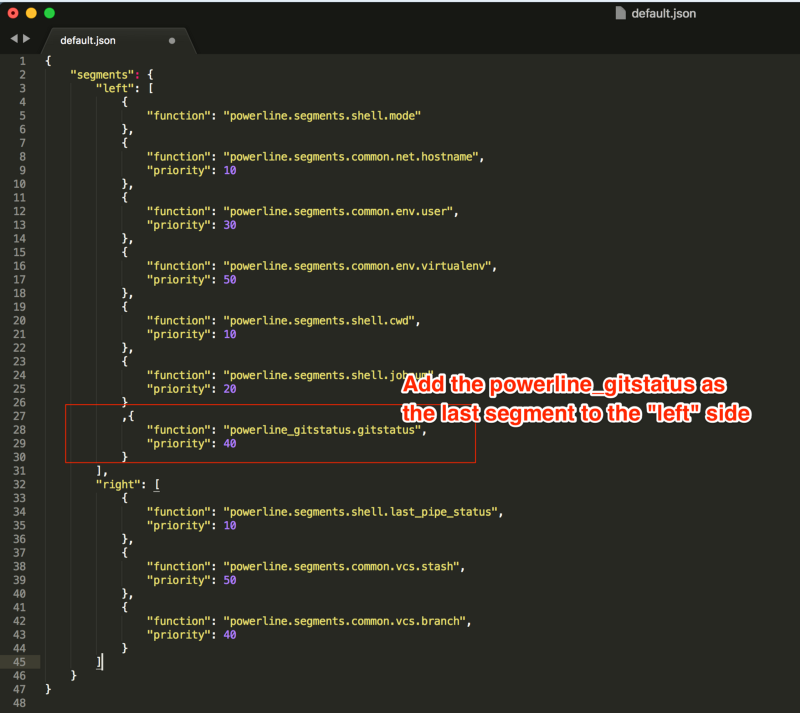
Below is my Powerline’s Theme default.json(you may copy and paste this instead):
Note: I have removed everything from the “right” section and also removed “job number” (“jobnum”) to keep things clean. Otherwise, you’ll see a little artifact on the right-hand side edge of the prompt.
{
	"segments": {
		"left": [{
				"function": "powerline.segments.shell.mode"
			},
			{
				"function": "powerline.segments.common.net.hostname",
				"priority": 10
			},
			{
				"function": "powerline.segments.common.env.user",
				"priority": 30
			},
			{
				"function": "powerline.segments.shell.cwd",
				"priority": 10
			}, {
				"function": "powerline_gitstatus.gitstatus",
				"priority": 40
			}
		],
		"right": []
	}
}
4.4 Restart the Daemon
Save the file and run the following: powerline-daemon —-replace in the Terminal.
Important Note: Every time you make changes to Powerline’s config, in addition to restarting the Terminal, you’ll also need to restart the daemon to see the changes reflected by running: powerline-daemon —-replace.4.5 Restart The Terminal
Quit the Terminal (Terminal > Quit Terminal) and open it again.
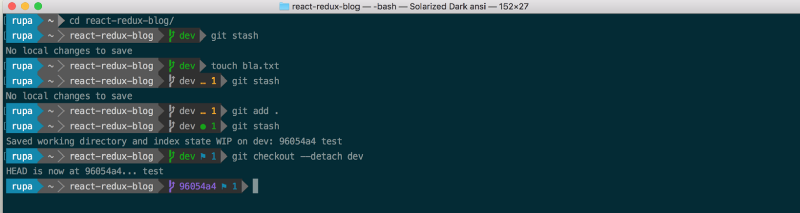
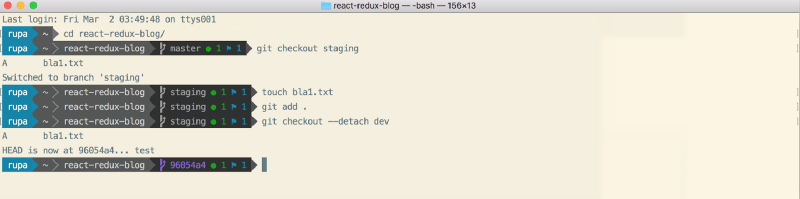
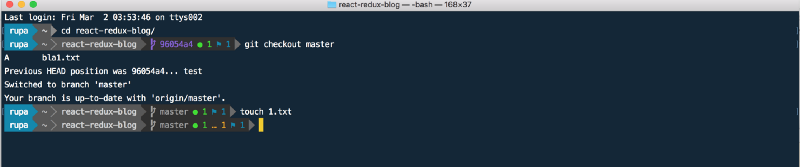
At this point, we are all done! whew! If you open the Terminal, and navigate to any git repo, and play around, it should look like the following.
Here is how it looks in Solarized-Light Theme:
Here is how it looks in Cobalt2 Theme:
?? Thank you!
If you have questions, please feel free to ask me on Twitter: https://twitter.com/rajaraodv
If this was useful, please click the clap ? button down below a few times to show your support! ⬇⬇⬇ ??
My Other Posts
https://medium.com/@rajaraodv/latest
ECMAScript 2015+
- Check out these useful ECMAScript 2015 (ES6) tips and tricks
- 5 JavaScript “Bad” Parts That Are Fixed In ES6
- Is “Class” In ES6 The New “Bad” Part?
Terminal Improvements
- How to Jazz Up Your Terminal — A Step By Step Guide With Pictures
- Jazz Up Your “ZSH” Terminal In Seven Steps — A Visual Guide
WWW
Virtual DOM
React Performance
Functional Programming
- JavaScript Is Turing Complete — Explained
- Functional Programming In JS — With Practical Examples (Part 1)
- Functional Programming In JS — With Practical Examples (Part 2)
- Why Redux Need Reducers To Be “Pure Functions”
WebPack
- Webpack — The Confusing Parts
- Webpack & Hot Module Replacement [HMR] (under-the-hood)
- Webpack’s HMR And React-Hot-Loader — The Missing Manual
Draft.js
React And Redux :
- Step by Step Guide To Building React Redux Apps
- A Guide For Building A React Redux CRUD App (3-page app)
- Using Middlewares In React Redux Apps
- Adding A Robust Form Validation To React Redux Apps
- Securing React Redux Apps With JWT Tokens
- Handling Transactional Emails In React Redux Apps
- The Anatomy Of A React Redux App
- Why Redux Need Reducers To Be “Pure Functions”
- Two Quick Ways To Reduce React App’s Size In Production