
by Gareth Redfern
How to Manage User State With Vuex and Firebase

This tutorial walks through adding Vuex to a simple Vue.js Firebase app. We use Vuex to manage the logged in user state and display protected content.
Building on top of the previous tutorial, we will now look at how we can handle storing logged in users. When a user logs in we need a way to be able to store their details and check them from our routes and components.
The data store will need to be in one place so that all routes and components can have the data flow down to them. When a user logs out we will need to pass that information back up from a component to the store.
Vuex allows us to do what we need. It provides a store where all the shared data can live. Each component can then use and update that single data store. Let’s start by adding a store folder to our site and create a store.js file. We will need to pull in the Vuex library from NPM and then use it in our app (the project files already do this).
With Vuex installed we then include it in our store.js file and tell Vue that we want to use it. Now we will create the store using export const = new Vue.Store(). Pass in the state property as an object where we add all the properties our app requires at the store level. With the store exported we can import it in our main.js file and then add it to the Vue instance. The store data will now be available for us to use in our app using :
this.$store.state.propertyName
Using Getters to Get the State
Accessing the store directly using this.$store.state.propertyName is not very DRY. It would be much better if you could call a method which gets our properties for us. You would also use this method to perform extra calculations if required. This is where getters come to our rescue.
Vuex allows us to define “getters” in the store. You can think of them as computed properties for stores. Like computed properties, a getter’s result is cached based on its dependencies, and will only re-evaluate when some of its dependencies have changed.
We add getters to our store.js file in the store instance. They are set as methods on the getters object. Here we have access to our state using the state argument:
getUser: (state) => { return state.user; } // ES6 function
This simple getter returns our user property from the state. We can now use it in any of our components by calling:
this.$store.getters.getUser;
While the example here is very simple, it shows how you can now reuse this code throughout our app. If you need to change how that method works, you only change it in one place.
Using Mutations to Change the State
It is also a good idea to have a single place to change the state of our store. That way components can manipulate the state and update all instances.
Mutations are what Vue uses to perform these tasks. We add mutations to our store.js file in the store instance. Components run these methods to update the state across the app. They can then listen for these changes through the getters we have set.
In our app, we create a mutation that reaches out to Firebase and sets the current logged in user. If there isn’t anybody logged in then the Firebase, auth method returns null.
setUser: state => { state.user = Firebase.auth().currentUser; }
Our app can now have one single place to check for logged in users. All components can use this to access user details and load the relevant UI.
Using Actions to Commit Mutations
The final part of this Vuex journey is to understand how actions work. Mutations can only run synchronously, we actually want this behavior from them. By running a synchronous method you can reliably know that it will change the state when you need it to.
Suppose we want to make a call to a 3rd party API though, how would we do that? We add an action to commit a mutation only when the asynchronous method is complete. That way we can run asynchronous methods but only commit their state once they have finished.
Let’s have a look how we do this in our app.
We trigger actions with the store.dispatch method. In our App.js component, when the Vue instance is first created, we fire the setUsermethod. This then executes the this.$store.dispatch(‘setUser’); action in our store.js file. Let’s now look at the setUser action which is set as a method.
setUser: context => { context.commit(‘setUser’); }
Here we pass in the context that is available from Vuex and gives us access to the commit method. The commit method then takes the mutation method you would like to run. In our case setUser. Our mutation method is named the same as the setUser action but it doesn’t have to be.
Putting it all Together
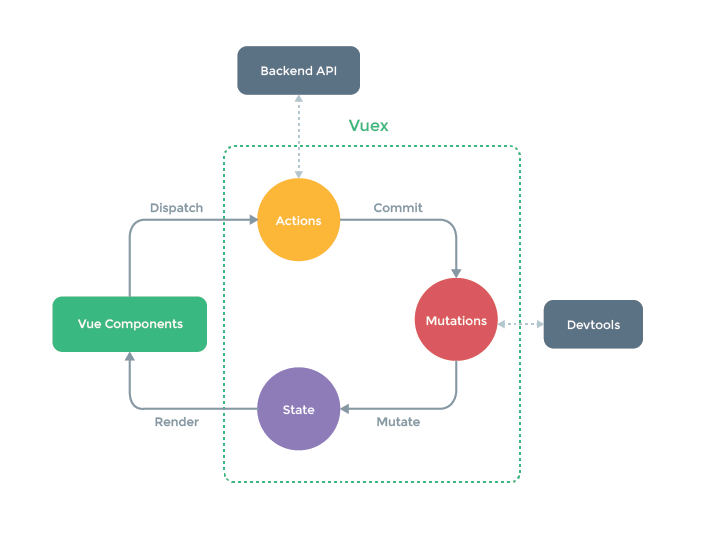
The diagram above summarizes how the 3 key parts of Vuex work together to serve data to our components. For this tutorial, Vuex may well be overkill.
Yet, it solved the problem of knowing when a user is signed-in so that we can display links in the navigation. Take a look at the Header.vue component.
Here we are displaying links depending on if a user is signed-in. All we need to do is add v-if=”!user” to each of our router-link components. The uservariable is a computed property, it returns the user object or nullif someone is signed-in or not.