
by Sumit Gupta
Playing make-believe using a proxy server
Guide to using a proxy server (mitmproxy) to get the response you want

Say you are developing a feature in an E-commerce web/mobile app.
You have to show an “Item is out of stock” banner on the “Cart” page when an item is out of stock.
You hit an endpoint /cart and this endpoint returns something like this.
[ { "name": "SomeShoes", "soldOut": false, "price": "$50", "quantity": 1, ... }]You get soldOut as true when the item is sold out.
To ease out development, you’d need to simulate this behavior.
Some ways to do so could be:
- You add an item to cart and then login as another user to buy all the available stock. This would simulate that the item was out of stock for the first user.
- You add an item to cart and then modify the data or change the code in the backend API to make sure that item is sold out.
Both of the above approaches would work, but both might require a lot of work. If those APIs are external, then you’d have next to zero control. The first approach might be possible but the second approach is impossible.
What if you could hack your way and change the value of soldOut to true without any of the above methods?
Enter the proxy server
A proxy server lets you see the response from the server and modify it even before it comes to the front-end app. You can intercept the /cart API call and modify the value of soldOut to true in the response.
Imagine how much time you’d save. All you wanted was to check how your sold out banner looks when it appears, if it even does.
No one wants to change the world to make sure they get a true instead of a false.
Choosing your proxy server
There are many proxy servers out there that’ll let you do this, and one such is mitmproxy.
mitmproxy is a free and open source tool for Windows, Linux, and Mac.
Here’s how to use mitmproxy (commands below are for Mac, but they should work on Linux as well).
Installation
Mac: brew install mitmproxy
Others: You can find installation instruction here.
mitmproxy has command line and web interfaces.
Web Interface
To start the proxy server, use the command:
Mac: mitmweb --port 9000 --web-port 9001
Windows: mitmweb.exe --listen-port 9000 --web-port 9001
Here,--port and --listen-port is used to specify the port on which the proxy server would run and --web-port is used to specify the port for the web interface of the server.
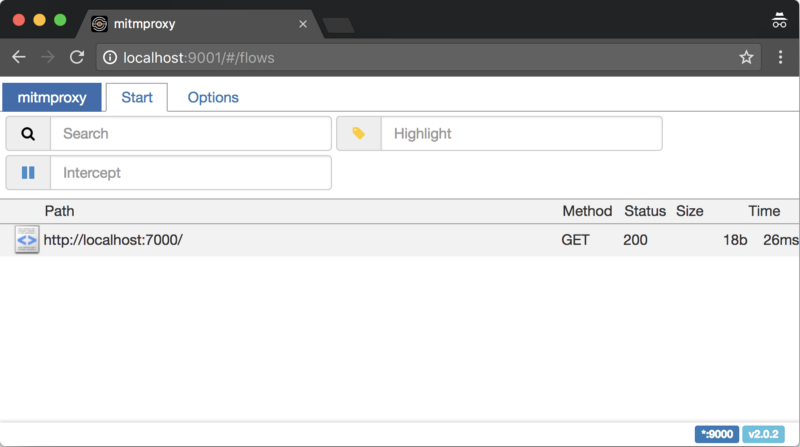
Now open the URLlocalhost:9001
Below is the web interface of the proxy server where you can see every request that goes through it.
Now we need to route all network requests through it.
I use Firefox for this as it has support for adding proxy settings and certificates just for Firefox.
Note: an Android phone/emulator or any other client can also be used.
Configuring Firefox
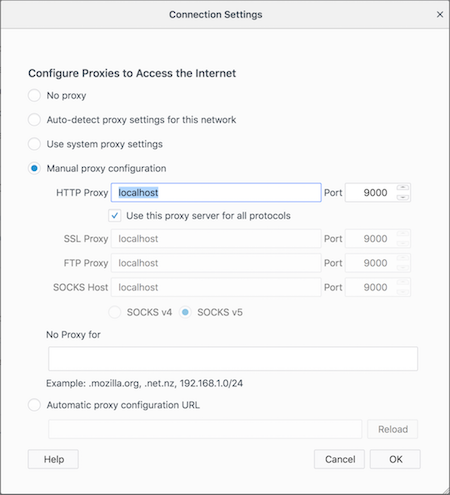
Configuring Proxy
Install and open Firefox.
Search “Connection Settings” in settings.
Here, you will manually add a proxy configuration. If you are following this guide, then add localhost in the HTTP proxy and port as 9000.
Also, clear the “No Proxy for” text.
Installing mitmproxy certificate
You need to install a certificate for mitmproxy to work. Otherwise, your browser won’t let you access anything.
DO NOT INSTALL THESE CERTIFICATES ON YOUR SYSTEM. INSTALL THEM ONLY ON THE CLIENT(the client is Firefox in this guide). Installing these certificates on your system is a security vulnerability.
This is one other reason I choose Firefox. Firefox allows you to install certificates only for itself.
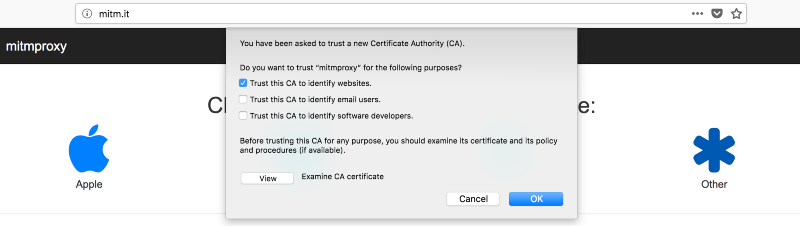
Open the URL “mitm.it” in your Firefox and then click on “Other” to install the certificate. Check the checkbox “Trust this CA to identify websites.”
The above step will install the mitmproxy certificate only in Firefox.
Do not install the certificate by clicking on Apple, Windows, or Android unless your client is a Windows VM or an iOS simulator/Android emulator or a real phone which you want to use as a client.
We are locked and loaded
Hit any URL you want and check the web interface of mitmproxy. You’ll find your request/response in there.
Modifying request and response
To modify the request and response, you must first intercept a request.
When you intercept a request it is stopped twice. Once when it is going to the server and second time when the response is coming from the server.
To intercept it, add a URL pattern in the “Intercept” text box.
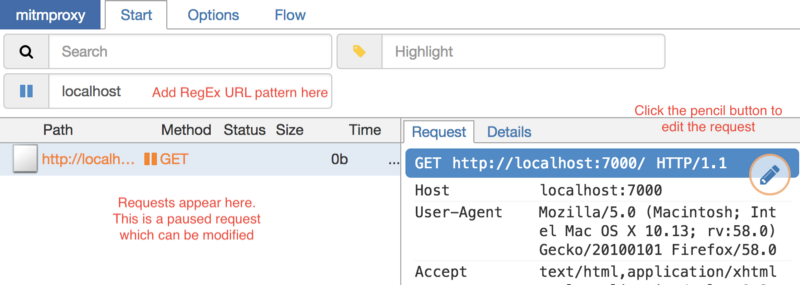
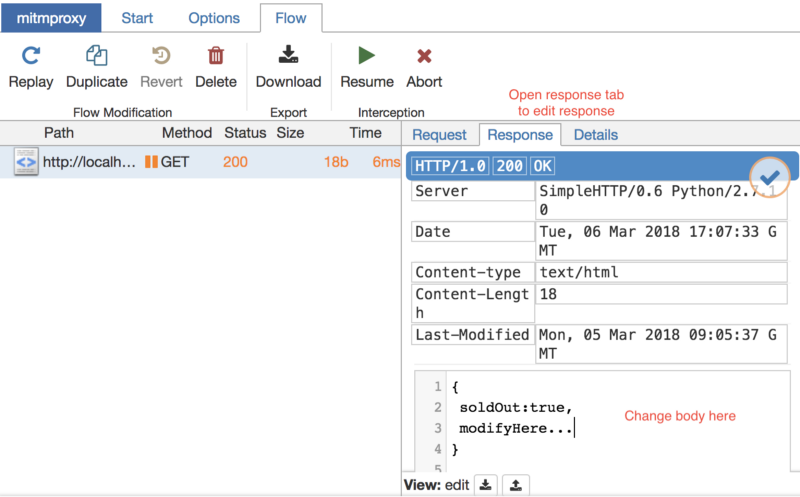
In the image above, I’ve intercepted the URL which has “localhost” in it. The requests are shown in the bottom left box. The current request is paused as it is intercepted. You can modify the request here.
Now switch to the “Flow” tab and hit the resume button.
Your request has now gone to the server and the response will come. This request will be paused again, but this time it is going back to Firefox and you can change the response as well.
The moment to shine
Now change that soldOut to true and hit that Resume button to see the magic (hack *cough) happen. Your frontend will receive the modified response, and it should show you the “Item is out of stock” banner you’ve waited all your life for.
You can change everything to a response and request. Literally, from head to body, cookies, and whatever else.
Command Line Interface (Unavailable in Windows)
mitmproxy has an excellent command line interface as well.
To start the proxy server in the CLI, use the command mitmproxy --port 9000
Here,--port is used to specify the port on which this server must run.
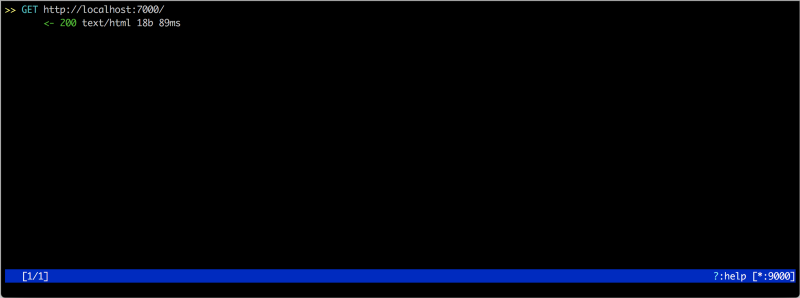
You’ll be greeted by this. Hit ? for shortcuts of the CLI.
As mentioned in the Web Interface configuration section, configure your Firefox.
At this point, you should be able to see all the requests/responses going through your proxy server.
To intercept a request, hit i and add a URL pattern (this is a RegEx).
Same as the web interface, mitmproxy intercepts requests twice: once while going to the server and again when coming back from the server.
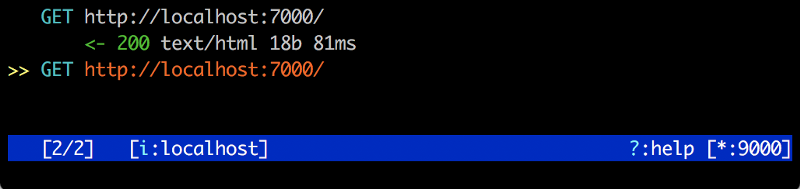
I’ve added a pattern localhost. It intercepted a request. Hit Enter on it to view this paused request.
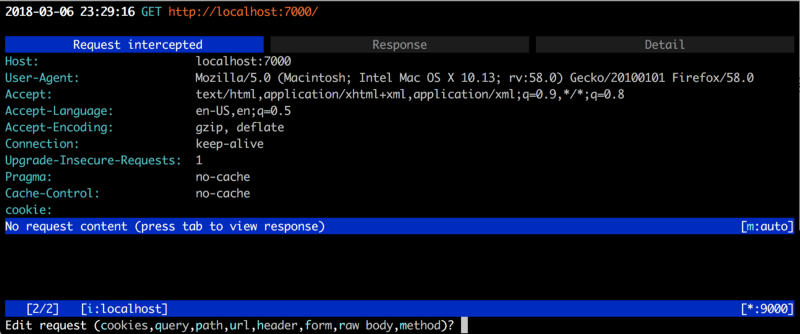
To modify, hit e and you’d be given options to modify whatever you want to.
Hit a to let the request go to the server. Now you can view the response and modify it as well.
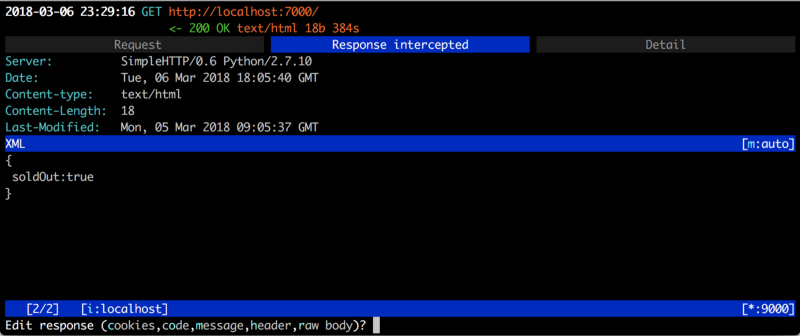
Above is the response tab. Hit e and you can modify the response. Press a again to let the response go to Firefox.
These are some basic commands you can use. For more help, hit ?.
Now hack your way into software development like:

For further information on mitmproxy, refer to the documentation here.
If you enjoyed this article, please click the ? button and share to help others find it! Feel free to leave a comment below.
Originally published at www.plightofbyte.com on March 13, 2018.