
Note: This the sixth video in the Git for beginners series. Watch the first video here.
Let’s say a friend of made a change to your repository and pushed the changes to the Git remote. At the same time, you also made a change to the same line of code.
When you pull their changes into your local repository, you’ll notice that there is a conflict.
This happens because Git no idea whether your friend’s version is the updated version or your version is the updated version.
This is what we call a Git conflict.
You’ll learn how to resolve a Git conflict today.
First, let’s produce a Git conflict so you see what happens.
Producing a conflict
To produce a Git conflict, we need two sets of code. For the first set, we need someone to push code into the remote.
In our case, we edit the files on GitHub to simulate a change.
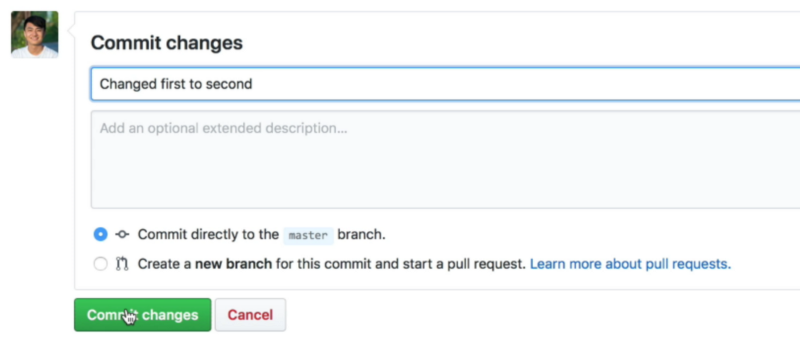
Let’s say we change the text in README.md from “Hello world, this is my first Github repo” to “Hello world, this is my second Github repo”.
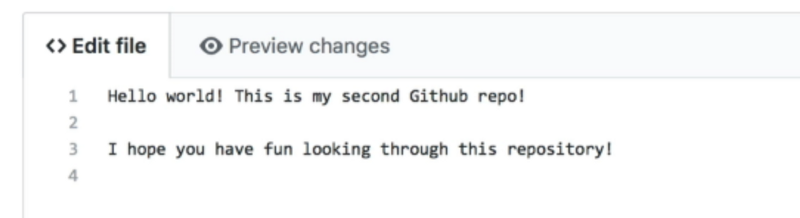
We’re also going make a commit message that says “Changed first to second” to see the effects in our Git History later.
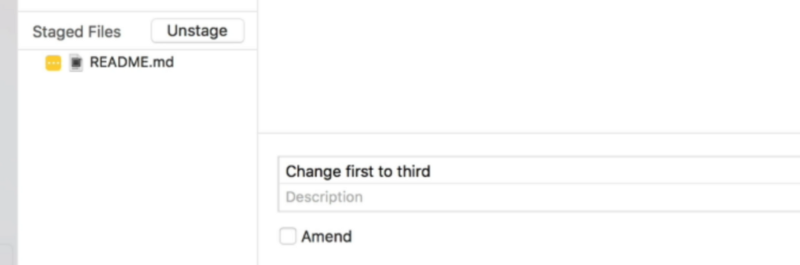
For the second set of code, you can change the same README.md file on your local repository. Instead of “second Github repository”, we’re going to say “third Github repository”.
Hello world! This is my third Github repo!We’re going to commit this file and set the commit message to “Change first to third.”
You can check for an update in your Git Client with the “Fetch” button. Once the fetch is completed, you can see that origin/master is on a different fork compared to master.
This happens because there are changes on the Git remote and on our local repository at the same time.
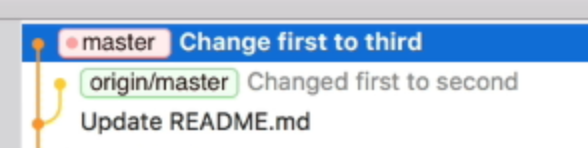
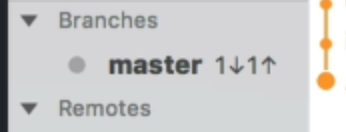
If you look at the branch on the left, you can see that the master branch says one down one up. This tells us there is one commit in the Git remote that is ahead of our master. At the same time, our master branch has one commit ahead of the remote.
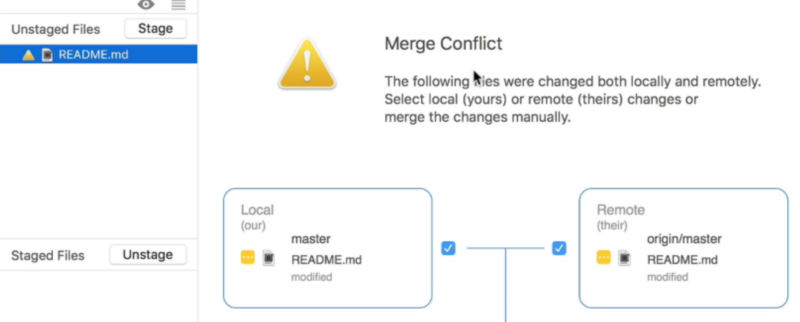
We need to pull our changes onto our local branch to consolidate the changes. When you pull the changes, you’ll see an error message.
This error message may be slightly different depending on the Git client you’re using. In Fork, it says “Merging branch origin/master into master. Fix 1 conflict and then continue”.

What this means is you need to fix the conflict before you continue.
To see the conflict, you can go back to the changes section. Here, you’ll see the files that contain conflicts. In this case, it is the README.md file.
First, let’s talk about why you need to merge.
Why merge?
When you pull changes from the remote branch to the local branch, the change from the remote branch is merged into the local branch.
Git helps us do the merge automatically if it knows what is changed first, and what is changed later, and there are no ambiguities.
But, when there is a conflict, Git doesn’t know which version is correct — so you have to merge the code yourself.
Resolving conflicts
The easiest way to resolve a conflict is to change the file on your computer. If you open README.md now, you’ll see lines that say this:
<<<<<< HEAD Hello world! This is my third Github repo!====== Hello world! This is my second Github repo! >>>>>> snt2h1s3n4tnthd9au8d3324The code between <<<;<<<; HEAD and ======= is the code in our local repository (our code).
The code between ====== and >>>>>> is the code from the remote repository (their code).
These two lines of code are conflicting. We need to choose between the “second Github repo” or the “third Github repo”.
To fix the conflict, you choose the correct line of code. Then you delete everything else.
In this case, let’s say “third” is the correct version. What you’ll do is delete everything else that’s incorrect.
Hello world! This is my third Github repo!Committing the merge
When you head back to Fork, you’ll see that the changes are updated. In our case, the change is the one on our local, so we don’t see any files that need to be staged.
If the change is different, you will need to stage the files.
After staging, you need to commit the merge.
If you look at the commit message area, you’ll see that Fork has filled in a commit message for you automatically. You can use the commit message directly.
Click on commit to commit the changes.

When you commit the changes, you’ll see that the master branch in the sidebar says 2 up. This means our local branch is two commits ahead of the remote.
If you look at the Git history, You can see that the remote master branch has a link back to the local master branch. This shows a merge.

What you need to do next is to push the changes up to the Git remote.

And this is how you resolve a Git conflict.
Preventing conflicts from happening
Conflicts happen when two or more people work on the same file at the same time.
There are two ways to prevent conflicts.
The first way is to reduce the size of your commits. That means you make a commit for every little thing you do. Commits are free, so just make more commits.
This helps because it is easy to resolve a small conflict like the one we just resolved. If you encounter a conflict that is hundreds of lines long, it’ll be hard to resolve.
The second way involves branches. Here, different people work on the code in different branches. They don’t interact with each other. They only merge the code into the main branch when they’re ready.
Branches are slightly more advanced. We’ll talk about branches and how to use branches in the next video.
Thanks for reading. Did this article help you in any way? If you did, I hope you consider sharing it. You might help someone out. Thank you!
This article was originally posted at my blog. Sign up for my newsletter if you want more articles to help you become a better frontend developer.