by Rajat Saxena
Rock Solid React.js Foundations: A Beginner’s Guide

I’ve been working with React and React-Native for the last couple of months. I have already released two apps in production, Kiven Aa (React) and Pollen Chat (React Native). When I started learning React, I was searching for something (a blog, a video, a course, whatever) that didn’t only teach me how to write apps in React. I also wanted it to prepare me for interviews.
Most of the material I found, concentrated on one or the other. So, this post is aimed towards the audience who is looking for a perfect mix of theory and hands-on. I will give you a little bit of theory so that you understand what is happening under the hood and then I will show you how to write some React.js code.
If you prefer video, I have this entire course up on YouTube as well. Please check that out.
Let’s dive in…
React.js is a JavaScript library for building user interfaces
You can build all sorts of single page applications. For example, chat messengers and e-commerce portals where you want to show changes on the user interface in real-time.
Everything’s a component
A React app is comprised of components, a lot of them, nested into one another. “But what are components?”, you may ask.
A component is a reusable piece of code, which defines how certain features should look and behave on the UI. For example, a button is a component.
Let’s look at the following calculator, which you see on Google when you try to calculate something like 2+2 = 4 –1 = 3 (quick maths!)
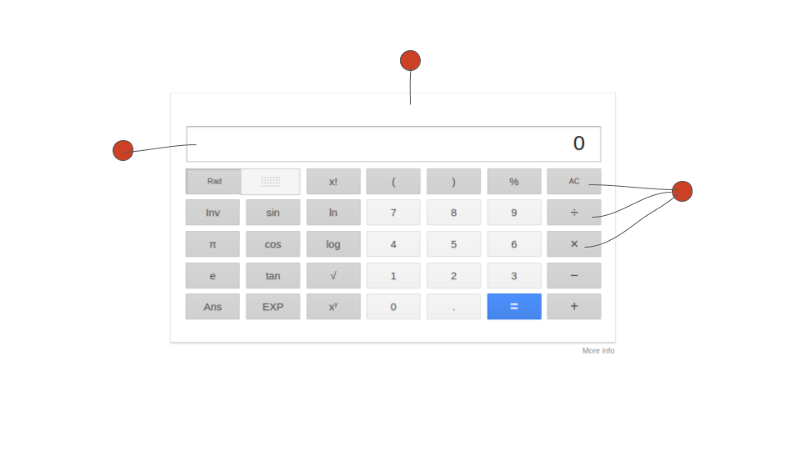
As you can see in the image above, the calculator has many areas — like the result display window and the numpad. All of these can be separate components or one giant component. It depends on how comfortable one is in breaking down and abstracting away things in React
You write code for all such components separately. Then combine those under one container, which in turn is a React component itself. This way you can create reusable components and your final app will be a collection of separate components working together.
The following is one such way you can write the calculator, shown above, in React:
Yes! It looks like HTML code, but it isn’t. We will explore more about it in the later sections.
Setting up our Playground
This tutorial focuses on React’s fundamentals. It is not primarily geared towards React for Web or React Native (for building mobile apps). So, we will use an online editor so as to avoid web or native specific configurations before even learning what React can do.
I’ve already set up an environment for you on codepen.io. Just follow the link and read all the comments in HTML and JavaScript (JS) tabs.
Controlling Components
We’ve learned that a React app is a collection of various components, structured as a nested tree. Thus, we require some sort of mechanism to pass data from one component to other.
Enter “props”
We can pass arbitrary data to our component using a props object. Every component in React gets this props object.
Before learning how to use this props object, let’s learn about functional components.
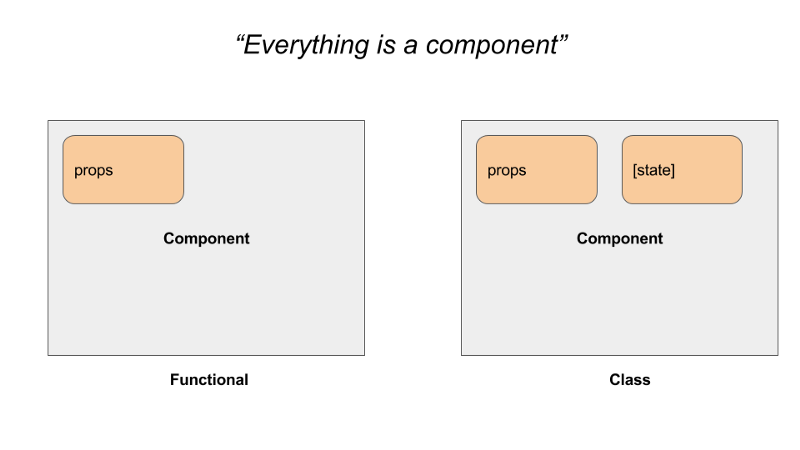
a) Functional component
A functional component in React consumes arbitrary data that you pass to it using props object. It returns an object which describes what UI React should render. Functional components are also known as Stateless components.
Let’s write our first functional component:
It’s that simple. We just passed props as an argument to a plain JavaScript function and returned, umm, well, what was that? That <div>{props.name}</div>thing! It’s JSX (JavaScript Extended). We will learn more about it in a later section.
This above function will render the following HTML in the browser:
Read the section below about JSX, where I have explainshow we get this HTML from our JSX code.
How can you use this functional component in your React app? Glad you asked! It’s as simple as the following:
The attribute name in the above code becomes props.name inside our Hello component. The attribute age becomes props.age and so on.
Remember! You can nest one React component inside other React components.
Let’s use this Hello component in our codepen playground. Replace the divinside ReactDOM.render() with our Hello component, as follows, and see the changes in the bottom window.
But what if your component has some internal state? For instance, like the following counter component, which has an internal count variable, which changes on + and — key presses.
b) Class-based component
The class-based component has an additional property state , which you can use to hold a component’s private data. We can rewrite our Hello component using class notation as follows. Since these components have a state, these are also known as Stateful components.
We extend React.Component class of React library to make class-based components in React. Learn more about JavaScript classes here.
The render() method must be present in your class as React looks for this method in order to know what UI it should render on screen.
To use this sort of internal state, we first have to initialize the state object in the constructor of the component class, in the following way.
Similarly, the props can be accessed inside our class-based component using this.props object.
To set the state, you use React.Component's setState(). We will see an example of this, in the last part of this tutorial.
Tip: Never call setState() inside render() function, as setState() causes component to re-render and this will result in endless loop.
Apart from state, a class-based component has some life-cycle methods like componentWillMount(). These you can use to do stuff, like initializing the state and all but that is out of the scope of this post.
JSX
JSX is a short form of JavaScript Extended and it is a way to write React components. Using JSX, you get the full power of JavaScript inside XML like tags.
You put JavaScript expressions inside {}. The following are some valid JSX examples.
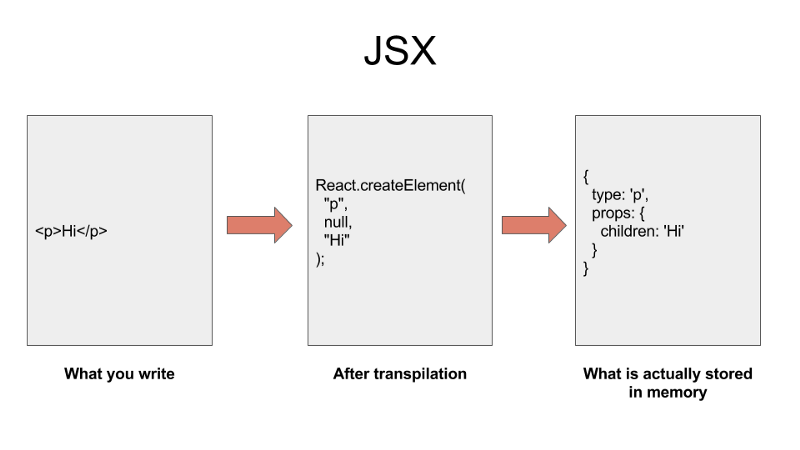
The way it works is you write JSX to describe what your UI should look like. A transpiler like Babel converts that code into a bunch of React.createElement() calls. The React library then uses those React.createElement() calls to construct a tree-like structure of DOM elements (in case of React for Web) or Native views (in case of React Native) and keeps it in the memory.
React then calculates how it can effectively mimic this tree in the memory of the UI displayed to the user. This process is known as reconciliation. After that calculation is done, React makes the changes to the actual UI on the screen.
You can use Babel’s online REPL to see what React actually outputs when you write some JSX.
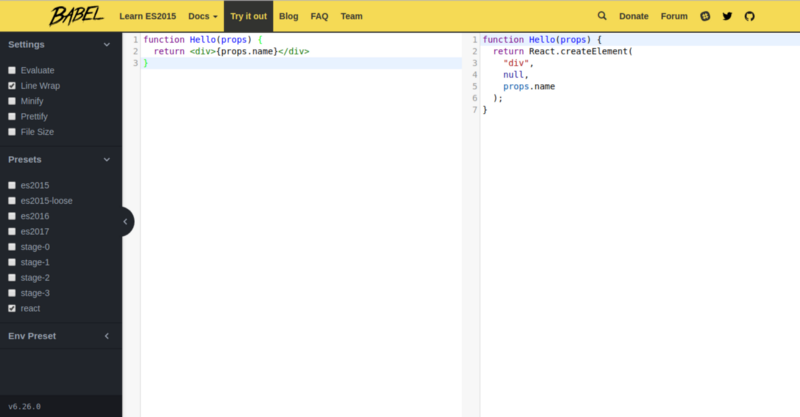
Since JSX is just a syntactic sugar over plain React.createElement() calls, React can be used without JSX
Now we have every concept in place, so we are well positioned to write a counter component that we saw earlier as a GIF.
The code is as follows and I hope that you already know how to render that in our playground.
The following are some salient points about the above code.
- JSX uses
camelCasinghencebutton's attribute isonClick, notonclick, as we use in HTML. - Binding is necessary for
thisto work on callbacks. See line #8 and 9 in the code above.
The final interactive code is located here.
With that, we’ve reached the conclusion of our React crash course. I hope I have shed some light on how React works and how you can use React to build bigger apps, using smaller and reusable components.
If you have any queries or doubts, hit me up on Twitter @rajat1saxena or write to me at rajat@raynstudios.com.
Please recommend this post, if you liked it and share it with your network. Follow me for more tech related posts and consider subscribing to my channel Rayn Studios on YouTube. Thanks a lot.