
TL;DR (updated 2021) You can now use dataunlocker.com service, which is a fully managed solution for fixing ad blockers' impact on the client-side analytics tools such as Google Analytics. Log in to DataUnlocker Admin to complete the quick 3-step setup of your web application or website.
The article below from 2017 explains some principles used behind the solution, as well as it is described in the solution's readme.
When your product is just getting started out, every single user matters. So does the data about how they interact with your product.
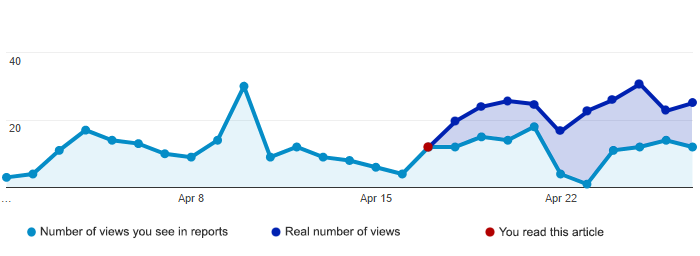
If you’ve tried using analytics solutions like Google Analytics, you may have faced an issue where your analytics collection was blocked by ad blockers.
According to PageFair, up to 30% of Internet users use ad blockers in 2017, and this number is constantly growing.
This article will explain some technical approaches you can take to prevent ad blockers from also blocking your analytics. We’ll use Google Analytics in this article, though much of this could be applied to other analytics tools.
Some ways you can bypass ad blockers
Almost all ad blockers work through the same methods: they disallow some http(s) browser requests for content at URLs that match a certain mask from their filtering base.
Most ad blockers blacklist www.google-analytics.com by default, and block any attempts by the Google Analytics JavaScript library to send or retrieve the data from its analytics servers.
Luckily for developers, ad blockers don’t block requests to our own domain names by default, because doing this may hurt the web application’s functionality. This gap reveals a way to avoid analytics blocking until your web service become well-known enough for some of its URLs appear in ad blocker filters.
In fact, even after some URLs appear in the content filtering base, you can start playing with ad blockers by inventing terrible things, such as hourly changing analytics URLs (though this is beyond the scope of this article). Some of these approaches are applied by services like DataUnlocker.com and Adtoniq, which offer users adblocker-free experience even when ad blockers are turned on.
A high-level explanation of what we’re going to do
In this article, we’ll assume that we have no permission restrictions on the server side. We will write the demo solution (a few lines of code) for the Node.js platform. Once you understand how this works, you should be able to port this solution to any programming language or platform.
The solution I’ll describe is pretty minimal, and if you’re an experienced web developer, it may only take you a few minutes to put it in place.
We’re going to use a simple proxying approach without the need to diving into the Google Analytics measurement protocol. In short, the solution looks as following:
- First, download the Google Analytics JavaScript library itself and host it on your server.
- Then alter the code in the downloaded library to change the target host from www.google-analytics.com to your own domain name using find-replace.
- Replace the link from the default Google Analytics script in your codebase to modified one.
- Create a proxy endpoint to Google Analytics servers on your back end. One important step here is to additionally detect the client’s IP address and write it explicitly in requests to Google Analytics servers to preserve correct location detection.
- Test the results. You’re done!
The full technical implementation walkthrough
All the code and described steps below are available on GitHub. The description below explains the method basics, and of course the suggested approach can be improved to be even more “anti-blocking.”
In Google Analytics, you start by acquiring a unique tracking ID for your property (web service). We will use UA-98253329–1 tracking ID in this article for the demonstration. Don’t forget to replace the tracking code to your one.
Google suggests adding this minified code to your web services to enable analytics:
<script>
(function(i,s,o,g,r,a,m){i['GoogleAnalyticsObject']=r;i[r]=i[r]||function(){
  (i[r].q=i[r].q||[]).push(arguments)},i[r].l=1*new Date();a=s.createElement(o),m=s.getElementsByTagName(o)[0];a.async=1;a.src=g;m.parentNode.insertBefore(a,m)
  })(window,document,'script',
'https://www.google-analytics.com/analytics.js','ga');
  ga('create', 'UA-98253329-1', 'auto');
  ga('send', 'pageview');
</script>
In a few words, this code loads the Google Analytics JavaScript library if it wasn’t loaded before by inserting the script tag to the document. This library includes all the logic of analytics collection, and it is the only thing we need to proceed.
Step 1: Download and patch Google’s analytics library
Download the script directly from https://www.google-analytics.com/analytics.js, open it with any text editor and replace all occurrences of:
www.google-analytics.comwith this exact string:
"+location.host+"/analyticsBy patching the analytics library in this way, it will start making requests to the local host (my.domain.com/analytics) endpoints instead of www.google-analytics.com. Place this patched analytics.js file on your server after the replacement.
Step 2: Replace the analytics script with the patched one
Let’s modify the Google Analytics embedding code in that way so it use our patched library instead of default one:
<script>
(function(i,s,o,r){i['GoogleAnalyticsObject']=r;i[r]=i[r]||function(){
  (i[r].q=i[r].q||[]).push(arguments)},i[r].l=1*new Date()})(window,document,'script','ga');
  ga('create', 'UA-98253329-1', 'auto');
  ga('send', 'pageview');
</script>
<script src="/analytics.js" async></script>
Note that here browser will search for the patched analytics script in the document root of your server, in this case, my.domain.com/analytics.js. Check whether you put the script in the document root or changed the path in script tag above. You can also check the results by running a test on your local server (see the readme for how to run the GitHub example).
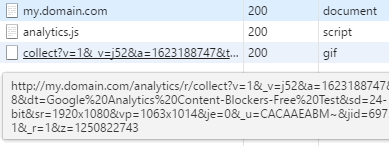
You should see something like this in browser’s developer tools:

Ultimately we want the act of downloading your patched analytics.js to return a successful response — a 200 (OK) or a 304 (not modified) status. But at this point, the request to my.domain.com/analytics/collect should respond with 404 status, since we haven’t implemented the proxy server yet.
Step 3: Implementing the Simplest Proxy Server
Now we’re going to code a bit. Our goal is to implement the proxy server, which will transport our analytics requests from our server to the real Google Analytics server. We can do this in many ways, but as an example, let’s use Node.js and Express.js with the express-http-proxy package.
Gathering all the files in the example together (see GitHub), we should end up with the following JavaScript server code:
var express = require("express"),
    proxy = require("express-http-proxy"), app = express();

app.use(express.static(__dirname)); // serve static files from cwd

function getIpFromReq (req) { // get the client's IP address
    var bareIP = ":" + ((req.connection.socket && req.connection.socket.remoteAddress)
        || req.headers["x-forwarded-for"] || req.connection.remoteAddress || "");
    return (bareIP.match(/:([^:]+)$/) || [])[1] || "127.0.0.1";
}

// proxying requests from /analytics to www.google-analytics.com.
app.use("/analytics", proxy("www.google-analytics.com", {
    proxyReqPathResolver: function (req) {
        return req.url + (req.url.indexOf("?") === -1 ? "?" : "&")
            + "uip=" + encodeURIComponent(getIpFromReq(req));
    }
}));

app.listen(1280);
console.log("Web application ready on http://localhost:1280");
A few last lines here do the proxying. The only trick we do here is instead of just proxying, we detect and append the client’s IP address explicitly in a form of a measurement protocol URL parameter. This is required to collect precise location data, because all the requests to Google Analytic originally come from our server’s IP address, which remains constant.
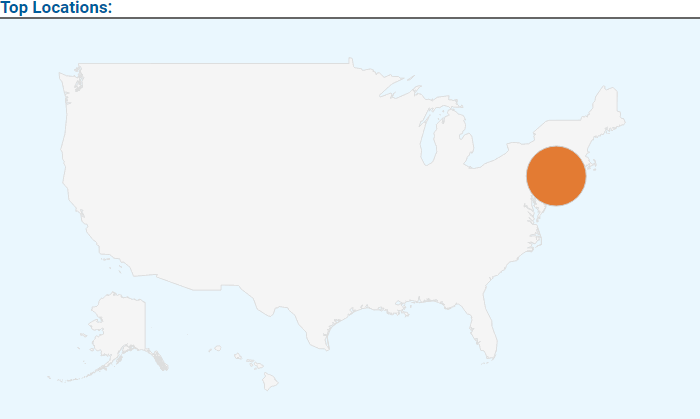
After setting up our server proxy, we can check whether the request to our /collect endpoint now successfully returns a 200 OK HTTP status:
We can use, for example, an anonymous connection to verify that location is also picked up correctly.
This “proxy server” approach is a fast workaround for analytics that enables your services to avoid ad blockers. But this method relies on the browser side, and if the browser script for some reason does not send analytics information to our servers, we get nothing.
The last possible step if you want to implement a solid solution is to send analytics directly from the server by using server-side libraries available for different languages (NodeJS, Python, Ruby, PHP). This approach will definitely avoid any content blockers, as every request to analytics servers comes directly from our servers.
Again, the demo application is available on GitHub, feel free to test it! Let me know if you have any feedback or interesting experiences using this approach.
Thanks for reading!