Migrating to serverless brings a lot of questions. How do you do some of the non-serverless tasks, such as a cronjob in a serverless application?
Let’s say you have a small Slack app that sends the top five stories from Hacker News to your Slack channel. At some point you decided to shut down the server where you run that app, but you still want to receive the stories. Serverless with AWS Lambda seems cool. But how do you trigger the AWS Lambda function at a specific time?
In case you’re not familiar, serverless is a method of deploying and running applications on cloud infrastructure, on a pay-per-use basis and without renting or buying servers. To learn more about serverless and how it works with AWS, see this guide.
You can trigger AWS Lambda functions with a variety of AWS services, such as API Gateway for APIs and S3 for files. For the full list of services, see the docs here. One of the available triggers is AWS CloudWatch Events.
Wait, isn’t CloudWatch for logs?
Well, it is. But it seems someone at AWS is a big fan of Dr. Jekyll and Mr. Hyde and in some cases a few different services are hidden behind the same name (hello Cognito).
Beside serving logs, Amazon CloudWatch has events that deliver a near real-time stream of system events that describe changes in AWS resources. Events can also schedule automated actions using cron or rate expressions. Bingo!
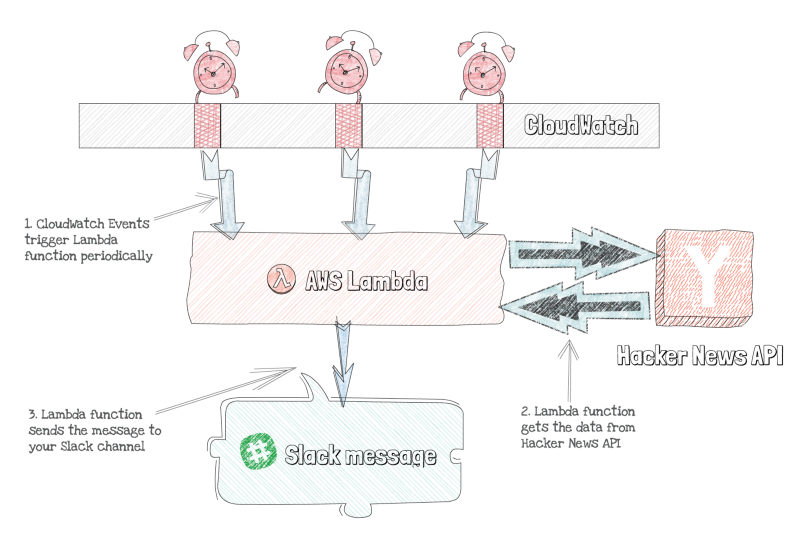
Application flow
How would the app work with CloudWatch Events?
You need to configure a CloudWatch scheduled event using cron syntax or rate expression (ie. 5 minutes). The CloudWatch event then triggers an AWS Lambda function at configured intervals. In your AWS Lambda function, you get the top five articles from the Hacker News API and post them to Slack using Incoming Webhooks.
You can see the flow in the figure below.

This sounds simple, right? Let’s see how it works in practice.
Sending scheduled messages
Before we begin, to be able to follow along with this tutorial, you need to have an AWS account, and AWS CLI and Node.js (v6+) need to be installed. You can get AWS CLI here.
You’ll also need to configure a Slack Incoming Webhook. To do so, follow this tutorial. At the end of the tutorial, you’ll get the webhook URL. Save that URL, because you’ll need it in a short while. Go, do it, I’ll wait here ⏳
Ok, times up! Let’s start with the fun part.
To start, create a new folder and start a new Node.js project in it (you can use npm init -y command).
As, you’ll need to send a few HTTP requests, install the minimal request promise module from NPM as a dependency. To do so, run the following command:
npm install minimal-request-promise --saveMinimal request promise is a small Node.js module that simply wraps native HTTP and HTTPS modules into JavaScript Promises.
Now that the dependency is ready, let’s take a look at the next figure with the project structure that you we will use.
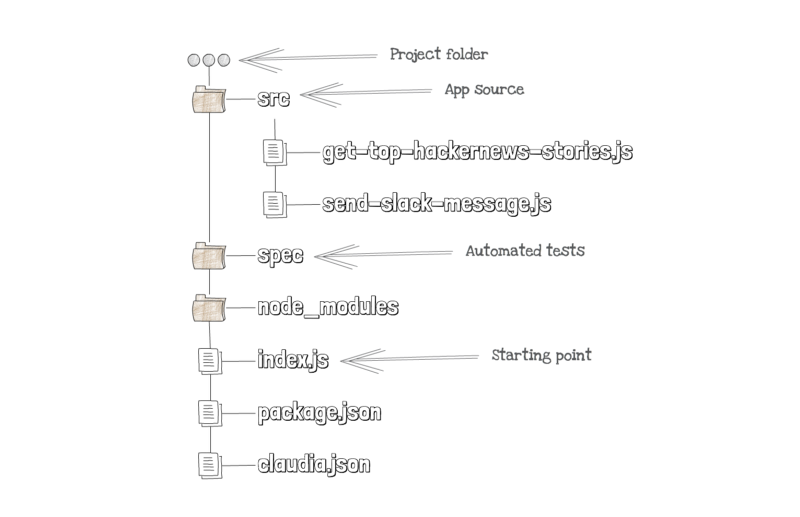
Even through the code is simple, we’ll split it into few small files to simplify the testing (see the intro to hexagonal architecture for more info). As you can see in the figure above, your code contains following files:
index.js- the initial file for your Lambda function that invokes the other two files and responds back to CloudWatch Events.src/get-top-hackernews-stories.js- a file that gets five top stories with details from Hacker News.src/send-slack-message.js- a file that formats and sends a Slack message.
Let’s start with the initial file. This file just requires the other two files and invokes the getTopHackerNewsStories and then the sendSlackMessage function. When both functions are ready, or if an error occurs, it responds back to the trigger (CloudWatch Event).
Your index.js file should look like the following code listing.
For readability, it doesn't contain event validation, which should be present in production code.
'use strict'const getTopHackerNewsStories = require('./src/get-top-hackernews-stories')
const sendSlackMessage = require('./src/send-slack-message')function scheduledSlackMessage(event, context, callback) { getTopHackerNewsStories() .then(stories => sendSlackMessage(stories)) .then(() => callback(null)) .catch(callback)}exports.handler = scheduledSlackMessageThe first of the two functions, getTopHackerNewsStories, makes an HTTP request to Hacker News API (no authentication required). As the API returns a list of story IDs, you need to get the first five IDs and send an HTTP request for each ID, to get the story’s details. Finally, you need to parse the response body (because the minimal request promise is not doing that under the hood) and return the results.
Your get-top-hackernews-stories.js file should look like the next code listing.
'use strict'const rp = require('minimal-request-promise')function getTopNews() { return rp.get('https://hacker-news.firebaseio.com/v0/topstories.json', { 'Content-Type': 'application/json' }) .then(response => { const storyIds = JSON.parse(response.body) return Promise.all( storyIds.slice(0, 5) .map(id => { return rp.get(`https://hacker-news.firebaseio.com/v0/item/${id}.json`, { 'Content-Type': 'application/json' }) .then(response => JSON.parse(response.body)) }) ) })}module.exports = getTopNewsWhen you get the stories, the sendSlackMessage function formats the message and sends another HTTP request to the Slack Incoming Webhook URL, as shown in the following code listing.
Instead of hardcoding the Incoming Webhook URL, we will pass it as an AWS Lambda environment variable. To learn more about environment variables and other ways of sharing secrets in serverless apps, see this guide.
'use strict'const rp = require('minimal-request-promise')function sendSlackMessage(news, url = process.env.SlackWebhookUrl) { const body = JSON.stringify({ text: 'Following posts are trending on Hacker News:', attachments: news.map(item => ({ 'author_name': `${item.score} points by ${item.by}`, title: item.title, 'title_link': item.url })) }) return rp.post(url, { headers: { 'Content-Type': 'application/json' }, body: body })}module.exports = sendSlackMessageNow that the code is ready, let’s deploy the app and schedule messages.
Deploying, configuring, and testing the app
We’ll use Claudia.js to deploy our function to AWS Lambda. Before we continue, make sure you follow this tutorial to install Claudia and configure AWS access credentials.
Also, you’d need to create the env.json file in your project folder, to define the Slack Webhook URL. This file should have similar content to the next code listing. Make sure you replace the generic URL with the one you received when you configured the Slack application.
{ "SlackWebhookUrl": "https://hooks.slack.com/services/T00000000/B00000000/XXXXXXXXXXXXXXXXXXXXXXXX"}Now that everything is ready, run the following command in your terminal to deploy your app:
claudia create --region eu-central-1 --handler index.handler --timeout 10 --set-env-from-json env.jsonIn this command, you do the following things:
- Define the region where your Lambda function will be deployed. For the full list of supported regions, see the docs.
- Define the handler file, which is a relative path to your entry point file, but with a
.handlerinstead of.jsextension. - Set the timeout, because default AWS Lambda is 3 seconds, but you need to do a few HTTP requests. To make it safe, increase the timeout to at least 10 seconds.
- Set the environment variables from the JSON file you prepared.
After a few seconds, you’ll receive a JSON response like in the example below. You’ll also see claudia.json file in your project folder.
{ "lambda": { "role": "scheduled-slack-messages-executor", "name": "scheduled-slack-messages", "region": "eu-central-1" }}This means that your AWS Lambda function is ready.
The next step is to create a CloudWatch Event. Let’s say you want to receive a message every day at 10 AM CET, because your cron is running in the GMT time zone. Your cron command should look like this: cron(0 9 * * ? *).
To setup an event every day at 10 AM, run the following command from your terminal:
aws events put-rule --name hackerNewsDigest --schedule-expression 'cron(0 9 * * ? *)'This command will output the rule ARN, which you’ll need to save because you’ll need it in a second.
Amazon Resource Names (ARNs) are unique identifiers of AWS resources. Read more about ARNs in the docs here.
Now that your CloudWatch Event is ready, you need to permit it to trigger a Lambda function. To do so, run the following command from your terminal:
aws lambda add-permission \ --statement-id 'hackernews-scheduled-messages' \ --action 'lambda:InvokeFunction' \ --principal 'events.amazonaws.com' \ --source-arn ruleArn \ --function-name functionName \ --region regionIn this command:
ruleArnis the ARN of the CloudWatch Event rule you recieved after running the previous command.functionNameis the name of your function from yourclaudia.jsonfile.regionis the region from yourclaudia.jsonfile.
Your command will return a JSON response. Find the Resource in the response and copy the Lambda ARN. It should look like the following:
- arn:aws:lambda:eu-central-1:123456789012:function:scheduled-slack-messages
Finally, you’ll need to set the trigger by running the following command from your terminal:
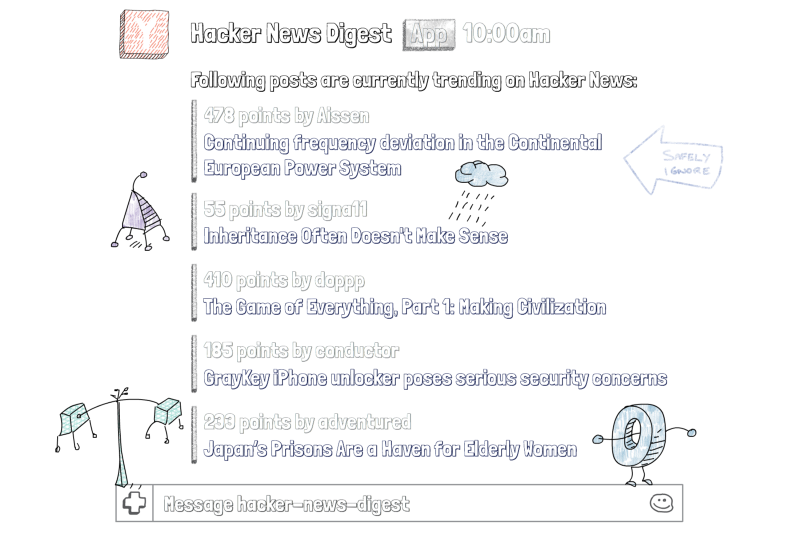
aws events put-targets --rule hackerNewsDigest --targets '[{ "Id": "1", "Arn": "your Lambda ARN" }]'And that’s it, your scheduled Slack event is ready. Next day at 10 AM CET you should receive a message that looks like the following figure.
In case you can’t wait for 10 AM and you want to see the result earlier, run the claudia test-lambda command from your terminal. Make sure you navigate to your project folder first.
More similar articles are on their way. If you want to stay up-to-date with my new articles, or you have a topic you would love to read about, follow and contact me on twitter - twitter.com/slobodan_.
As always, many thanks to my friend Aleksandar Simović for help and feeback on the article.
All illustrations are created using SimpleDiagrams4 app.
If you want to learn more about serverless apps in general, check out “Serverless Apps with Node and Claudia.js”, the book I wrote with Aleksandar Simovic for Manning Publications.
Serverless Apps with Node and Claudia.js
First the buzzwords: Serverless computing. AWS Lambda. API Gateway. Node.js. Microservices. Cloud-hosted functions…www.manning.com
The book will teach you how to build and debug a real world serverless APIs (with DB, authentication and tests) using Node and Claudia.js. It also covers the migration of your existing app that is running on servers to a serverless app, how to build chatbots for Facebook Messenger and SMS (using Twilio), and Alexa skills.