

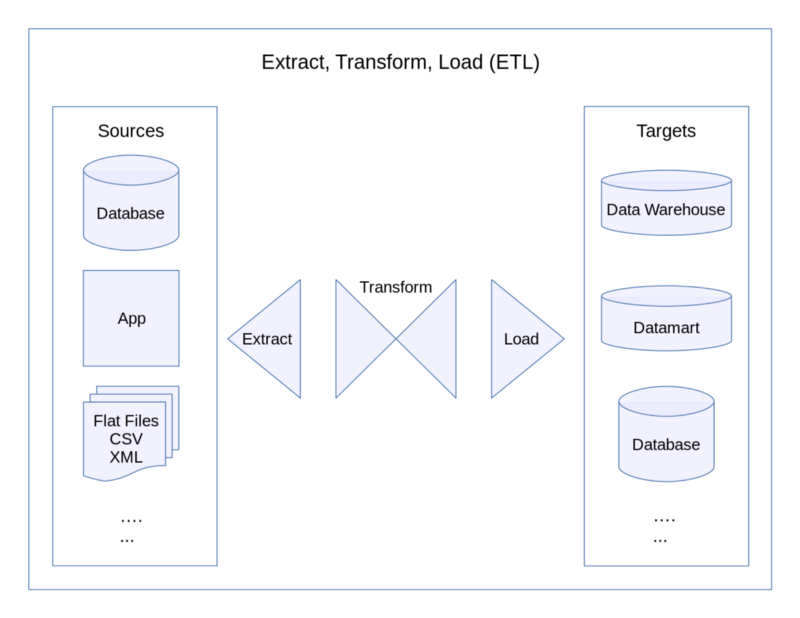
One of the key aspects of any data science workflow is the sourcing, cleaning, and storing of raw data in a form that can be used upstream. This process is commonly referred to as “Extract-Transform-Load,” or ETL for short.
It is important to design efficient, robust, and reliable ETL processes, or “data pipelines.” An inefficient pipeline will make working with data slow and unproductive. A non-robust pipeline will break easily, leaving gaps.
Worse still, an unreliable data pipeline will silently contaminate your database with false data that may not become apparent until damage has been done.
Although critically important, ETL development can be a slow and cumbersome process at times. Luckily, there are open source solutions that make life much easier.
What is SQLAlchemy?
One such solution is a Python module called SQLAlchemy. It allows data engineers and developers to define schemas, write queries, and manipulate SQL databases entirely through Python.
SQLAlchemy’s Object Relational Mapper (ORM) and Expression Language functionalities iron out some of the idiosyncrasies apparent between different implementations of SQL by allowing you to associate Python classes and constructs with data tables and expressions.
Here, we’ll run through some highlights of SQLAlchemy to discover what it can do and how it can make ETL development a smoother process.
Setting up
You can install SQLAlchemy using the pip package installer.
$ sudo pip install sqlalchemyAs for SQL itself, there are many different versions available, including MySQL, Postgres, Oracle, and Microsoft SQL Server. For this article, we’ll be using SQLite.
SQLite is an open-source implementation of SQL that usually comes pre-installed with Linux and Mac OS X. It is also available for Windows. If you don’t have it on your system already, you can follow these instructions to get up and running.
In a new directory, use the terminal to create a new database:
$ mkdir sqlalchemy-demo && cd sqlalchemy-demo
$ touch demo.db
Defining a schema
A database schema defines the structure of a database system, in terms of tables, columns, fields, and the relationships between them. Schemas can be defined in raw SQL, or through the use of SQLAlchemy’s ORM feature.
Below is an example showing how to define a schema of two tables for an imaginary blogging platform. One is a table of users, and the other is a table of posts uploaded.
from sqlalchemy import *
from sqlalchemy.ext.declarative import declarative_base
from sqlalchemy.orm import sessionmaker
from sqlalchemy.sql import *

engine = create_engine('sqlite:///demo.db')
Base = declarative_base()

class Users(Base):
    __tablename__ = "users"
    UserId = Column(Integer, primary_key=True)
    Title = Column(String)
    FirstName = Column(String)
    LastName = Column(String)
    Email = Column(String)
    Username = Column(String)
    DOB = Column(DateTime)

class Uploads(Base):
    __tablename__ = "uploads"
    UploadId = Column(Integer, primary_key=True)
    UserId = Column(Integer)
    Title = Column(String)
    Body = Column(String)
    Timestamp = Column(DateTime)

Users.__table__.create(bind=engine, checkfirst=True)
Uploads.__table__.create(bind=engine, checkfirst=True)
First, import everything you need from SQLAlchemy. Then, use create_engine(connection_string) to connect to your database. The exact connection string will depend on the version of SQL you are working with. This example uses a relative path to the SQLite database created earlier.
Next, start defining your table classes. The first one in the example is Users. Each column in this table is defined as a class variable using SQLAlchemy’s Column(type), where type is a data type (such as Integer, String, DateTime and so on). Use primary_key=True to denote columns which will be used as primary keys.
The next table defined here is Uploads. It’s very much the same idea — each column is defined as before.
The final two lines actually create the tables. The checkfirst=True parameter ensures that new tables are only created if they do not currently exist in the database.
Extract
Once the schema has been defined, the next task is to extract the raw data from its source. The exact details can vary wildly from case to case, depending on how the raw data is provided. Maybe your app calls an in-house or third-party API, or perhaps you need to read data logged in a CSV file.
The example below uses two APIs to simulate data for the fictional blogging platform described above. The Users table will be populated with profiles randomly generated at randomuser.me, and the Uploads table will contain lorem ipsum-inspired data courtesy of JSONPlaceholder.
Python’s Requests module can be used to call these APIs, as shown below:
import requests

url = 'https://randomuser.me/api/?results=10'
users_json = requests.get(url).json()
url2 = 'https://jsonplaceholder.typicode.com/posts/'
uploads_json = requests.get(url2).json()
The data is currently held in two objects (users_json and uploads_json) in JSON format. The next step will be to transform and load this data into the tables defined earlier.
Transform
Before the data can be loaded into the database, it is important to ensure that it is in the correct format. The JSON objects created in the code above are nested, and contain more data than is required for the tables defined.
An important intermediary step is to transform the data from its current nested JSON format to a flat format that can be safely written to the database without error.
For the example running through this article, the data are relatively simple, and won’t need much transformation. The code below creates two lists, users and uploads, which will be used in the final step:
from datetime import datetime, timedelta
from random import randint

users, uploads = [], []

for i, result in enumerate(users_json['results']):
    row = {}
    row['UserId'] = i
    row['Title'] = result['name']['title']
    row['FirstName'] = result['name']['first']
    row['LastName'] = result['name']['last']
    row['Email'] = result['email']
    row['Username'] = result['login']['username']
    dob = datetime.strptime(result['dob'],'%Y-%m-%d %H:%M:%S')
    row['DOB'] = dob.date()

    users.append(row)

for result in uploads_json:
    row = {}
    row['UploadId'] = result['id']
    row['UserId'] = result['userId']
    row['Title'] = result['title']
    row['Body'] = result['body']
    delta = timedelta(seconds=randint(1,86400))
    row['Timestamp'] = datetime.now() - delta

    uploads.append(row)
The main step here is to iterate through the JSON objects created before. For each result, create a new Python dictionary object with keys corresponding to each column defined for the relevant table in the schema. This ensures that the data is no longer nested, and keeps only the data needed for the tables.
The other step is to use Python’s datetime module to manipulate dates, and transform them into DateTime type objects that can be written to the database. For the sake of this example, random DateTime objects are generated using the timedelta() method from Python’s DateTime module.
Each created dictionary is appended to a list, which will be used in the final step of the pipeline.
Load
Finally, the data is in a form that can be loaded into the database. SQLAlchemy makes this step straightforward through its Session API.
The Session API acts a bit like a middleman, or “holding zone,” for Python objects you have either loaded from or associated with the database. These objects can be manipulated within the session before being committed to the database.
The code below creates a new session object, adds rows to it, then merges and commits them to the database:
Session = sessionmaker(bind=engine)
session = Session()

for user in users:
    row = Users(**user)
    session.add(row)

for upload in uploads:
    row = Uploads(**upload)
    session.add(row)

session.commit()
The sessionmaker factory is used to generate newly-configured Session classes. Session is an everyday Python class that is instantiated on the second line as session.
Next up are two loops which iterate through the users and uploads lists created earlier. The elements of these lists are dictionary objects whose keys correspond to the columns given in the Users and Uploads classes defined previously.
Each object is used to instantiate a new instance of the relevant class (using Python’s handy some_function(**some_dict) trick). This object is added to the current session with session.add().
Finally, when the session contains the rows to be added, session.commit() is used to commit the transaction to the database.
Aggregating
Another cool feature of SQLAlchemy is the ability to use its Expression Language system to write and execute backend-agnostic SQL queries.
What are the advantages of writing backend-agnostic queries? For a start, they make any future migration projects a whole lot easier. Different versions of SQL have somewhat incompatible syntaxes, but SQLAlchemy’s Expression Language acts as a lingua franca between them.
Also, being able to query and interact with your database in a seamlessly Pythonic way is a real advantage to developers who’d prefer work entirely in the language they know best. However, SQLAlchemy will also let you work in plain SQL, for cases when it is simpler to use a pre-written query.
Here, we will extend the fictional blogging platform example to illustrate how this works. Once the basic Users and Uploads tables have been created and populated, a next step might be to create an aggregated table — for instance, showing how many articles each user has posted, and the time they were last active.
First, define a class for the aggregated table:
class UploadCounts(Base):
    __tablename__ = "upload_counts"
    UserId = Column(Integer, primary_key=True)
    LastActive = Column(DateTime)
    PostCount = Column(Integer)

UploadCounts.__table__.create(bind=engine, checkfirst=True)
This table will have three columns. For each UserId, it will store the timestamp of when they were last active, and a count of how many posts they have uploaded.
In plain SQL, this table would be populated using a query along the lines of:
INSERT INTO upload_counts
SELECT
  UserId,
  MAX(Timestamp) AS LastActive,
  COUNT(UploadId) AS PostCount
FROM
  uploads
GROUP BY 1;
In SQLAlchemy, this would be written as:
connection = engine.connect()

query = select([Uploads.UserId,
    func.max(Uploads.Timestamp).label('LastActive'),
    func.count(Uploads.UploadId).label('PostCount')]).\
    group_by('UserId')

results = connection.execute(query)

for result in results:
    row = UploadCounts(**result)
    session.add(row)

session.commit()
The first line creates a Connection object using the engine object’s connect() method. Next, a query is defined using the select() function.
This query is the same as the plain SQL version given above. It selects the UserId column from the uploads table. It also applies func.max() to the Timestamp column, which identifies the most recent timestamp. This is labelled LastActive using the label() method.
Likewise, the query applies func.count() to count the number of records that appear in the Title column. This is labelled PostCount.
Finally, the query uses group_by() to group results by UserId.
To use the results of the query, a for loop iterates over the row objects returned by connection.execute(query). Each row is used to instantiate an instance of the UploadCounts table class. As before, each row is added to the session object, and finally the session is committed to the database.
Checking out
Once you have run this script, you may want to convince yourself that the data have been written correctly into the demo.db database created earlier.
After quitting Python, open the database in SQLite:
$ sqlite3 demo.dbNow, you should be able to run the following queries:
SELECT * FROM users;

SELECT * FROM uploads;

SELECT * FROM upload_counts;
And the contents of each table will be printed to the console! By scheduling the Python script to run at regular intervals, you can be sure the database will be kept up-to-date.
You could now use these tables to write queries for further analysis, or to build dashboards for visualisation purposes.
Reading further
If you’ve made it this far, then hopefully you’ll have learned a thing or two about how SQLAlchemy can make ETL development in Python much more straightforward!
It is not possible for a single article to do full justice to all the features of SQLAlchemy. However, one of the project’s key advantages is the depth and detail of its documentation. You can dive into it here.
Otherwise, check out this cheatsheet if you want to get started quickly.
The full code for this article can be found in this gist.
Thanks for reading! If you have any questions or comments, please leave a response below.