
by Stefan Doorn
How to test Webhooks when you’re developing locally

Webhooks can be used by an external system for notifying your system about a certain event or update. Probably the most well known type is the one where a Payment Service Provider (PSP) informs your system about status updates of payments.
Often they come in the form where you listen on a predefined URL. For example http://example.com/webhooks/payment-update. Meanwhile the other system sends a POST request with a certain payload to that URL (for example a payment ID). As soon as the request comes in, you fetch the payment ID, ask the PSP for the latest status via their API, and update your database afterward.
Other examples can be found in this excellent explanation about Webhooks. https://sendgrid.com/blog/whats-webhook/.
Testing these webhooks goes fairly smoothly as long as the system is publicly accessible over the internet. This might be your production environment or a publicly accessible staging environment. It becomes harder when you are developing locally on your laptop or inside a Virtual Machine (VM, for example, a Vagrant box). In those cases, the local URL’s are not publicly accessible by the party sending the webhook. Also, monitoring the requests being sent around is be difficult, which might make development and debugging hard.
What will this example solve:
- Testing webhooks from a local development environment, which is not accessible over the internet. It cannot be accessed by the service sending the data to the webhook from their servers.
- Monitor the requests and data being sent around, but also the response your application generates. This will allow easier debugging, and therefore a shorter development cycle.
Prerequisites:
- Optional: in case you are developing using a Virtual Machine (VM), make sure it’s running and make sure the next steps are done in the VM.
- For this tutorial, we assume you have a vhost defined at
webhook.example.vagrant. I used a Vagrant VM for this tutorial, but you are free in choosing the name of your vhost. - Install
ngrokby following the installation instructions. Inside a VM, I find the Node version of it also useful: https://www.npmjs.com/package/ngrok, but feel free to use other methods.
I assume you don’t have SSL running in your environment, but if you do, feel free to replace port 80 with port 433 and http:// with https:// in the examples below.
Make the webhook testable
Let’s assume the following example code. I’ll be using PHP, but read it as pseudo-code as I left some crucial parts out (for example API keys, input validation, etc.)
The first file: payment.php. This file creates a payment object and then registers it with the PSP. It then fetches the URL the customer needs to visit in order to pay and redirects the user to the customer in there.
Note that the webhook.example.vagrant in this example is the local vhost we’ve defined for our development set-up. It’s not accessible from the outside world.
<?php
/*
 * This file creates a payment and tells the PSP what webhook URL to use for updates
 * After creating the payment, we get a URL to send the customer to in order to pay at the PSP
 */
$payment = [
    'order_id' => 123,
    'amount' => 25.00,
    'description' => 'Test payment',
    'redirect_url' => 'http://webhook.example.vagrant/redirect.php',
    'webhook_url' => 'http://webhook.example.vagrant/webhook.php',
];

$payment = $paymentProvider->createPayment($payment);
header("Location: " . $payment->getPaymentUrl());
Second file: webhook.php. This file waits to be called by the PSP to get notified about updates.
<?php
/*
 * This file gets called by the PSP and in the $_POST they submit an 'id'
 * We can use this ID to get the latest status from the PSP and update our internal systems afterward
 */

$paymentId = $_POST['id'];
$paymentInfo = $paymentProvider->getPayment($paymentId);
$status = $paymentInfo->getStatus();

// Perform actions in here to update your system
if ($status === 'paid') {
    ..
}
elseif ($status === 'cancelled') {
    ..
}
Our webhook URL is not accessible over the internet (remember: webhook.example.vagrant). Thus, the file webhook.php will never be called by the PSP. Your system will never get to know about the payment status. This ultimately leads to orders never being shipped to customers.
Luckily, ngrok can in solving this problem. ngrok describes itself as:
ngrok exposes local servers behind NATs and firewalls to the public internet over secure tunnels.
Let’s start a basic tunnel for our project. On your environment (either on your system or on the VM) run the following command:
ngrok http -host-header=rewrite webhook.example.vagrant:80
Read about more configuration options in their documentation: https://ngrok.com/docs.
A screen like this will come up:
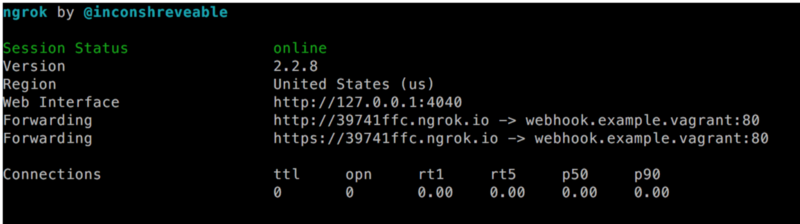
What did we just start? Basically, we instructed ngrok to start a tunnel to http://webhook.example.vagrant at port 80. This same URL can now be reached via http://39741ffc.ngrok.io or https://39741ffc.ngrok.io, They are publicly accessible over the internet by anyone that knows this URL.
Note that you get both HTTP and HTTPS available out of the box. The documentation gives examples of how to restrict this to HTTPS only: https://ngrok.com/docs#bind-tls.
So, how do we make our webhook work now? Update payment.php to the following code:
<?php
/*
 * This file creates a payment and tells the PSP what webhook URL to use for updates
 * After creating the payment, we get a URL to send the customer to in order to pay at the PSP
 */
$payment = [
    'order_id' => 123,
    'amount' => 25.00,
    'description' => 'Test payment',
    'redirect_url' => 'http://webhook.example.vagrant/redirect.php',
    'webhook_url' => 'https://39741ffc.ngrok.io/webhook.php',
];

$payment = $paymentProvider->createPayment($payment);
header("Location: " . $payment->getPaymentUrl());
Now, we told the PSP to call the tunnel URL over HTTPS. ngrok will make sure your internal URL get’s called with an unmodified payload, as soon as the PSP calls the webhook via the tunnel.
How to monitor calls to the webhook?
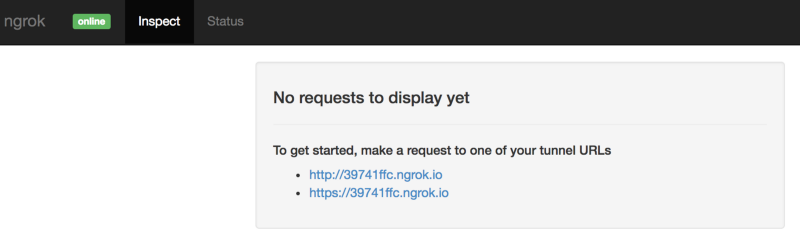
The screenshot you’ve seen above gives an overview of the calls being made to the tunnel host. This data is rather limited. Fortunately, ngrok offers a very nice dashboard, which allows you to inspect all calls:
I won’t go into this very deep because it’s self-explanatory as soon as you have it running. Therefore I will explain how to access it on the Vagrant box as it doesn’t work out of the box.
The dashboard will allow you to see all the calls, their status codes, the headers and data being sent around. You will also see the response your application generated.
Another neat feature of the dashboard is that it allows you to replay a certain call. Let’s say your webhook code ran into a fatal error, it would be tedious to start a new payment and wait for the webhook to be called. Replaying the previous call makes your development process way faster.
The dashboard by default is accessible at http://localhost:4040.
Dashboard in a VM
In order to make this work inside a VM, you have to perform some additional steps:
First, make sure the VM can be accessed on port 4040. Then, create a file inside the VM holding this configuration:
web_addr: 0.0.0.0:4040
Now, kill the ngrok process that’s still running and start it with this slightly adjusted command:
ngrok http -config=/path/to/config/ngrok.conf -host-header=rewrite webhook.example.vagrant:80
You will get a screen looking similar to the previous screenshot though the ID’s have changed. The previous URL doesn’t work anymore, but you got a new URL. Also, the Web Interface URL got changed:
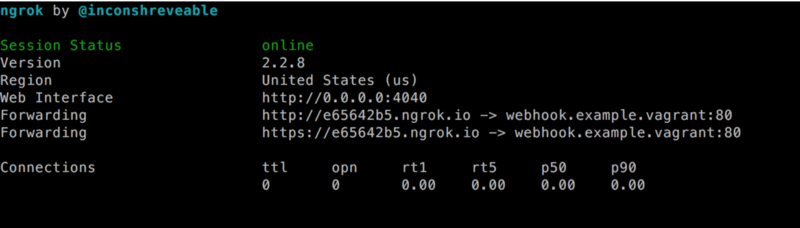
Now direct your browser to http://webhook.example.vagrant:4040 to access the dashboard. Also, make a call to https://e65642b5.ngrok.io/webhook.php.This will probably result in an error in your browser, but the dashboard should show the request being made.
Final remarks
The examples above are pseudo-code. The reason is that every external system uses webhooks in a different way. I tried to give an example based on a fictive PSP implementation, as probably many developers have to deal with payments at some moment.
Please be aware that your webhook URL can also be used by others with bad intentions. Make sure to validate any input being sent to it.
Preferably also add a token to the URL which is unique for each payment. This token must only be known by your system and the system sending the webhook.
Good luck testing and debugging your webhooks!
Note: I haven’t tested this tutorial on Docker. However, this Docker container looks like a good starting point and includes clear instructions. https://github.com/wernight/docker-ngrok.
Stefan Doorn
https://github.com/stefandoorn
https://twitter.com/stefan_doorn
https://www.linkedin.com/in/stefandoorn