by Amin Mohamed Ajani
The brain-fatigued JavaScripter’s guide to modern frontend tooling in 2018

From package managers to ESLint, CommonJS to AMD, and ES6 Modules to Babel and Webpack — that’s a lot of tools! In this article, we’ll migrate an old AngularJS app where we’ll decode the tools NOW.
I’m tired…
Yes, I got the fatigue today.
How will your project die? #javascript pic.twitter.com/zhSlmrAEZU
— David Neal ?? (@reverentgeek) June 13, 2018
Which got me thinking, I could have stayed working in sales and not taken a detour to front end web development. But then I realized that front end development is for the brave hearts, and brave hearts don’t quit. They win.
So I’m choosing to win by writing something worthwhile for fatigued victims of front end development and its tooling. I’ll be writing on how I transformed beginner code to a full-blown production level application, and the tools I configured in the process.
Let’s get started!
What we’re building
Nothing fancy. We’re building a web application that fetches some random users from an API and displays it on the front-end. It will have no routing extraordinare. The end goal of the article is to equip you to get used to frontend tooling.
I’m using AngularJS with no boilerplate, so we that aren’t abstracted away from CLIs that leaves us breathless and in the awe of black magic funnery. Note: I’m using AngularJS and not Angular. AngularJS because I couldn’t find any posts related to AngularJS tooling and bundling.
Let’s start by creating an index file on our root directory.
<html>
<head>
    <title>Random User!</title>
    <link rel="stylesheet" href="https://unpkg.com/spectre.css/dist/spectre.min.css">
</head>
<body>
<div class="container">
    <h1 class="text-center">Random User!</h1>
</div>
<script src="https://cdnjs.cloudflare.com/ajax/libs/angular.js/1.7.0/angular.min.js"></script>
</body>
Good old days of yore. Got an Angularjs file and a minimal CSS framework from the CDN, and then we start cooking our JavaScript code and keep attaching it to the index line by line.
But as your app will grow, it will be necessary to keep track of all your dependencies (in this case, Angular).
Enter Package Managers
So a lot of people resort to having a package manager which keeps track of the versions of dependencies they use on their project. A package manager’s single most USP is to goto the GitHub of the dependency, download it in your folder, and keep track of the version downloaded. This helps you not break your code if you move your repo and later download another version.
There was duojs, jspm, bower, npm and now, there is:
Introducing Yarn: a new package manager for JavaScript from @fbOpenSource, @tildeio, @googledevs & @exponentjs. https://t.co/2LfN5OXjOv
— Yarn (@yarnpkg) October 11, 2016
Go ahead, install it. We’re gonna need it. When we add a dependency in our application, yarn will download the stuff and keep it inside the node_modules folder. From then on, if you need the file, you can src-reference into your index.
yarn add angular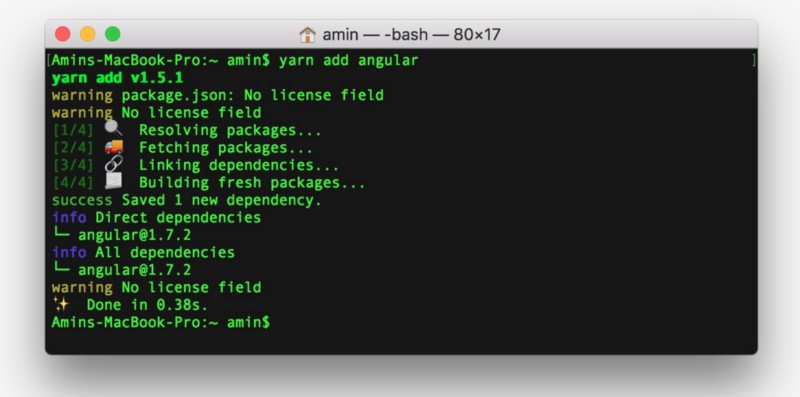
While we’re doing this, let’s also add app.js, userController.js, and userFactory.js files in our root directory and link them up into our index file.
App.js:
/**
 * /app.js
 */

var app = angular.module("RandomApp", []);
userFactory.js:
// /userFactory.js
app.factory("UserF", function($http) {
    var UserF = {};
    UserF.getUsers = function(){
        return $http({
            method: 'GET',
            url: 'https://www.reqres.in/api/users',
        })
    };
    return UserF;
});
userController.js:
// /userController.js
app.controller("userController", function($scope, UserF){
    $scope.users = [];
    UserF.getUsers()
        .then(function(res) {
            $scope.users = res.data.data;
        })
});
index.html:
<!doctype html>
<html lang="en">
<head>
    <meta charset="UTF-8">
    <meta name="viewport"
          content="width=device-width, user-scalable=no, initial-scale=1.0, maximum-scale=1.0, minimum-scale=1.0">
    <meta http-equiv="X-UA-Compatible" content="ie=edge">
    <title>Random User!</title>
    <link rel="stylesheet" href="https://unpkg.com/spectre.css/dist/spectre.min.css">
</head>
<body>
<div class="container" ng-app="RandomApp">
    <h1 class="text-center">Random User!</h1>
    <div ng-controller="userController">
        <div ng-repeat="user in users">
            <div class="card">
                <div class="card-image">
                    <img ng-src="{{user.avatar}}" class="img-responsive">
                </div>
                <div class="card-header">
                    <div class="card-title h5">{{user.first_name}} {{user.last_name}}</div>
                </div>
            </div>
        </div>
    </div>
</div>
<script src="node_modules/angular/angular.min.js"></script>
<script src="app.js"></script>
<script src="userController.js"></script>
<script src="userFactory.js"></script>
</body>
</html>
Problems with this approach
The order of our script tag must be in that specific order. app.js makes the variable app and then attaches it to the global window object. This app variable is then used by the rest of the script files. This is often called global namespace pollution, and if you are still using this approach, don’t. Further, if we open any one JS file in any given moment, we will have no idea what the app variable holds.
Another semantic problem with this code is that this code uses anonymous functions. Anonynous functions are both a boon and bane to JavaScript. Always name your anonymous function. It will make stack traces easier to debug.
Now wouldn’t it be cool if we could have a JS police that pointed out this stuff to us while we wrote?
ESLint
ESLint is a linter. Kind of like code-pairing with a stricter version of you. Linters save time for you by debugging your code before you even run your application. Also it forces you and your team to follow clean code practices. Who says no to such an awesome teacher?
We ❤️ the @geteslint `--fix` option. It speeds up the process of integrating such a cool tool to existing projects . #software #devtools #javascript #eslint #superpowers pic.twitter.com/l0lrskSzUJ
— Origen Studio (@TheOrigenStudio) June 20, 2018
Configuring ESLint
yarn add eslint eslint-config-airbnb eslint-config-airbnb-base -DWe’ll be using Airbnb’s style configuration that runs through our code and tells us wherever we’re writing the code in a non-standard way. The above command will install the configurations in the node_modules folder, but we will need to tell ESLint to use these. Make a file called .eslintrc.json and fill it up with:
// .eslintrc.json
{
  "extends": [
    "airbnb/legacy"
  ],
  "env": {
    "browser": true
  }
}
The extends stack tells ESLint to use the Airbnb rules on top of its own rules. The env variable tells ESLint to not scream at us if we’re using variables like window without initializing it. To lint through all our files, you can use a wildcard *.
node_modules/.bin/eslint *.jsLet’s run ESLint on our files and see what happens.
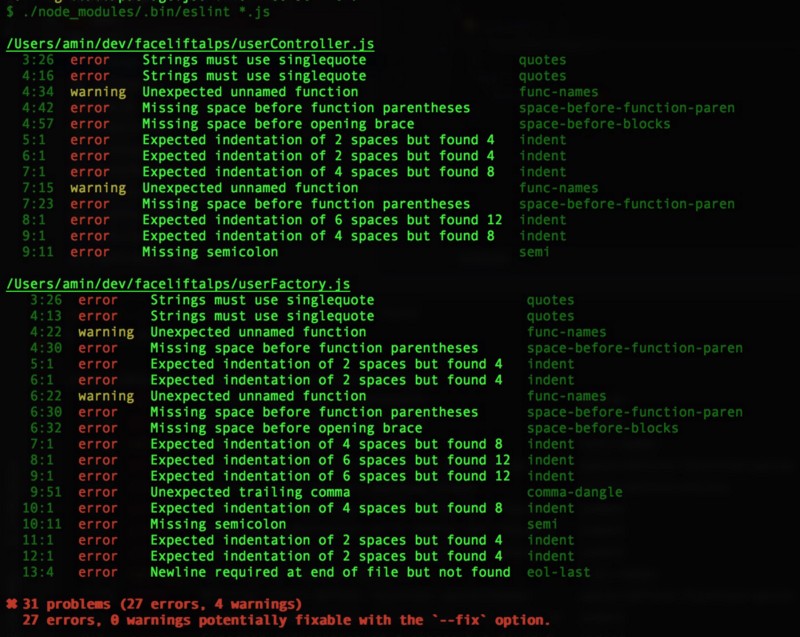
These are all rules defined in the Airbnb style guide. I’ll leave it up to you to fix your files. It’s always better to have a linter from the beginning. Of course, you can also switch off a particular rule. For example, if you prefer no-semicolon, or the double-quote style to single quote, you can switch them off. ESLint will give you that flexibility.
Modules
Now let’s talk about modularity. When making large scale applications, we need to have our code well-structured so that it’s easier to scale. We put in place a separation of concerns by grouping code pieces in separate modules. JavaScript didn’t support modules until ES6 came along. But the concept of modularity came long before ES6.
CommonJS
Before ES6, this standard was adopted as a pattern where you write your piece of code and tell the environment to export that piece. And then you’d use a library like RequireJS to import the module.
// util.js
module.export = {
    noop: function(){},
    validateUrl: function(s){
      return s.matches(/https?:\/\/(www\.)?[-a-zA-Z0-9@:%._\+~#=]{2,256}\.[a-z]{2,6}\b([-a-zA-Z0-9@:%_\+.~#?&//=]*)/)
    }
};
// postController.js
var validateUrl = require('./util').validateUrl;
var handleSubmit = function handleSubmit(e) {
    if(!validateUrl(e.target.value)) {
       return;
    }
    submitUrl(e.target.value);
}
If you’ve tinkered around with Node, you may find that piece of code very familiar. But there are downsides to this standard, because it’s synchronous. Which means that unless validateUrl is required, handleSubmit on Line 3 of postController above isn’t executed. The code halts.
This ideology works fine in Node.js. In Node, we can have a lot of dependencies before starting a server. For example, configuring log files, connecting to the DB on cloud, configuring secret keys. But on the front end, it is not always required.
Asynchronous Module Definition (AMD)
Like the name suggests, it asynchronously loads modules and has a few more advantages over CommonJS patterns. Here’s how the code looks like in AMD (I added a couple of functions). Do you see something familiar?
define(['validateSpam', 'blockUser', function(validateSpam, blockUser){
  return {
    noop: function(){},
    validateUrl: function(s) {
      return s.matches(/https?:\/\/(www\.)?[-a-zA-Z0-9@:%._\+~#=]{2,256}\.[a-z]{2,6}\b([-a-zA-Z0-9@:%_\+.~#?&//=]*)/)
    },
    validateSpammyComment: function validateSpammyComment(comment, userID) {
      if(validateSpam(comment)) {
        blockUser(userID);
        return false;
      }
      return true;
  }
It kind of feels like the way we Inject Dependencies in AngularJS on Line 1.
ES6 Modules
Since the committee at TC39 saw developers using external libraries, they clearly felt the need for JavaScript to support modules. So they introduced them in ES6. Let’s use them!
utils.js:
function noop(){};
function validateUrl(s) {
  return s.matches(/https?:\/\/(www\.)?[-a-zA-Z0-9@:%._\+~#=]{2,256}\.[a-z]{2,6}\b([-a-zA-Z0-9@:%_\+.~#?&//=]*)/)
}
export {
  noop,
  validateUrl
}
postController:js
import { validateUrl } from './util';

var handleSubmit = function handleSubmit(e) {
    if(!validateUrl(e.target.value)) {
       return;
    }
    submitUrl(e.target.value);
}
No external library to call. Import/export natively supported. But there are still versions of browsers which do not completely support all the features of ES6. This inconsistency of browser support didn’t stop programmers from writing the next generation of JavaScript. Tools like babel are available that scan through the JavaScript and transpile it down to browser compatible code. And just like that, your code supports older browsers like IE (oh IE die already!).
Babel and ES6
Okay, so let’s convert our old JavaScript to newer JavaScript. A little bit so that we can add some modularity. All this while, let’s keep our linter from yelling.
// /userFactory.js
let angular = window.angular;
let app = angular.module('RandomApp');

/**
 * A User factory which gets the user list
 * @param $http
 */

let userFactory = $http => {
  let UserF = {};
  UserF.getUsers = () => $http({
    method: 'GET',
    url: 'https://www.reqres.in/api/users'
  });
  return UserF;
};
app.factory('UserF', userFactory);
// /userController.js
let angular = window.angular;
let app = angular.module('RandomApp');
/**
* Controls the user
* @param $scope
* @param UserF
*/
let userController = ($scope, UserF) => {
$scope.users = [];
UserF.getUsers().then(res => $scope.users = res.data.data);
};
userController.$inject = ['$scope', 'UserFactory'];
app.controller('userController', userController);Problem with this code
This code won’t work. Because the let keyword of ES6 creates block scoped variables, and we can’t redefine a block scoped variable inside it’s own scope again. Remember: we’re still sitting on the global scope. We’ll fix this.
The reason why I asked you to refactor the code is because I want you to use babel on this and see the magic yourself. Time to fire up that terminal.
yarn add babel-cli babel-preset-envThis will add babel-cli and babel-preset-env.
Babel plugins and presets
The code goes through a series of transformations, and you can choose what kinds of transformations you want. You can have it convert arrow functions to anonymous, transform spread operators, transform for…of loops and a lot more. These transformations are what we call plugins.
You can pick and choose what kinds of transformations you want. Groups of plugins are called presets. Babel-preset-env creates a moving target for your babel. You are not pin-pointing the actual version of JavaScript, but you are asking babel to track the last n versions of all browsers.
Now make a babel configuration file: .babelrc and place it in the root folder.
{
  "presets": [
    ["env", {
      "targets": {
        "browsers": "last 2 versions"
      }
    }]
  ]
}
Now, if you run the following command on your terminal, babel will do its job. Go ahead, try it out:
node_modules/.bin/babel *.js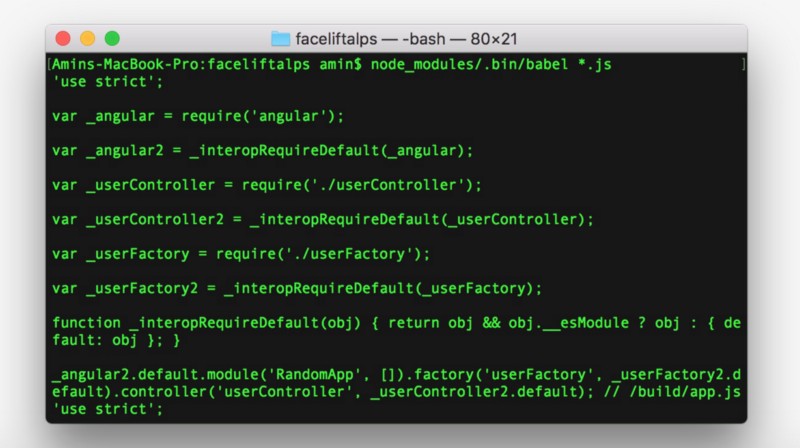
Nifty stuff, right? Babel gave a preview of how the files will look if it were to convert the files for us.
Now let’s take a breather and think about what all we’ve accomplished so far. We’ve broken down a JavaScript file into many files. We’ve added a linter so that it yells at us if we write funny code. We’re writing JavaScript in the future and making it available to the browser in a version it understands. We’ve polluted the global namespace, but we’ve done it awesomely which we will fix soon.
If only there was a tool that does all that automatically. We’d tell it to take our code, run the linter for any errors before the code hits production, and transpile it to browser compatible code. Yes, there is such a tool.
Let’s automate the hell out of this.
Bundling with Webpack
First, move all JS files into a folder. And let’s use standard mnemonics and name the folder build. Also, let’s refactor our JavaScript files so that we can have all our files built up in a single file.
// /build/userController.js

/**
 * Controls the user
 * @param $scope
 * @param UserF
 */
let userController = ($scope, UserF) => {
    $scope.users = [];
    UserF.getUsers().then(res => $scope.users = res.data.data);
};
userController.$inject = ['$scope', 'userFactory'];

export default userController;
// /build/userFactory.js
/**
* A User factory which gets the user list
* @param $http
*/
let userFactory = $http => {
let UserF = {};
UserF.getUsers = () => $http({
method: 'GET',
url: 'https://www.reqres.in/api/users'
});
return UserF;
};
userFactory.$inject = ['$http'];
export default userFactory;// /build/app.js
import angular from 'angular';
import userController from './userController';
import userFactory from './userFactory';
angular.module('RandomApp', [])
.factory('userFactory', userFactory)
.controller('userController', userController);yarn add webpack webpack-dev-server babel-loader eslint-loader -DAnd now, create a webpack.config.js file:
var path = require('path');

module.exports = {
    mode: 'development', // tells webpack that this is a development build. the 'production' switch will minify the code among other things
    devtool: 'cheap-eval-source-map', // generate source maps for better debugging and dont take much time.
    context: __dirname, // since this runs in a node environment, webpack will need the current directory name
    entry: './build/app.js', // take this file and add to the bundled file whatever this file imports
    output: {
        path: path.join(__dirname, 'dist'), // output this in a dist folder
        filename: 'bundle.js' // and name it bundle.js
    },
  // read medium post to know what's module and devServer because I dont have much room for comments
    module: {
      rules: [{
        enforce: 'pre',
        loader: 'eslint-loader',
        test: /\.js$/
      }, {
        loader: 'babel-loader',
        test: /\.js$/
      }]
    },
    devServer: {
        publicPath: '/dist/',
        filename: 'bundle.js',
        historyApiFallback: true,
        overlay: true
    }
};
If you now fire up Webpack, you will see all files bundled up in a single file in a dist folder.
webpack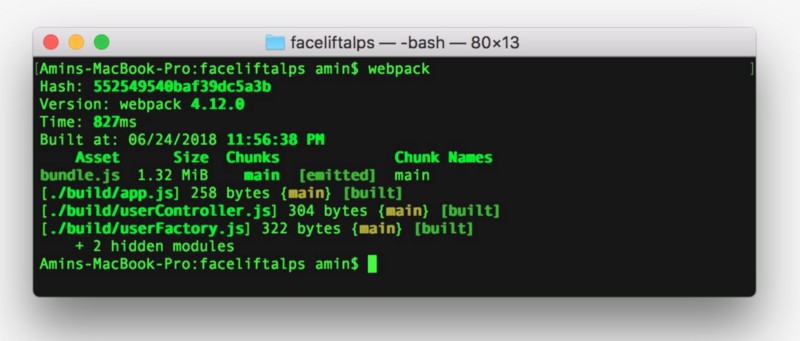
Bliss.
Dissecting Webpack Configuration
Congratulations. Give yourself a pat on the back. You bundled your files so that they’re almost production ready. Now let’s talk about the configuration. I’ll break it down and tell you exactly what each key is. For more, you can always read the manual.
I’ve commented most of the stuff. Here, I talk about the left out stuff:
Webpack Loaders (module object)
Think of this as a chain of code-loading units in a pipeline. The last one in the stack (babel-loader in our case) is the first one which Webpack uses for loading the code chunks. We’re asking Webpack to go through our code and transpile it first into ES5 using the babel-loader.
A loader object will also need a test key. It uses this key to find all files it needs to pick up (in our case, a regex that matches files ending with the extension dot JS). Once transpiled, proceed to the next loader (eslint-loader in our case). And in the end, write the changes from memory to a file and dump it in the file which we’ve specified in the output object.
But that’s not what our config does. We’ve added an enforce-pre on our ESLint loader because we want the linting first. Because the output will be a single file. And that file will be in a barely human readable format if we use minification and obfuscation (which is often the case in production). The Linter will go crazy looking at our end code. We don’t want that. So Webpack will lint first and then transpile.
Apart from these, there are many loaders you can use, be it to load your style files, your SVGs, or fonts. One loader that I almost always end up using at work is the html-loader.
HTML loader
In the case of Angular, when we have templates in directives/components, we can use an html-loader in Webpack.
templateUrl: './users/partial/user.tpl.html' // instead of this,
templateUrl: require('./users/partial/user.tpl.html')
Webpack thrives on a super huge community which comes up with awesome loaders with great documentation. For all your needs, chances are, there is at least one loader written.
Webpack Dev Server (devServer)
Webpack dev server is a module that comes separate from Webpack. It spins up its own server and watches the files we change. If you make any changes, the WDS will bundle it again and refresh the page. If there are errors, it will refresh the page to an overlay screen (configured by the overlay key) and show you the error right on the browser. And it’s super fast because it does all that in the memory and not on the hard storage.
Of course, to get it to work, you first need to have a base build file (that is, run Webpack at least once to have a build file). Once you have that, you can fire up this command. It will start the server and serve the static files, open the browser for you on port 8080 by default, and keep watching the changes.
webpack-dev-server --openThat’s it!
But this is not the end of it if you think about it. There are still so many things you can do. At work, we use Flow for static type check while we code. A static type checker looks at your code and warns you if you’re, say, calling functions with the wrong type of arguments. You can integrate that as well in Webpack.
We also use Prettier to format our code automatically as we type. It just makes the code more readable.
Any fool can write code that a computer can understand. Good programmers write code that humans can understand — Martin Fowler.
I’m going to put that up as a poster on my desk soon.
Conclusion
Congratulations! You did it!
If you survived reading this larger than life article, let me give you an over-the-internet-hi-five and tell you that today, you won. Surviving JavaScript is not easy for me. I wish I could have known all this while working on my first project as a UI guy. But I guess that’s how front-end development is for me. Keep learning, keep evolving.
I’m tinkering with React for now, and I soon may come up with another article if you liked this one. Maybe include ReasonML, GraphQL or Redux. If you liked this article or hated it or have some feedback, please do tell me.
I live on twitter as @AminSpeaks and everywhere else as @binarybaba.
Cheers and Godspeed.