by Kevin Kononenko

Traversing the DOM Is Just Like Creating Your Personal Schedule
If you use a calendar to plan your day, then you can understand the basics of the DOM.
Think back to the first time you learned HTML.
Someone (or some software) had to explain how the different elements worked together so that you could build your first web page.
They probably described it as “boxes within boxes… within boxes…. within boxes…”

And that basic level of understanding actually works pretty well to get you going! But then, once you get comfortable with CSS and get into JavaScript… well, boxes within boxes is no longer going to cut it.
JavaScript Forces You To Understand The DOM More Deeply
As soon as you get to JavaScript and jQuery, you need to understand the Document Object Model (DOM). The DOM is an Application Programming Interface (API) that allows you to use JavaScript to make changes to your HTML.
It is the key to building dynamic websites and linking JavaScript and HTML on the front-end.
Usually, the DOM is called the DOM tree. This sort of works to explain the basic idea since people understand the idea of tree branches and an infinite hierarchy of these branches.
But, the analogy is still so basic that you will struggle to understand the different relationships between elements in the DOM.
I wanted to find a way to explain the two key concepts in the DOM:
- Containment: Parent elements contain children elements. And those children contain their children elements.
- Order: DOM elements have a definite order that you can manipulate.
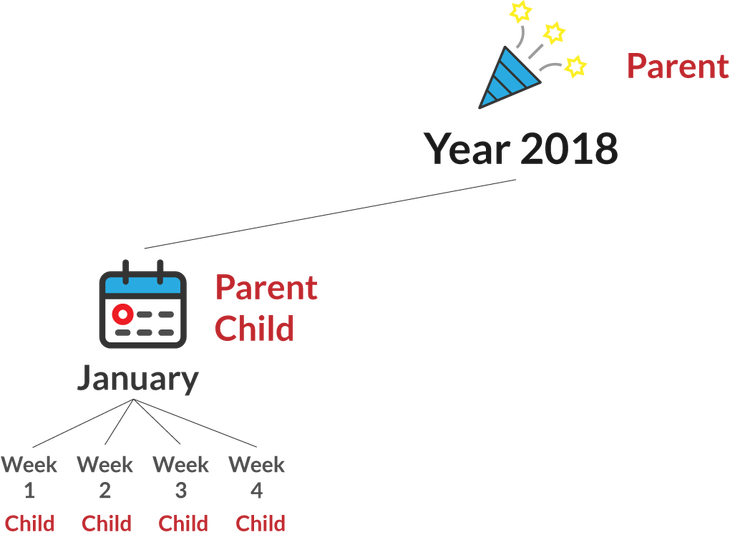
I found that the concept of a personal calendar does a much better job at showing the complex relationships between elements in the DOM. Here is a visual explanation of how to use a calendar to understand the DOM.
In order to understand this tutorial, you just need to understand classes and how to set up an HTML document.
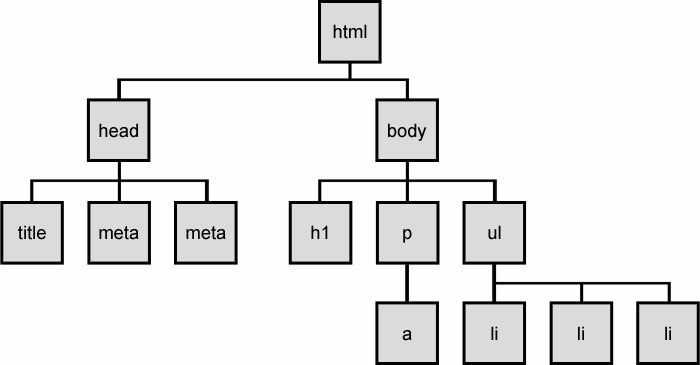
The Basics of Traversing The DOM
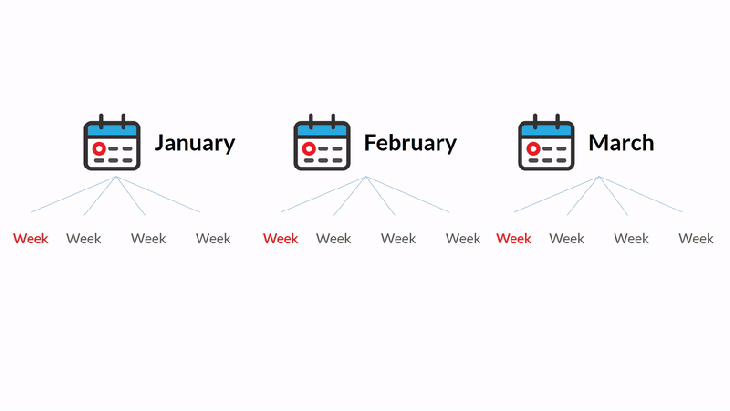
Here is a quick diagram of the first three months of 2018.
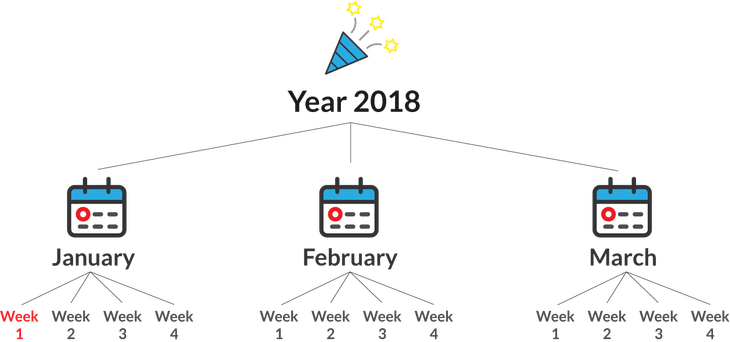
In this case, the year contains three months, which each contain 4 weeks.
Here is the exact same concept in HTML:
Each month is a div that not only has the class of month, but also a class with a specific name of the month. This is because there are a nearly infinite number of years, so there are many cases of each class. The same structure is used on the div with class year on line 1.
Also, the weeks do not have any particular identifier beyond the week class. You will see why in a moment.
Besides using classes and IDs to access elements via the DOM, we can also use the relationships between elements. There are three that you need to know for now — child, parent, and sibling.
Child Elements
Child element: An element that is contained within another element
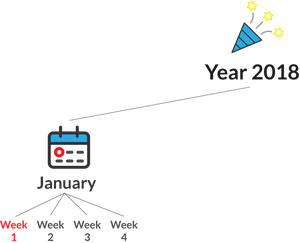
Example — The january div is a child of the year 2018.
Parent Elements
Parent element: An element that contains other elements.
Example: The year 2018 is a parent. But January is also a parent because it contains 4 weeks!
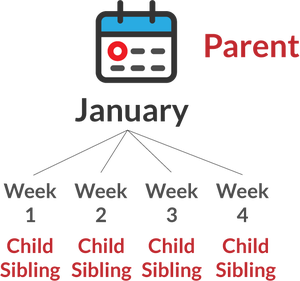
Sibling Elements
Sibling Element: an element that has the same direct parent as other elements.
Example: All 4 weeks within January are siblings of each other.
So what is the difference between the DOM and actual HTML, you might be asking?
Well, think of the way you use a personal calendar. It is just a record of the things that you do during your days. It is not the actual activity! In other words, it is a model of the stuff that goes on during the day.
The HTML is the actual content of your day. HTML elements make up the webpage, while the DOM is an accessible interface to direct changes.
Here are a few examples that will show these concepts in action.
Example #1: Playing Soccer Once A Week
Okay, we are going to show how you would represent some real-world habits in the DOM. Here’s the scenario: You want to play soccer once a week for the month of January.
In HTML terms, that means we need to get each of the 4 weeks in January and change their content to: “Play soccer”.
This may sound like a silly, rhetorical question, but do you know what those 4 divs with class week have in common?
The answer: They are all children of the div with class january!
So, we can use the following statement in JavaScript to get the div with class january:
document.getElementsByClassName('january');Then, we need all children of that div. We can update the previous statement with the childNodes property:
document.getElementsByClassName('january').childNodes;
Finally, we need to use the nodeValue property to change the text for every element. And, we need to use a for loop to access element withing childNodes, since that returns an array of elements. So we need to iterate through that list.
let weeks = document.getElementsByClassName('january').childNodes;for(let i = 0; i< weeks.length; i++){ weeks[i].nodeValue = "Play soccer";}Here is the final result in HTML:
We did two things here:
- Traversed the DOM– that means we used a series of selectors to get the elements we need: the 4
weekdivs - Manipulated the DOM– we actually changed the text content within the HTML elements!
Example #2: Paying Your Credit Card Bill
Here’s the second scenario: You need to make a credit card bill payment during the first week of every month (there are three total months in this case).
In HTML terms, this means that we need to get the first child element of every div with class month. You then need to change the value to Bill payed.
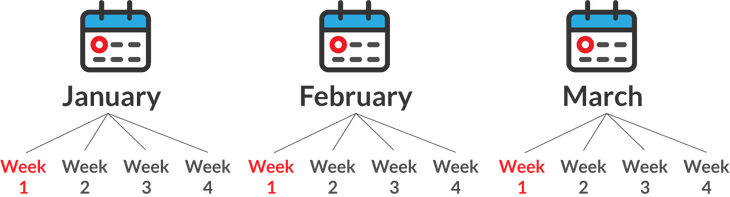
Let’s start the same way as last time. We need to grab every div with class month.
document.getElementsByClassName('month');Next, JavaScript actually has a firstChild property. So we can grab the first child of every div with class month.
document.getElementsByClassName('month').firstChild;Here is what that looks like:
Now, just like last time, we need to change the value of all those week divs at once to a value of Bill payed.
document.getElementsByClassName('month').firstChild.nodeValue = "Bill payed";Having the JavaScript statement on two lines doesn’t matter, by the way, as long as there is just one semicolon.
Final HTML:
See how we can update elements at scale based simply on a class name? Pretty powerful.
Example #3: Going On Vacation For A Week
Here’s the scenario. Let’s say that this is your work calendar, and you want to indicate that you will be taking the second week of February off to go on vacation with your family.
In HTML terms, that means you need to select the second child of the february div and change the value to Vacation.
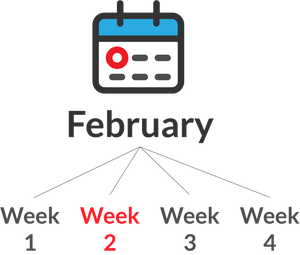
Last time, we used the firstChild property from JavaScript. But there is no second child property! Instead, we are going to use the childNodes property, just like in the first example.
childNodes returns an array of all the children of the parent element. If you are not already familiar with arrays, check out my guide here. The good news is that you can select specific elements using braces [ ], just like any other array.
Since arrays are 0-indexed, we need to select the element with an index of 1, which is the second item.
document.getElementsByClassName('february').childNodes[1];And then we just need to change the value.
document.getElementsByClassName('february') .childNodes[1].nodeValue= 'Vacation';And the final HTML.
childNodes simply applies the array structure, which you probably already know, onto the DOM so that you can manipulate HTML.
Call To Action
Did you enjoy this? If you want to get notified when I release future tutorials that use analogies, sign up here.