
I have over two decades of professional experience as a developer, I know a wide variety of frameworks and programming languages, and one of my favorites is Python. I’ve been teaching it for quite some time now, and according to my experience, establishing Python environments is a challenging topic.
Thus, my main motivation for writing this article was to help current and potential Python users to have a better understanding of how to manage such environments.
If you’ve opened this article, chances are that you already know what Python is, why it is a great tool, and you even have a Python installed on your computer.
So why exactly do you need Python environments? You might ask: shouldn’t I just install the latest Python version?
Why you need multiple Python environments
When you start learning Python, it is a good starting point to install the newest Python version with the latest versions of the packages you need or want to play around with. Then, most likely, you immerse yourself in this world, and download Python applications from GitHub, Kaggle or other sources. These applications may need other versions of Python/packages than the ones you have been currently using.
In this case, you need to set up different so-called environments.
Aside from this situation, there are more use cases when having additional environments might come in handy:
- You have an application (developed by yourself or by someone else) that once worked beautifully. But now you’ve tried to run it, and it is not working. Perhaps one of the packages is no longer compatible with the other parts of your program (due to the so-called breaking changes). A possible solution is to set up a new environment for you application, that contains the Python version and the packages that are completely compatible with your application.
- You are collaborating with someone else, and you want to make sure that your application is working on your team member’s computer, and vice versa, so you can also set up an environment for your co-worker’s application(s).
- You are delivering an application to your client, and again, you want to make sure that it is working smoothly on your client’s computer.
An environment consists of a certain Python version and some packages. Consequently, if you want to develop or use applications with different Python or package version requirements, you need to set up different environments.
Now that we’ve discussed why environments are useful, let’s dive in and talk about some of the most important aspects of managing them.
Package and environment managers
The two most popular tools for setting up environments are:
- PIP (a Python package manager; funnily enough, it stands for “Pip Installs Packages”) with virtualenv (a tool for creating isolated environments)
- Conda (a package and environment manager)
In this article, I cover how to use Conda. I prefer it because:
- Clear Structure: It is easy to understand its directory structure
- Transparent File Management: It doesn’t install files outside its directory
- Flexibility: It contains a lot of packages (PIP packages are also installable into Conda environments)
- Multipurpose: It is not only for managing Python environments and packages — you can also use it for R (a programming language for statistical computing)
At the time of writing this article, I use the 4.3.x versions of Conda, but the new 4.4.x versions are also available.
In the case of Conda 4.4, there have been recent changes affecting Linux/Mac OS X users. They are described in this changelog entry.
How to choose an appropriate Conda download option
Installing your Conda system is a bit more complicated than downloading a nice picture from Unsplash or buying a new ebook. Why is that?
1. Installer
Currently, there are 3 different installers:
- Anaconda (free)
- Miniconda (free)
- Anaconda Enterprise platform (it is a commercial product that allows organizations to apply Python and R in enterprise environments)
Let’s take a closer look at the free tools, Anaconda and Miniconda. Now, what are the main differences between these two?
What are the things they share in common? They both set up on your computer
- the Conda (the package & environment management system) and
- the so-called “root environment” (more on that a bit later).
As for the main differences, Miniconda requires about 400MB disk space, and it contains only a few basic packages.
The Anaconda installer requires about 3GB disk space, and it installs over 150 scientific packages (for example, packages for statistics and machine learning). It also sets up the Anaconda Navigator, a GUI tool that helps you manage Conda environments and packages.
I prefer Miniconda, since I’ve never used most of the packages that are included in Anaconda by default. Another reason is that applying Miniconda allows for a smoother duplication of the environment (for example, if I want to use it on a different computer as well), since I only install the packages required by my app(s) on both computers.
From now on, I’m going to describe how Miniconda works (in the case of using Anaconda, the process is almost the same).
2–3. Platform (operating system and bit-count)
In addition to these 3 different installers, there are also subtypes based on bit-count: 32- and 64-bit installers. And of course these also have subtypes for the different operating systems: Windows, Linux, and Mac OS X (except that the Mac OS X version is 64-bit only).
In this article, I focus on the Windows version (the Linux and the Mac OS X versions are only slightly different. For instance the path of the installation folders and some command line commands differ).
So 32-bit or 64-bit?
If you have a 64-bit operating system (OS) with 4GB RAM or more, you should install the 64-bit version. Additionally, you might need a 64-bit installer if the packages you are planning to apply require the 64-bit versions of Python. For instance, if you want to use TensorFlow — more precisely, the official so-called binaries — you need a 64-bit OS and Python version.
If you have a 32-bit OS or you are planning to utilize packages that only have 32-bit versions, the 32-bit version is the good option for you.
4. Python version (for the root environment)
If these 3 dimensions aren’t enough (installers, 32/64-bit, and operating systems), there is a 4th one based on the different Python versions (included in the installer — and consequently, in the root environment)!
So let’s talk a bit about the different available Python versions.
Currently, your options are version 2.7 or version 3.x (at the time of writing this article, it’s 3.6) for the Python that is inside the root environment. For the additional environments, you can choose any version — ultimately, this is why you create environments in the first place: to easily switch between the different environments and versions.
So 2.7 or 3.x version Python for my root environment?
Let me help you decide it really quickly:
Since the 3.x is newer, this should be your default choice. (The 2.7 version is a legacy version, it was released in 2010, and there won’t be newer 2.7 major releases for it, only fixes.)
However, if
- you have mostly 2.7 code (you made or utilize applications using the 2.7 versions) or
- you need to use packages that don’t have Python 3.x versions,
you should install a Python 2.7-based root environment.
You might ask that: why don’t I just create two environments based on these two 2.7 and 3.x versions? I’m glad that you asked. The reason for that is that your root environment is the one that is created during the installation process and it’s activated by default.
I’ll explain in one of the following sections how you can activate an environment, but basically it means that the root environment is the more easily accessible one, so carefully selecting your root environment will make your workflow more efficient.
Throughout the installation process, Miniconda will let you change some options set by default (for example you can check/uncheck some checkboxes). When you install Conda for the first time, I recommend that you leave these options intact (except for the path of the installation directory).

I’d like to mention one more thing here. While you can have multiple environments that contain different versions of Python at the same time on the same computer, you can’t set up 32- and 64-bit environments using the same Conda management system. It is possible to mix them somehow, but it is not that easy, so I’m going to devote a separate article to this topic.
Python environments: root and additional
So now you’ve picked an appropriate installer for yourself, well done! Now let’s take a look at the different types of environments and how they are created.
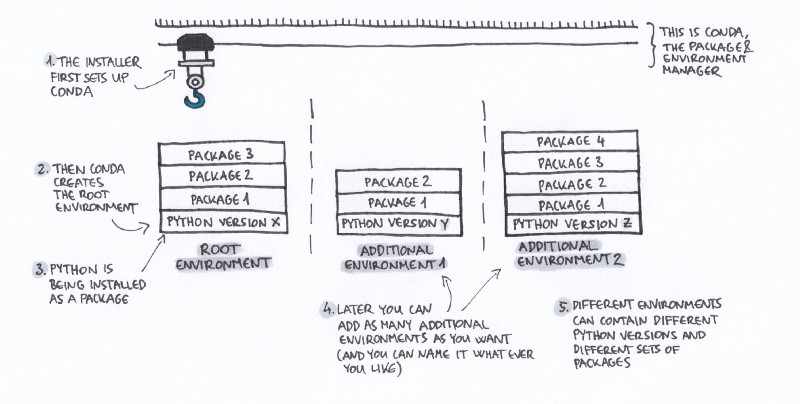
Miniconda sets up two things for you: Conda and the root environment.
The process looks like this: the installer installs Conda first, which is — as I already mentioned — the package and environment management tool. Then, Conda creates a root environment that contains two things:
- a certain version of Python and
- some basic packages.
Next to the root environment, you can create as many additional environments as you want. And the whole point is that these additional environments can contain different versions of Pythons and other packages. So it means that, for example, if your precious little application is not working anymore in the newest, state-of-the-art environment you’ve just set up, you can always go “back” and use some another version(s) of some packages (including Python— Python itself is a package, more on that later).
As I already summarized at the beginning of the article, the main use cases of applying an additional environment are these:
- You develop applications with different Python or package version requirements
- You use applications with different Python or package version requirements
- You collaborate with other developers
- You create Python applications for clients
Before diving into the basics of environment management, let’s take a look at your Conda system’s directory structure.
Directory structure
As I mentioned above, the Conda system is installed into a single directory. In my example this directory is: D:\Miniconda3-64\. It contains the root environment and two important directories (the other directories are irrelevant for now):
\pkgs(it contains the cached packages in compressed and uncompressed formats)\envs(it contains the environments — except for the root environment — in separate subdirectories)
The most significant executable files and directories inside a Conda environment (placed in the \envs\environmentname directory) are:
\python.exe— the Python executable for command line applications. So for instance, if you are in the directory of theExample App, you can execute it by:python.exe exampleapp.py\pythonw.exe— the Python executable for GUI applications, or completely UI-less applications\Scripts— executables that are parts of the installed packages. Upon activation of an environment, this directory is added to the system path, so the executables become available without their full path\Scripts\activate.exe— activates the environment
And if you’ve installed Jupyter, this is also an important file:
\Scripts\jupyter-notebook.exe— Jupyter notebook launcher (part of thejupyterpackage). In short, Jupyter Notebook creates so-called notebook documents that contain executable parts (for example Python) and human-readable parts as well. It’d take another article to get into it in more detail.
So now you should have at least one Python environment successfully installed on your computer. But how can you start utilizing it? Let’s take a closer look.
GUI vs. Command line (Terminal)
As I mentioned above, the Anaconda installer also installs a graphical user interface (GUI) tool called Anaconda Navigator. I also pointed out that I prefer using Miniconda, and that does not install a GUI for you, so you need to use text-based interfaces (for example command line tools or the Terminal).
In this article, I focus on the command line tools (Windows). And while I concentrate on the Windows version, these examples can be applied to Linux and Mac OS X as well, only the path of the installation folders and some command line commands differ.
To open the command line, select “Anaconda 32-bit” or “Anaconda 64-bit” (depending on your installation) in the Windows’s Start menu, then choose “Anaconda Prompt”.
I recommend reading through the official Conda cheat sheet (pdf), as it contains the command differences between Windows and Mac OS X/Linux, too.
In the following sections, I’m going to give you some examples of the basic commands, indicating their results as well. Hopefully these will help you better manage your new environment.
Managing environments
Adding a new environment
To create a new environment named, for instance mynewenv (you can name it what ever you like), that includes, let’s say, a Python version 3.4., run:
conda create --name mynewenv python=3.4You can change an environment’s Python version by using the package management commands I describe in the next section.
Activating and leaving (deactivating) an environment
Inside a new Conda installation, the root environment is activated by default, so you can use it without activation.
In other cases, if you want to use an environment (for instance manage packages, or run Python scripts inside it) you need to first activate it.
Here is a step by step guide of the activation process:
First, open the command line (or the Terminal on Linux/Mac OS X). To activate the mynewenv environment, use the following commands depending on the operating system you have:
- on Windows:
activate mynewenv- On Linux or Mac OS X:
source activate mynewenvThe command prompt changes upon the environment’s activation. It becomes, for example, (mynewenv) C:\> or (root) D:\>, so as a result of the activation, it now contains the active environment’s name.
The directories of the active environment’s executable files are added to the system path (this means that you can now access them more easily). You can leave an environment with this command:
deactivateOn Linux or Mac OS X, use this one:
source deactivateAccording to the official Conda documentation, in Windows it is a good practice to deactivate an environment before activating another.
It needs to be mentioned that upon deactivating an environment, the root environment becomes active automatically.
To list out the available environments in a Conda installation, run:
conda env list Example result:
# conda environments:#mynewenv D:\Miniconda\envs\mynewenvtensorflow-cpu D:\Miniconda\envs\tensorflow-cpuroot * D:\MinicondaThanks to this command, you can list out all your environments (the root and all the additional ones). The active environment is marked with an asterisk (at each given moment, there can be only one active environment).
How do you learn the version of your Conda?
It can be useful to check what version of Conda you are using, and also what are the other parameters of your environment. I’m going to show you below how to easily list out this information.
To get the Conda version of the currently active environment, run this command:
conda --versionExample result:
conda 4.3.33To get a detailed list of information about the environment, for instance:
- Conda version,
- platform (operating system and bit count — 32- or 64-bit),
- Python version,
- environment directories,
run this command:
conda infoExample result:
Current conda install:Current conda install:
platform : win-64
conda version : 4.3.33
conda is private : False
conda-env version : 4.3.33
conda-build version : not installed
python version : 3.6.3.final.0
requests version : 2.18.4
root environment : D:\Miniconda (writable)
default environment : D:\Miniconda\envs\tensorflow-cpu
envs directories : D:\Miniconda\envs
C:\Users\sg\AppData\Local\conda\conda\envs
C:\Users\sg\.conda\envs
package cache : D:\Miniconda\pkgs
C:\Users\sg\AppData\Local\conda\conda\pkgs
channel URLs : https://repo.continuum.io/pkgs/main/win-64
https://repo.continuum.io/pkgs/main/noarch
https://repo.continuum.io/pkgs/free/win-64
https://repo.continuum.io/pkgs/free/noarch
https://repo.continuum.io/pkgs/r/win-64
https://repo.continuum.io/pkgs/r/noarch
https://repo.continuum.io/pkgs/pro/win-64
https://repo.continuum.io/pkgs/pro/noarch
config file : C:\Users\sg\.condarc
netrc file : None
offline mode : False
user-agent : conda/4.3.33 requests/2.18.4 CPython/3.6.3 Windows/10 Windows/10.0.15063
administrator : FalseNow you know some basic commands for managing your environment. Let’s take a look at managing the packages inside the environment.
Managing packages
Depending on the installer you chose, you’re going to end up with some basic (in case of using Miniconda) or a lot of (in case of using Anaconda) packages to start with. But what happens if you need
- a new package or
- another version of an already installed package?
Conda — your environment and package management tool — will come to the rescue. Let’s look at this in more detail.
Package channels
Channels are the locations of the repositories (on the illustration I call them storages) where Conda looks for packages. Upon Conda’s installation, Continuum’s (Conda’s developer) channels are set by default, so without any further modification, these are the locations where your Conda will start searching for packages.
Channels exist in a hierarchical order. The channel with the highest priority is the first one that Conda checks, looking for the package you asked for. You can change this order, and also add channels to it (and set their priority as well).
It is a good practice to add a channel to the channel list as the lowest priority item. That way, you can include “special” packages that are not part of the ones that are set by default (~Continuum’s channels). As a result, you’ll end up with all the default packages — without the risk of overwriting them by a lower priority channel — AND that “special” one you need.
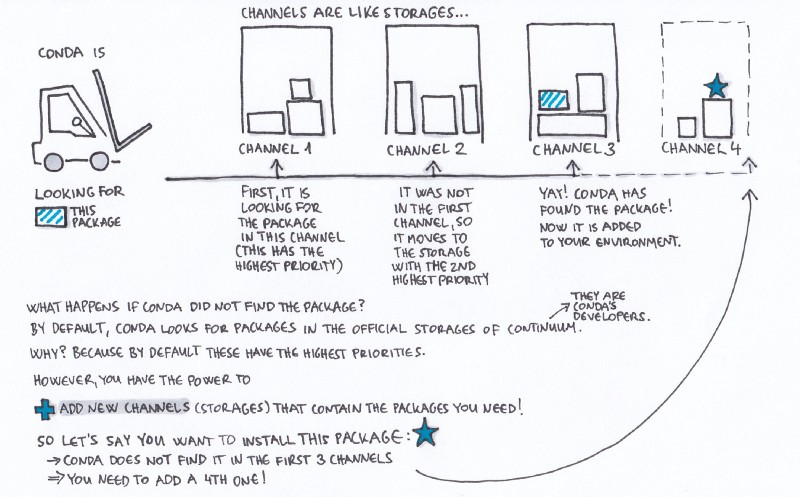
To install a certain package that cannot be found inside these default channels, you can search for that “special” package on this website. Not all packages are available on all platforms (=operating system & bit count, for example 64-bit Windows), however, you can narrow down your search to a specific platform. If you find a channel that contains the package you’re looking for, you can append it to your channel list.
To add a channel (named for instance newchannel) with the lowest priority, run:
conda config --append channels newchannelTo add a channel (named newchannel) with the highest priority, run:
conda config --prepend channels newchannelIt needs to be mentioned that in practice you’ll most likely set channels with the lowest priority. For a beginner, adding a channel with the highest priority is an edge case.
To list out the active channels and their priorities, use the following command:
conda config --get channelsExample result:
--add channels 'conda-forge' # lowest priority
--add channels 'rdonnelly'
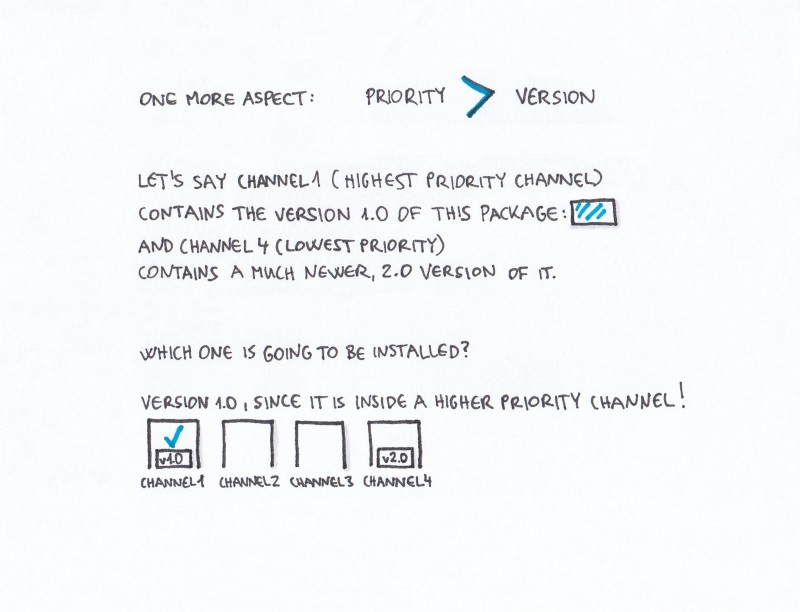
--add channels 'defaults' # highest priorityThere is one more aspect that I’d like to summarize here. If multiple channels contain a package, and one channel contains a newer version than the other one, the channels’ hierarchical order determines which one of these two versions are going to be installed, even if the higher priority channel contains the older version.
Searching, installing and removing packages
To list out all the installed packages in the currently active environment, run:
conda listThe command results in a list of the matching package names, versions, and channels:
# packages in environment at D:\Miniconda:
#
asn1crypto                0.22.0           py36h8e79faa_1
bleach                    1.5.0                     <pip>
ca-certificates           2017.08.26           h94faf87_0

...

wheel                     0.29.0           py36h6ce6cde_1
win_inet_pton             1.0.1            py36he67d7fd_1
wincertstore              0.2              py36h7fe50ca_0
yaml                      0.1.7            vc14hb31d195_1  [vc14]
To search for all the available versions of a certain package, you can use the search command. For instance, to list out all the versions of the seaborn package (it is a tool for data visualization), run:
conda search -f seabornSimilarly to the conda listcommand, this one results in a list of the matching package names, versions, and channels:
Fetching package metadata .................
seaborn           0.7.1                    py27_0  conda-forge
                  0.7.1                    py34_0  conda-forge
                  0.7.1                    py35_0  conda-forge

...

                  0.8.1            py27hab56d54_0  defaults
                  0.8.1            py35hc73483e_0  defaults
                  0.8.1            py36h9b69545_0  defaults
To install a package (for instanceseaborn) that is inside a channel that is on your channel list, run this command (if you don’t specify which version you want, it’ll automatically install the latest available version from the highest priority channel):
conda install seabornYou can also specify the package’s version:
conda install seaborn=0.7.0To install a package (for example yaml— that is, btw. a YAML parser and emitter) from a channel (for instance a channel named conda-forge), that is inside a channel that is not on your channel list, run:
conda install -c conda-forge yamlTo update all the installed packages (it only affects the active environment), use this command:
conda updateTo update one specific package, for example the seaborn package, run:
conda update seabornTo remove the seaborn package, run:
conda remove seabornThere is one more aspect of managing packages that I’d like to cover in this article. If you don’t want to deal with compatibility issues (breaking changes) caused by a new version of one of the packages you use, you can prevent that package from updating. As I mentioned above, if you run the conda update command, all of your installed packages are going to be updated, so basically it is about creating an “exception list”. So how can you do this?
Prevent packages from updating (pinning)
Create a file named pinned in the environment’s conda-metadirectory. Add the list of the packages that you don’t want to be updated to the file. So for example, to force the seaborn package to the 0.7.x branch and lock the yaml package to the 0.1.7 version, add the following lines to the file named pinned:
seaborn 0.7.*
yaml ==0.1.7
Changing an environment’s Python version
And how can you change the Python version of an environment?
Python is also a package. Why is that relevant for you? Because you’re going to use the same command for replacing the currently installed version of Python with another version that you use when you replace any other package with another version of that same package.
First, you should list out the available Python versions:
conda search -f pythonExample result (the list contains the available versions and channels):
Fetching package metadata .................
python   2.7.12     0  conda-forge
         2.7.12     1  conda-forge
         2.7.12     2  conda-forge

...

3.6.3      h3b118a2_4  defaults
         3.6.4      h6538335_0  defaults
         3.6.4      h6538335_1  defaults
To replace the current Python version with, for example, 3.4.2, run:
conda install python=3.4.2To update the Python version to the latest version of its branch (for instance updating the 3.4.2 to the 3.4.5 from the 3.4 branch), run:
conda update pythonAdding PIP packages
Towards the beginning of this article, I recommended using Conda as your package and environment manager (and not PIP). And as I mentioned above, PIP packages are also installable into Conda environments.
Therefore, if a package is unavailable through the Conda channels, you can try to install it from the PyPI package index. You can do this by using the pip command (this command is made available by the Conda installer by default, so you can apply it in any active environment). For instance if you want to install the lightgbm package (it is a gradient boosting framework), run:
pip install lightgbmSummary
So let’s wrap this up. I know that it seems quite complicated — and it is, in fact, complicated. However, utilizing environments will save you a lot of trouble.
In this article, I’ve summarized how you can:
- choose an appropriate Conda installer for yourself
- create additional environments (next to the root environment)
- add or replace packages (and I also explain how channels work)
- manage your Python version(s)
There are many more aspects in the area of Python environment management, so please let me know what aspects you find most challenging. Also let me know if you have some good practices that I don’t mention here. I’m curious about your workflow, so please feel free to share in the response section below if you have any suggestions!
Recommended Articles
If you’re interested in this topic, I encourage you to check out these articles as well. Thanks for these great resources Michael Galarnyk, Dries Cronje, Ryan Abernathey, Sanyam Bhutani, Jason Brownlee and Jake Vanderplas.
Python Environment Management with Conda (Python 2 + 3, Using Multiple Versions of Python)
Why do you need virtual environments? Say you have multiple projects and they all rely on a library (Pandas, Numpy…towardsdatascience.com
Setup your Windows 10 machine for Machine Learning
How to setup your Windows 10 machine for Machine Learning using Ubuntu Bash shell and Condabecominghuman.ai
Custom Conda Environments for Data Science on HPC Clusters
A problem that lot of scientists have to deal with is how to run our python code on an HPC cluster (e.g. an xsede…medium.com
Basic Tutorials Part 3
Condamedium.com
How to Setup a Python Environment for Machine Learning and Deep Learning with Anaconda - Machine…
It can be difficult to install a Python machine learning environment on some platforms. Python itself must be installed…machinelearningmastery.com
Conda: Myths and Misconceptions
I've spent much of the last decade using Python for my research, teaching Python tools to other scientists and…jakevdp.github.
Using Docker
A little side note based on one of my reader’s question (thanks for bringing this up Vikram Durai!):
If your application
- uses a server (for example a database server with preloaded data), AND
- you want to distribute this server and its data together with your application and its Python environment to others (for instance to a fellow developer or to a client),
you can “containerize” the whole thing with Docker.
In this case, all these components will be encapsulated in a Docker container:
- The application itself,
- The Conda environment that can run your application (so a compatible Python version and packages),
- The local server or service (for example: a database server and a web server) required to run the application
You can read more about how Anaconda and Docker work together in this article by Kristopher Overholt:
Anaconda and Docker - Better Together for Reproducible Data Science
Anaconda integrates with many different providers and platforms to give you access to the data science libraries you…www.anaconda.com
Some more articles about Docker containers (by Preethi Kasireddy and Alexander Ryabtsev):
What is Docker and How to Use it With Python (Tutorial)
This is an introductory tutorial on Docker containers. By the end of this article you will get the idea on how to use…djangostars.com
Respond ? — please let me know in the response section if you have any suggestions or questions!
Thanks for reading! ?
And thanks to my wife Krisztina Szerovay, who helped me make this article more comprehensible and created the illustrations. If you’re interested in UX design (if you are a developer, you should be :) ), check out her UX Knowledge Base Sketches here:
UX Knowledge Base Sketch
The UX Knowledges Base Sketch collection is for UX designers and anyone interested in UX design or in sketching.uxknowledgebase.com