
by Zafar Saleem
Writing Scalable Architecture For Nodejs

Writing backend logic for any project these days is pretty easy, thanks to full stack JavaScript. This is especially so with the introduction of dozens of frameworks for both client side and server side implementation.
One of the most popular Node.js frameworks is Express.js. It offers an easy approach to building applications at different scales. However, as a project grows, it becomes hard to scale at some point.
Many developers tend to keep adding new route files and models for new services and API end points. This approach works, but it really makes it hard for future engineers to scale and add new services.
In this blog I am going to build a login and registration system that uses JWT authentication with scalable architecture. For those who prefer to get right into the code, go ahead and clone this repository.
There will be four parts in this blog.
- Basic Architecture Setup
- Registration
- Login
- Dashboard
This blog assumes that you already installed Node.js in your system. Let’s get into the first step — basic architecture setup.
Basic architecture setup
First things first, make a new directory on your file system and call it auth (or anything you like).
mkdir authNow cd into that directory and create a package.json file. Add the lines below into it.
{ "name": "auth", "version": "0.0.0", "private": true, "main": "index.js", "scripts": { "start": "node index.js" }, "dependencies": { "bcrypt": "latest", "body-parser": "^1.18.2", "cookie-parser": "~1.4.3", "express": "~4.15.5", "jsonwebtoken": "^8.1.1", "mongoose": "^5.0.3", "lodash": "^4.17.11", "morgan": "^1.9.0", "passport": "^0.4.0", "passport-jwt": "^3.0.1", "serve-favicon": "~2.4.5" } }The most important part of the file above is the dependencies property. These are the dependencies required for the project. They will be used as middleware later in this blog.
Now go ahead and run the command below to install all of these dependencies. You may need to wait a few seconds.
npm installOnce it installs all of above dependencies, go ahead and create an index.js file in your root folder, like below:
touch index.jsThis particular file is only responsible to start the server. To do that, add below code into it:
'use strict';const server = require('./server')();const config = require('./configs');const db = require('./configs/db');server.create(config, db);server.start();As you can see, this file requires three files:
- server
- config
- db
We will create these next.
The code above then calls the create method on the server module. Finally, it calls the start method, which starts the server.
1. Create the server folder
mkdir serverOnce done, cd into that folder and create another index.js file.
touch index.jsNow add the code below into this file:
'use strict';const express = require('express');const bodyParser = require('body-parser');const logger = require('morgan');const mongoose = require('mongoose');const passport = require('passport');const cookieParser = require('cookie-parser');module.exports = function() { let server = express(), create, start; create = function(config, db) { let routes = require('./routes'); // Server settings server.set('env', config.env); server.set('port', config.port); server.set('hostname', config.hostname); // Returns middleware that parses json server.use(bodyParser.json()); server.use(bodyParser.urlencoded({ extended: false })); server.use(cookieParser()); server.use(logger('dev')); server.use(passport.initialize()); mongoose.connect(db.database); require('../configs/passport')(passport); // Set up routes routes.init(server); }; start = function() { let hostname = server.get('hostname'), port = server.get('port'); server.listen(port, function () { console.log('Express server listening on - http://' + hostname + ':' + port); }); }; return { create: create, start: start };};In this file, we first require all of the dependencies needed for this project. Note that more dependencies can be added into this file whenever required.
Then we export an anonymous function from this module using module.exports. Inside that function, create three variables: server, create and start.
The server variable is for the Express.js server. So, call the express() function and assign that to server. We will assign anonymous functions to the create and start variables.
Now, it is time to write a create function with two parameters: config and db.
Then set a few server settings using the server.use() function i.e. env, port and hostname. Then use cookieParser, bodyParser, logger and passport middlewares. Then connect to mongoose database and finally require passport’s configuration file and call it with the required passport.
Passport middleware is used for authentication, which we will use later in this blog. To learn more about it click here.
Now it’s time for API end points i.e. routes. Simply call the init function on routes and pass server into this.
Next, write the start function. Set hostname and port and start the server with the listen command inside this function.
Then, return both create and start functions to make them available for other modules to use.
2. Create the config folder
At the root level, create a configs folder:
mkdir configscd into that folder and create an index.js file:
touch index.jsAdd the below code to the index.js file:
'use strict';const _ = require('lodash');const env = process.env.NODE_ENV || 'local';const envConfig = require('./' + env);let defaultConfig = { env: env};module.exports = _.merge(defaultConfig, envConfig);Now create a local.js file:
touch local.jsOpen it, and add the code below:
'use strict';let localConfig = { hostname: 'localhost', port: 3000};module.exports = localConfig;This one’s simple too. We are creating a localConfig object and adding a few properties such as hostname and port. Then export it to use it like we are doing in the ./index.js file.
3. Now create a database
touch db.jsOpen db.js in your favourite editor and paste the below code into it.
module.exports = { 'secret': 'putsomethingsecretehere', 'database': 'mongodb://127.0.0.1:27017/formediumblog'};We are exporting a JavaScript object with properties secret and database. These are used to connect with a MongoDB database using middleware called mongoose.
Building the app
Now we are done with basic setup of our project, time for the fun stuff!
cd into the server folder and create the following folders:
mkdir controllers models routes servicesFirst, we will cover the routes folder. This folder is used to add all the end points that are available for client side use. First of all go ahead and create the index.js file first inside the routes folder.
touch index.jsAnd put the below code into this file:
'use strict';const apiRoute = require('./apis');function init(server) { server.get('*', function (req, res, next) { console.log('Request was made to: ' + req.originalUrl); return next(); }); server.use('/api', apiRoute);}module.exports = { init: init};First, require the apiRoute folder which we are going to create next. This folder will contain another folder with the version number of the API i.e. v1 .
Second create an init function. We are calling this function from the server/index.js file inside the create function at the bottom and passing server as a parameter. It simply gets all the routes and returns the next callback function.
Then use the apiRoute that we are requiring above. Finally, export the init function to make this function available in the rest of the project.
Now go ahead create an apis folder. Inside that folder create a file index.js .
mkdir apistouch index.jsPaste the below code into the index.js file.
'use strict';const express = require('express');const v1ApiController = require('./v1');let router = express.Router();router.use('/v1', v1ApiController);module.exports = router;This file requires express and the api version folder i.e. v1. Then create the router and make /v1 end point using router.use() method. Finally export the router.
It’s time to create apis/v1.js file. Paste the below code inside the v1.js file:
'use strict';const registerController = require('../../controllers/apis/register');const express = require('express');let router = express.Router();router.use('/register', registerController);module.exports = router;We need to register the controller and express.js and create a router. Then we need to expose register API endpoints for client side use. Finally, we must export the router from this module.
This is the file that we are going to keep modifying. We will require more controllers here when we create them.
Now we are done with the routes folder, and it is time for the controllers folder. Go ahead and CD into that folder and create a folder apis .
mkdir apisNow that we have the apis folder inside controllers, we are going to create the following three controllers and their respective services.
- Basic Architecture Setup
- Registration
- Login
- Dashboard
First up is the registerController. Go ahead and create the below file.
touch register.jsOpen this file in your favourite editor and paste the below code into it:
'use strict';const express = require('express');const registerService = require('../../services/authentication/register');let router = express.Router();router.post('/', registerService.registerUser);module.exports = router;First it is requiring express.js and the register service (which we are going to write later). Then create a router using the express.Router() method and make a post request to the '/' path. Then call the registerUser method on registerService (which we are going to write later). Finally, export the router from this module.
Now we need to require this controller inside the routes/apis/v1.js file which we already did.
Now registering the controller is done. It is time to get to the services folder. CD into that folder and create an authentication folder. First things first, cd into authentication and create a register.js file.
touch register.jsThen open the register.js file and paste the below code into it:
'use strict';const express = require('express');const User = require('../../models/User');const httpMessages = { onValidationError: { success: false, message: 'Please enter email and password.' }, onUserSaveError: { success: false, message: 'That email address already exists.' }, onUserSaveSuccess: { success: true, message: 'Successfully created new user.' }}// Register new usersfunction registerUser(request, response) { let { email, password } = request.body; if (!email || !password) { response.json(httpMessages.onValidationError); } else { let newUser = new User({ email: email, password: password }); // Attempt to save the user newUser.save(error => { if (error) { return response.json(httpMessages.onUserSaveError); } response.json(httpMessages.onUserSaveSuccess); }); }}module.exports = { registerUser: registerUser};In the register service, first we are requiring expressjs and User model. Then we are creating a JavaScript object i.e. httpMessages which is basically a list of all the messages we are going to send to clients via the api when the client sends the request.
Then the function registerUser which actually performs the registration process. Before saving the user there is a check if the user provided their email and password. If they did then create a newUser using the new keyword with the provided email and password.
Then simply call the save function on newUser to save that user in the database and send the appropriate response using response.json.
Finally export this function using module.exports to make use of it in the rest of the project. We are using this inside the controllers/register.js file.
Before testing this to see if it works, first we need to create a User model. Go ahead create a file User.js inside the models folder.
touch User.jsAnd paste this code into the above file:
const mongoose = require('mongoose');const bcrypt = require('bcrypt');const UserSchema = new mongoose.Schema({ email: { type: String, lowercase: true, unique: true, required: true }, password: { type: String, required: true }, role: { type: String, enum: ['Client', 'Manager', 'Admin'], default: 'Client' }});UserSchema.pre('save', function(next) { let user = this; if (this.isModified('password') || this.isNew) { bcrypt.genSalt(10, (err, salt) => { if (err) { console.log(err); return next(err); } bcrypt.hash(user.password, salt, (err, hash) => { if (err) { console.log(err); return next(err); } user.password = hash; next(); }); }); } else { return next(); }});// Create method to compare password input to password saved in databaseUserSchema.methods.comparePassword = function(pw, cb) { bcrypt.compare(pw, this.password, function(err, isMatch) { if (err) { return cb(err); } cb(null, isMatch); });};module.exports = mongoose.model('User', UserSchema);First of all require the mongoose and bcrypt modules. Mongoose is used to create mongodb schema whereas bcrypt is used to encrypt passwords before storing them into the database.
Create UserSchema with email, password and role properties. Then before saving the user, perform some checks before hashing the password.
The final function is to compare the passwords. It compares the user’s password with the hashed password in the database.
Now in order to test this code, open postman (if you haven’t installed postman go ahead install it from here). Open postman and enter the below url:
http://localhost:3000/api/v1/registerSelect POST as the request, choose the body tab and form-urlencoded and enter the email and password. Press the send button and you should see the below success message.
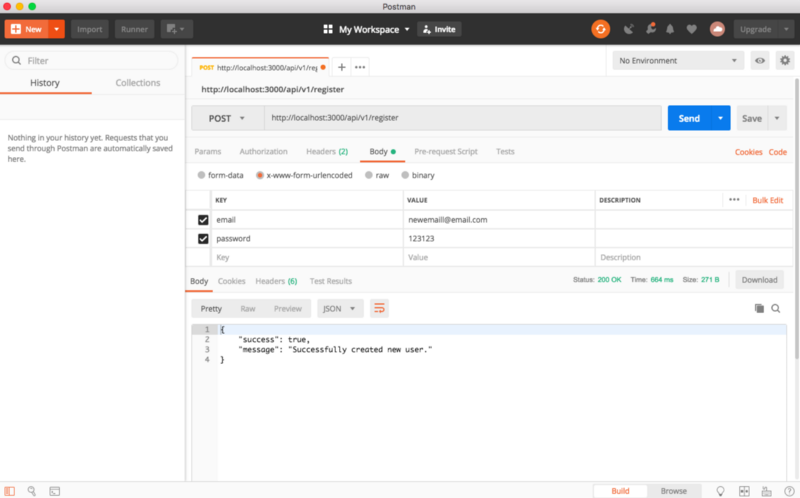
Now the register part is done.
- Basic Architecture Setup
- Register
- Login
- Dashboard
It is time to focus on login. Create a login.js file inside the controllers folder.
touch login.jsNow open it and paste the below code:
'use strict';const express = require('express');const loginService = require('../../services/authentication/login');let router = express.Router();router.post('/', loginService.loginUser);module.exports = router;Again it’s simple and the same as the register module: after importing express.js and loginService we are creating the router and make a post request to the root path '/' with the loginUser callback function on loginService . Finally export the router.
It’s time to require loginController in the routes/apis/v1.js file. Your v1.js file should look like the below now.
'use strict';const registerController = require('../../controllers/apis/register');const loginController = require('../../controllers/apis/login');const express = require('express');let router = express.Router();router.use('/register', registerController);router.use('/login', loginController);module.exports = router;Now for the login service, create a login.js file inside services/authentication/:
touch login.jsAnd paste the below code into this file:
'use strict';const express = require('express');const apiRoutes = express.Router();const jwt = require('jsonwebtoken');const passport = require('passport');const db = require('../../../configs/db');const User = require('../../models/User');const httpResponse = { onUserNotFound: { success: false, message: 'User not found.' }, onAuthenticationFail: { success: false, message: 'Passwords did not match.' }}function loginUser(request, response) { let { email, password } = request.body;User.findOne({ email: email }, function(error, user) { if (error) throw error; if (!user) { return response.send(httpResponse.onUserNotFound); } // Check if password matches user.comparePassword(password, function(error, isMatch) { if (isMatch && !error) { var token = jwt.sign(user.toJSON(), db.secret, { expiresIn: 10080 }); return response.json({ success: true, token: 'JWT ' + token }); } response.send(httpResponse.onAuthenticationFail); }); });};module.exports = { loginUser: loginUser};First require some necessary modules such as: express.js, jsonwebtoken, passport, db and User model. Create a JavaScript object that has a list of messages to be sent to the client side when the http request is made to this service.
Create a loginUser function, and inside that create a couple of variables i.e. email and password, and assign the email and password sent by the user to these variables which are in request.body.
Then use the findOne() method on the User model to find a use based on the email sent from the client by the user. The callback function of findOne() accepts 2 parameters, error and user. First check if the above findOne() method throws any error — if it does then throw an error.
Then perform a check: if no user is found, then send the proper response with a message from the list of messages that we declared above in this module.
Then compare the password that the user sent with the one in the database using the compare function we wrote in the User model earlier in this blog.
If the password matches and it does not return an error, then we create a token using the jsonwebtoken module and return that token using json.response() to the client. Otherwise we send an authenticationFail message.
Finally export the loginUser function with exports.module so that we can use it in our controllers and anywhere else.
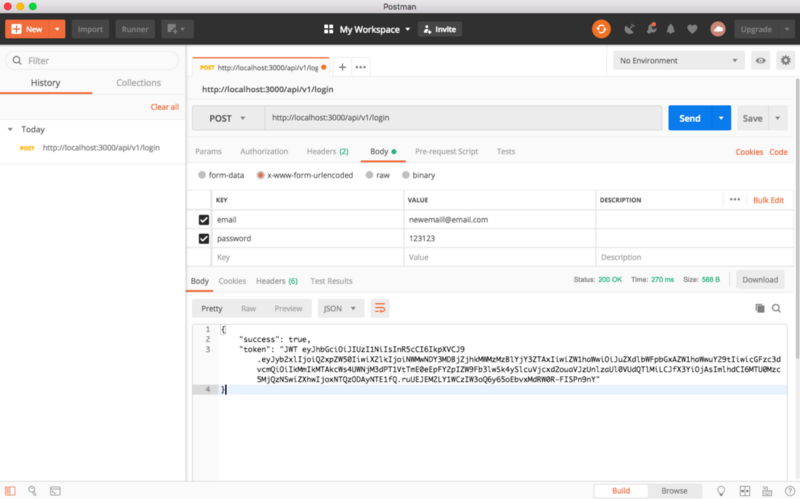
It’s time to test login functionality. Go back to postman and this time replace register with login as the api end point in the url. Enter the email and password and press the send button. You should be able to receive a token. Go ahead and copy that to the clipboard because you will use it later to access the dashboard.
- Basic Architecture Setup
- Register
- Login
- Dashboard
Now it’s time for the dashboard.js file. Create dashboard.js file insidecontrollers folder.
touch dashboard.jsAnd open it and paste the below code:
'use strict';const passport = require('passport');const express = require('express');const dashboardService = require('../../services/dashboard/dashboard');let router = express.Router();router.get('/', passport.authenticate('jwt', { session: false }), dashboardService.getDashboard);module.exports = router;This controller is different in the sense that it requires authenticated access. That is, only a logged-in user can access the dashboard service and make different http requests.
For that reason we are also importing passport, and for the get request we are using the passport.authenticate() function to getDashboard service.
Again we need to require dashboardController in the routes/apis/v1.js file. Your v1.js file should look like the below:
'use strict';const registerController = require('../../controllers/apis/register');const loginController = require('../../controllers/apis/login');const dashboardController = require('../../controllers/apis/dashboard');const express = require('express');let router = express.Router();router.use('/register', registerController);router.use('/login', loginController);router.use('/dashboard', dashboardController);module.exports = router;Now that dashboardController is available to be used for client side requests, it’s time to create its respective service. Go to the services folder and create a dashboard folder inside it. Create a dashboard.js file and put the below code inside this file.
'use strict';function getDashboard(request, response) { response.json('This is from dashboard');}module.exports = { getDashboard: getDashboard}No fancy stuff going on. For demonstration purposes, I am simply responding with a text message This is from dashboard. Then export this method to be used in its respective controller which we already accomplished.
Now it’s testing time. Open postman and change the end point of the url to the dashboard. Click the headers tab and add Authorization and paste the JTW copied in the previous step when you logged in.
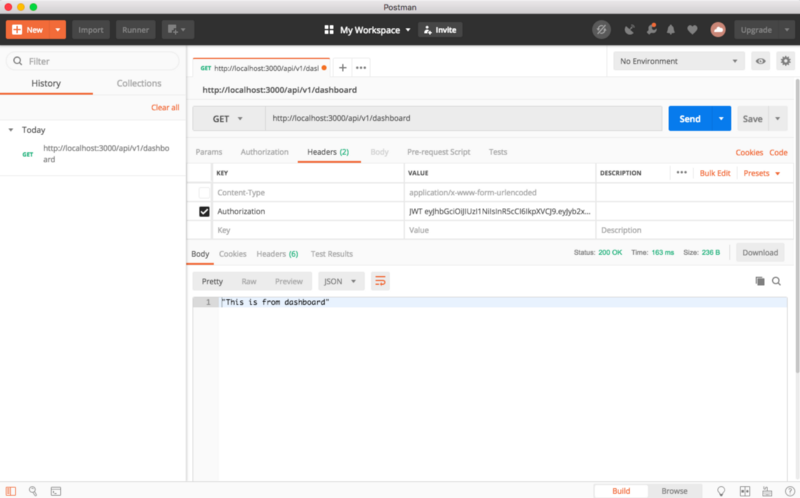
You should see the message This is from dashboard as a response.
As you can see, when we make a new service we need one controller for it and we can keep adding new services into the architecture. If you would like to change the version of the API and also keep the current one, simply add a new v2.js file and redirect all requests to that end point. That is one simple example.
I hope you liked this blog and see you next time.
UPDATE: If you would like to implement its client side then please click here where I used react.js to authenticate with this server.